

 It’s this time of year that always seems magical. Trees have an abundance of Autumnal toned leaves, as they tumble around like confetti on the breeze, swooning in swathes wherever they land. Late blooming flowers appear, their vibrant blossoms adding some freshness to the greenery that remains. Although it’s November, the sun shines just as brightly as in earlier months, spilling spectacular shades across the skies as it arrives & departs each day.
It’s also a great time of year for those comforting dishes, the ones that really hit the spot when you need it. Sumptuously slow-cooked stews, deeply filled fruit pies & crisp flaky pastries. We all have our favourites,  especially those childhood dishes that evoke fond memories of deliciousness. The mere mention of puff pastry takes me to a stool in my Mum’s kitchen, watching her create all kinds of pastry treats & especially savoury pasties. She would make shortcrust pastry ones, filled with her heavenly homemade stew (our version of a Cornish pasty). Leftovers would be lovingly wrapped in fabulously flaky pastry parcels, deliciously warm & comforting. And then there were my favourites – crisp buttery puff pastry packed with mashed potatoes, cheese & onion. There would always be some mashed potatoes leftover from the previous night’s dinner, just enough to make a few pasties for lunch the next day.
Now you all know that I prefer homemade puff pastry (all butter & no unnecessary ingredients!), but we don’t always have the time. This recipe is one that was passed on to me & one I make often for both savoury & sweet treats. It’s a faster flaky pastry with all the buttery crispness of puff pastry, but takes much less time to make. Also, don’t worry about special pastry cutters or equipment. All you need is a small side plate or saucer & a sharp knife. You should get eight good sized pasties from this recipe, so plenty to go around. Ready to bake it happen? Hands washed, aprons on & here we go!
What you need:
For the Pastry:
8oz Self-Raising Flour (plus additional for dusting your worktop)
5oz Salted Butter, cold from the fridge or at least chilled so it’s firm
100ml Cold Water
1 large Egg, beaten (for glazing the pasties)
1/2oz Melted Butter (for the tin)
For the Filling:
Approx. 8oz Potatoes, peeled & chopped into small chunks
1 tablespoon Semi-Skimmed Milk
1/2 a teaspoon Sea Salt
2oz Butter
4oz Cheese, grated (I use whatever I have in the fridge)
1 medium Red Onion, finely chopped
Freshly ground Black Pepper & a little Sea Salt
Fresh Thyme leaves (just a couple of sprigs)
What to do:
First, let’s make the pastry. Sieve the flour into a mixing bowl. Cut the butter into small pieces, dropping them directly into the flour.
 Using your fingertips, rub the butter chunks into the flour a little – we don’t want it like fine breadcrumbs, more like a rough rubble texture with plenty of lumps. This is just breaking down the butter a bit to make rolling easier.
Using a round ended knife, stir the water into the flour mixture to form a soft dough – the bowl should be clean when you’ve finished.
Tip the dough onto a lightly floured worktop & shape into a rough rectangle. Dust your rolling pin to stop it sticking & roll out the pastry until about half a centimetre thick.
Fold into thirds (fold one end into the middle, then the other over the top), turn it 90 degrees, then roll again (remember to re-dust your work surface to stop it sticking). Repeat this once more, then very loosely wrap in a sheet of greaseproof paper & place in the fridge for about 15 minutes or so. This will allow it to rest & the layers to form.
While the pastry is resting, make the mashed potatoes. Fill the kettle with water & put it on to boil. Cut the potatoes into small chunks, about a centimetre (this will help them cook faster) & chuck in a deep saucepan.
Add the sea salt & carefully tip on the boiling water from the kettle (no standing around waiting for the pan to heat up), just enough water to cover the potatoes. Put the lid on & simmer for about 8-10 minutes, until soft enough to cut easily. Drain well into a colander over the sink. Give the empty pan a quick wipe with a cloth to remove any moisture, then tip the potatoes back into the pan, ready for mashing.
Add the semi-skimmed milk & butter, then get mashing! It’s up to you how mashed you want them (personally, I prefer a bit of texture to my mash & always use a manual hand-held masher). Leave to cool with the lid off (don’t be tempted to put the lid on, as it forms condensation & you’ll end up with watery spuds).
While the mash is cooling, pre-heat the oven to 220*C & prepare your baking tray. Line it with a sheet of greaseproof paper, lightly brushed with the melted butter (the butter will add colour & crispness to the underside of the pasties as they bake).
Add the finely chopped onions & grated cheese to the potatoes, along with a little seasoning & a sprinkling of Thyme leaves. Give everything a good stir & have a quick taste to make sure you’re happy with the filling (this takes restraint, because I could just eat it from the pan at this stage). Set aside.
By now, your pastry will be ready to roll. Lightly flour your work surface & rolling pin, then roll out the pastry to about half a centimetre in thickness. Make sure it’s nice & even, but don’t worry about being too precise.
 Place your saucer or plate on the pastry, cutting neatly around the edge & repeat until you have cut out as many as you can. Where you have leftover pieces of pastry, place them on top of each other, reshape & roll out again. Sometimes, I’ll just shape these last ones with my fingers rather than cutting them out again (trust me, it will all be fine once they’re baked).
Take one of the circles & roll lightly from top to bottom, to make a more oval shape. Place a couple of spoonfuls of the potato mixture onto the lower half of the pastry, leaving about a centimetre edge of pastry uncovered. Repeat until you have all your pasties made.
 Brush a little beaten egg around the edge of the pastry & fold the top half of the pastry over, pressing the edges together to seal in your filling. From one corner of the pasty, gradually squish the edges together to form a crust, finishing at the other corner. Lift onto your prepared baking tray, prick holes with a fork in the top. Repeat this step, until you have all your pasties made.
Brush them well with the beaten egg & sprinkle on a little black pepper (or grated cheese if you like). Bake in the centre of the oven for about 25-30 minutes until gorgeously golden topped & piping hot.
 Place on a cooling rack for a few minutes – even if you’re eating them warm, they will be like the surface of the sun right now & melt your mouth. While they’re cooling a little, grab a few crisp salad leaves or some chunky chips (or both), pile them on a plate & tuck in!
Fabulously flaky pastry, filled with fluffy cheesy potatoes & crisp red onion, these delicious savoury pasties are perfect for a light lunch or lazy supper. If you do have any leftover pasties, they can be frozen once completely cooled & reheated when you fancy one (pop them in the oven at 200*C, for about 15-20 minutes until piping hot again).
 These delicious pasties also make fabulous flaky finger-foods, great for picnics & parties – just make smaller nibble-sized ones & add a spicy tomato dip for dunking! I use my tomato sauce recipe for meatballs & add a pinch of cayenne to give it a kick (recipe link here: https://hopeyourehungry.co.uk/having-a-ball/). Next time you have a cheesy comfort food craving, try my easy cheesy mashed potato pasties! Stay hungry! Aimee 😉 x

 The seasons have started to shift, it’s almost as if you can taste it in the air, as we swap long lazy Summer days for softer sunsets & cosy nights. Hot-headed August has passed the baton to sultry September, bringing with her the bountiful & beautiful beginnings of a delicious Autumn. There is nothing as therapeutic as an early morning meander in the countryside, especially during September! Gloriously gorgeous berries adorn the brambles & hedgerows, while trees are groaning under the weight of their fruity loot. Nature is amazing, turning tiny Spring blossoms into an Autumnal array of plump berries & fragrant fruits, with a little help from her pollinator peeps of course!
 Firstly, we’re going to make the plum compote. Half the fruit, carefully remove the stones (you can put them in the composter). Set aside a few plums in a dish, cover & pop in the fridge to keep them firm for later (these will be for your topping).
 Gently heat until the sugar dissolves into the water, carefully nudging everything around the pan with a wooden spoon or spatula. Bring to a boil & simmer gently for about 15 minutes on a medium heat, stirring regularly to make sure nothing sticks to the bottom of the pan. It should reduce to a sunset-coloured jammy syrup that smells like Autumn.
 Turn down the heat, remove the spices & orange strips, then a
 Roll out the pastry a couple of inches larger than your tin & about half a centimetre thick. Lay it carefully over your rolling pin & gently lift onto the baking tin, allowing it to drape into the middle. Push it into the edges gently, so that it covers the entire base & sides of your tin evenly.
 Grab a bit of greaseproof paper, screw it up to make it easier to shape to your tin & then loosely place on top of your pastry. Tip some baking beads or dry pasta shapes onto the paper, spreading them all across the top & filling the pastry case.
 Tip the Mascarpone cheese, double cream, Greek yoghurt, lemon curd & vanilla extract into a large mixing bowl & briefly whisk together until thick & fluffy. It’s going to be piped on top of your dessert, so it needs to be thick enough to do so. If it’s too thick, add a little more Greek yoghurt to loosen a little (a couple of teaspoons should do the trick). Once you’re happy, pop the bowl in the fridge to chill.
 Now for those pretty plum slices we made earlier! Place the slices skin-side up at intermittent gaps across the top, like shards of sunshine peeking through the clouds. Add a couple of mint leaves at intervals – you don’t need many, just a few will do. Pop your dessert in the fridge for about ten minutes or so.
 This delicious dessert would make a pretty Autumnal centrepiece for a special dinner or celebration. Refreshingly tangy, softly spiced plum compote, crowned with a feather-light fluffy cloud of Mascarpone cream & fresh plums, all sat atop a crisp, melt-in-the-mouth pastry base. If you have any of that delicious plum compote left over, it’s a magical multi-tasker – it tastes rather lovely spread on hot buttered toast, or try a spoonful with a few slices of cheese & crackers too.
 bake all kinds of wonderful delicious treats, including the most beautifully light, crisp choux pastry (pâte à choux). I remember sitting in the kitchen, watching in amazement as my Mum vigorously beat the dough with such ease, making it seem so effortless. Of course, I learned later on there is a lot of effort that goes into them – although simple to make, profiteroles need plenty of stamina!
 by magic! Although I don’t tend to make spun sugar very often, I do still make proper profiteroles & once you have tried them, you’ll be hooked too. Ready to bake it happen? Hands washed & aprons on!
 Once cooled, your profiteroles are ready! If you are preparing them in advance, you can freeze them unfilled & a few at a time in a single layer. They crisp up beautifully in a warm oven for a couple of minutes & you’ll be able to dish up a dessert at a moment’s notice.
 Generously drizzle warm, chocolate sauce over them & serve! You want the recipe for chocolate sauce, don’t you? It’s really easy to make & one of my favourite “chuck it all in a pan” recipes. I make jars of this & store it in the fridge or the cold pantry, then warm it up to make it runny enough to pour over cupcakes (it tastes fabulous spread on hot toast too). Here it is!
 They even freeze well (unfilled), so you can have a stash ready for unexpected guests or just as a treat when you fancy them.
 Sultry September has arrived with a slight coolness about her & although the mornings are a little chilly now, the sunrises are just as spectacular. Getting up early means I see some amazing sunrises & Autumn never fails to deliver. An array of moody clouds smooched across the sky this morning, kissing the rooftops as it gave way to the sunshine before we’d finished breakfast. The garden looks prettily overgrown at the moment, all luscious long grass, wispy branches
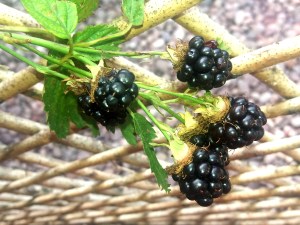
  & a scattering of jewel-coloured blackberries on the hedgerows, contrasting with their dark green background. They are happily growing at a rapid rate, replacing the ones that have already been plucked & packed in a pie with sweet sliced apples & cinnamon sugar.
 a good fruit pie! Although a slightly stodgy pie is very welcome at this time of year, sometimes we like something a little lighter but just as indulgent. On one of my recent shopping trips to our local shops, there were shelves stacked with punnets of pears. They looked so beautiful & fresh, with pale juniper green skins & a smattering of gold around the bottom. Obviously, I had to buy some & starting thinking of how to do them some justice in a lighter pie, recipe calculating in my head as usual. By the time I got to the checkout a few minutes later, I’d packed my basket with a selection of ingredients & headed home excitedly to start my next creation.
 The filling would have included single cream, however there was a slight incident. Upon opening the fridge, the cream pot leapt from the top shelf, unceremoniously smacking into the floor & spectacularly showering me & everything in it’s path. Cue a huge clean up operation & a slight delay in my creation. When things like this happen, I tend to have a look around to see what I can replace it with, rather than hit the shops again & I had some lovely over-ripe bananas that were the perfect replacement! My Pear & Almond Tart (Crostata di Pere e Mandorle) is a simple but pretty dessert, easy to make & the addition of the dark chocolate makes it deliciously decadent. Ready to bake it happen? Hands washed, aprons on & here we go!
 4 ripe Pears, peeled & cored
 Roll out your pastry to a couple of inches larger than the pie tin. Using your rolling pin, flop the pastry over onto it & carefully drape it over your pie tin, so it reaches all the inside edges.
 Remove your tin from the oven & put on a cooling rack. Leave the greaseproof paper & baking beans in place for at least 5 minutes (they will be hotter than the sun), then lift them out on the greaseproof paper & put in a heatproof bowl or similar to cool.
 Now to make the filling! Take the pears & halve them. Use a teaspoon to scoop out the core. Slice each half into fine, frond-like fingers. Place one half in the pastry case, rounded side up & gently press to fan them out. Add the next pear half & repeat, making sure each is nicely spaced apart.
 Scatter the chocolate pieces all over the pears evenly.
 Stir the ground almonds & flour together in a separate bowl, then fold into the wet ingredients until blended thoroughly.
 Remove & put on a cooling rack to rest. Once cool, trim off the pastry edge until level with the pie tin. Set aside while you make the decorations.
 Lift the paper up & place on a cooling rack until completely cool.

 Gazing into the garden while sipping my first coffee of the day, there is an Autumnal air about it. The early sunshine is just peaking over the rooftops, causing the dew laden lawn to shimmer in the sunlight & perfectly summing up the Summer.
 inbetween. The poor plants don’t seem to know which way to turn & our multi-tasking willow tree has been happily soaking up the excess water, whilst providing welcome cool shade to the local wildlife. There are baby olives on our little olive tree trying to ripen, green tomatoes just starting to blush red & a bounty of blackberries waiting patiently to be plucked. The garden seems to be clinging on by it’s very leaf-tips to the last days of Summer, as Autumn has quietly arrived & begun to unpack her colourful attire across the landscape.
 amazing! From the tiny to the tawny, closed cup or open, the frilly or the flat, these fabulous funghi are just waiting to be turned into delicious dishes!
 stems work well), along with any mushroom stems, parsnip, bean or pea trimmings – wash everything well to remove grit & dirt, then chuck them all in a roasting tin with 2-3 pints of cold water, a splash of olive oil & a few good grinds of black pepper & sea salt. Cover it with foil to seal in all the juices & bake at 200*C for just over an hour, then strain & that’s it. Use it fresh, stick it in the fridge for a couple of days or freeze it. Save the veggies to whizz up into soups or sauces & pour any leftovers into jars for the fridge or ice cube trays to freeze.
 Next, although I have used two types of pastry (shortcrust for the base & puff for the lid), you could use shortcrust all over or just use shop-bought puff lids if time is limited – please make sure it’s proper all-butter puff to do your pie proud. If you do fancy having a go at making your own, here’s the link to my puff pastry recipe:

 Sprinkle in the plain flour around the pan & stir fry everything together until the flour has disappeared. This is going to make a roux in the pan, as it will absorb the butter & oil in the mixture, thickening everything up nicely.
 Tip the mushroom pie filling into the pastry lined tin & spread out well. Dip your finger in a cup of cold water & run it around the edge of the pastry.
 Put the pie tin on a cooling rack for a few moments to relax before serving. That’s it! Just get everyone around the table & dig in! Meaty but meatless, this mushroom-packed pastry goes well with either a generous scoop of cheesy mashed potatoes & steamed crisp vegetables, or a zesty green salad scattered with a few spots of aged Balsamic vinegar & toasted pine nuts. Slice it up cold for a luscious leftover lunch or freeze in slices for indulgent lazy suppers after a long day at work.

 Summer has arrived & although the sunshine has been a bit shy just lately, there are some fabulous fruits in the shops right now, ripe for the picking. Summer for me has always meant strawberries & as a child, I would love to both pick & eat them. We grew them in pots in the garden & sometimes would go strawberry picking at a local farm, but they were always lusciously lovely & the mere scent of strawberries brings back those memories instantly! Sunny Summer afternoons spent sitting on the grass, sipping a glass of my Mum’s homemade elderflower fizz (now there’s a recipe!) & pretending it was the finest Champagne, the hum of bumble bees buzzing around & warm sunshine on my face, whilst indulging in a beautiful blanket banquet. This would obviously include a bowl of freshly picked strawberries, washed & dunked in a little sugar before being devoured. This is why I always smell strawberries before buying them (& probably why I get such funny looks from other shoppers!). The sweeter the scent, the sweeter the berry! Sometimes the simplest of treats is the most delicious & satisfying to all the senses – we don’t just eat food with our mouths, all the other senses chip in too!
 One of my all time favourite treats is a petite pretty pastry, filled to the brim & adorned with ripe, ruby red strawberries. To call it a jam tart would not do justice to them, as the jam is simply the sweet glue that bonds these beautiful berries together within the pastry cup. These delicate delicacies are another of my childhood favourites & tremendously easy to make, all it takes is a little preparation & of course a little patience too. They also work well with a variety of berries or fruit – try cherries, raspberries, blackberries or blueberries, or why not pineapple, apricots or apples! Ready to bake it happen? Hands washed, aprons on & here we go!
 Now to prepare your strawberries – give them a w
 Stand the strawberries on their plumper end & slice the edges off, then set aside for later (pop them in the fridge on a plate covered up, especially if it’s a warm day). Keep the ends to make dinky decorations for your baked tarts. Slice up the rest of the strawberries into thin slices. Again, set aside in a dish for later, but separately from your strawberry hearts (in case they give out any juice).
 There are a couple of ways to make the pretty heart-shaped strawberry slices like I have. Either use a small heart-shaped cutter or plunger if you have one or, as the strawberry is naturally shaped that way, simply cut a little V out of the top of the slice & trim the edges to a point at the bottom of the berry. Make sure you wash your hands after this stage & dry well.
 Once rolled, take a circle cookie cutter slightly larger than your patty tin & cut out twelve circles. Place each circle in the prepared tin & using the end of your rolling pin, gently dab each one into place.
 Place the tarts in the centre of the oven & bake for 8-10 minutes, until the jam is bubbling around the berries & the pastry has turned a golden hue.
 To get the strawberry pastry decorations I made, you’re going to need a small calyx cutter (or small star) & a small heart cutter. You can buy these online or at any good baking retailer.
 When cooked, use a pallet knife to carefully lift the pastry strawberries onto a cooling rack. They should lift easily off the greaseproof paper, plus you have a clean baking tray – no washing up! Leave to rest until completely cooled. You can make these the day before & pop them in an airtight container until you’re ready to use them.
 Place the pastry strawberry on top, tilting it at a slight angle & a strawberry heart on either side of the cream. Repeat until you have decorated them all & set them onto a pretty plate. If you’re serving them later, cover them & keep in the fridge until then. They will keep overnight (as long as nobody eats them!).
 That’s it! Perfect served as part of an elegant afternoon tea, a special soiree, or simply as a sumptuous strawberry treat with a chilled glass of fizz, these plump little pastries will certainly bring some sunshine to your day! Stay hungry! A 😉 x
 August is always a busy month of celebrations for our family & this one is no exception. It begins with our Son’s birthday, swiftly followed the very next day by mine (he is truly the best birthday present I could have wished for) & finally crowned with our wedding anniversary just after mid-month. There are some pretty cakes to be shared & catch ups with family & friends, sometimes with a glass of
  Prosecco of course (although I never get to finish my drink because we’re all too busy chatting).
 add a handful of fresh plump, ruby
  jam & piped with cream, then layered up into a tall, slender slice of sweetness. Sometimes the top would be iced with white & chocolate icing in a delicate feathered pattern (so simple, yet so effective), then sometimes it would simply be dusted with a light sifting of icing sugar. Either way, they would always be welcome as a tea-time treat or special Sunday dessert!
 Turn out your pastry onto a lightly floured worktop & shape into a rectangle. Roll away from you into a long piece, about a centimetre thick. Try to keep the edges as straight as you can, but don’t worry too much or you’ll drive yourself loopy! Using a dry pastry brush, dust off any excess flour as you go, especially when folding the layers (otherwise it may affect the recipe & you want flaky pastry, not floury).
 Take one of the three pieces of butter & cut into small chunks of about 1cm (you can just pull it apart, but the heat from your hands might melt it).
 Dust the worktop with a little more flour. Turn the pastry one turn to the right & roll out again, just as you did above.
 Lay your pastry on a piece of greaseproof paper, fold the top of the paper over your pastry & put it on a plate in the fridge for an hour (you might need to leave it longer during this heatwave we’re having, so probably add another ten minutes if you’re not sure – I’ve left it a couple of hours before & it didn’t do any harm). Get yourself a cuppa, put your feet up & read a book or something (if you’re like me, you’ve probably been whizzing around, so relax for a bit).
 Cut the pastry into equal sized rectangles, using a ravioli or pizza cutter (I find these give a smoother, clean cut).
 Bake in the centre of the oven for about 6-8 minutes, until fluffed up & slightly risen. They won’t be very coloured at this stage.
 Remove from the oven & carefully transfer each pastry slice to a cooling rack. Leave them to go completely cold.
 In a large bowl, whip up the cream with a tablespoon of icing sugar, until fluffy & smooth. The icing sugar just adds a little stiffness to the cream & allows it to set, which is perfect if you’re serving them in Summer.
 Time to cut your pastry pieces in half. Along the side of each piece of pastry, you will see where the layers have separated. Using a serrated knife (a sharp bread knife will do), slice carefully through the centre horizontally. Lay them on the cooling rack.
 Pipe neat, small splodges of the cream on the bottom layer of pastry – you should be able to comfortably get eight spots of cream on there.
 Dust them lightly with icing sugar, using a tea strainer to get a fine sugar powder.
 If you don’t have raspberries, why not try strawberry slices instead? This works just as well with other berries too, so you could make them with blueberries, blackberries or cherries. Sometimes, I just use a little jam or preserve on the bottom instead of fruit, so the choice is yours (try apricot – it’s fabulous!). For a truly decadent treat, try making my version of Pain au Chocolat (or Chocolatines) – add a couple of pieces
  of dark chocolate to each slice of pastry, then roll them up, place on a baking tray & glaze with beaten egg. Bake at 190*C for 10 minutes, then turn up the oven to 210*C for the last 15 minutes. When they’ve cooled a little (flaming hot chocolate needs to rest for a few minutes), sprinkle with icing sugar & serve. These go very well with a cup of coffee, as it brings out the
  flavour of the chocolate.
 Driving home this morning, seeing the luscious much-needed rain has brought the gardens back to greenery & lowered the temperature slightly, I felt rather peaceful. Pretty flowers were less wilted & seemed to flourish, the herbs were more fragrant & our beloved willow tree had perked up again, waggling it’s beautiful branches in the Summer breeze.
 hands are cool, after washing them run your wrists under the cold tap for a few moments (trust me, it works).
 Tip the flour into a large mixing bowl & add one of the butter pieces. Rub it into the flour until it resembles fine breadcrumbs.
 Cut into two equal pieces & on one of them, brush a little melted butter all over the top & sprinkle on two thirds of the cheese.
 Brush the top of your cheesy pastry with beaten egg – just the top, not the edges, otherwise your pastry won’t rise properly.
 Place on the baking tray & repeat with the rest of the pastry, until you have a couple of trays of twirly swirls with about half an inch between them.
 Bake in the centre of the oven for about 10-12 minutes, until they have risen & turned a gorgeous golden hue. Carefully transfer them onto a cooling rack using a pallet knife or thin spatula. Remember the crunchy cheesy chips? Shake them into a dish for sprinkling on salad as a crispy garnish or just eat them as they are – Chef’s perks!
 Serve your cheesy sticks either on their own or maybe dunked in an oozy, warm baked Camembert with a glass of chilled wine (you’ve worked hard & deserve a treat). I doubt they will last long, but if you do have any leftover just pop them in an airtight container (they will keep for a couple of days, so I’m told).
 If you want to make an alternative to cheese twists, just make cheese “sausage” rolls – instead of cutting into strips, cut into wide ribbons. Lay grated cheese across the top half of the pastry ribbon, brush a line of beaten egg on the opposite edge of the pastry & roll over, carefully encasing the cheese inside. Press lightly to stick the roll together, then cut into inch long pieces & brush with egg.
  Bake at 220*C for about 10-12 minutes, until golden & risen. Transfer to a baking tray to cool for a few minutes before serving. Great for lunches, nibbles or parties.
 Here we are in the middle of a perfect July & let’s face it, Summer has been a long time coming! Due to the magnificent mini-heatwave we’re having, all the pretty pots of plants are sprouting with lots of lovely flowers & fruit. Sitting on the patio having coffee early in the morning is one of the best feelings, just relaxing & starting the day with a little sunshine.
 that we have a rainbow of fabulous fruits & vegetables coming into season, all ready to inspire us into cooking something fresh & exciting. Bright berries & vivid vegetables to fill you with inner sunshine, giving you a well-deserved boost after being wrapped in woolly pullys for so long (that’s sweaters if you don’t know).
 Thanks to the temptation of my local shops, I recently stocked up on some beautifully fragrant fruits & vegetables, perfect for pairing with pastry! Forget those overloaded, soggy-bottomed, smudgy layered mouthfuls of the past (that’s where they should stay). Savoury or sweet, tarts should be sumptuously satisfying & stuffed with just enough filling to keep you happy.
 cold custard (it didn’t end well). An attentive boyfriend in my early 20s used to bring me a strawberry tart for our mid-morning coffee breaks & would always ensure they were custard-free, so I didn’t have to relive the horror. Obviously, I make sure my own home-baked versions are definitely free of custard too.
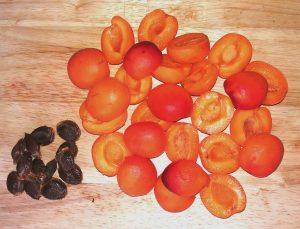 1 punnet of fresh Apricots
 Now to make the pastry! Into a large mixing bowl, add all the pastry ingredients together – the flour, eggs, sugar, butter & some zest. Get your hands in & squish everything together to form a silky soft ball of pastry.
 Wash the apricots in cold water & gently pat dry. Run a paring knife along the natural line around the middle of each fruit, then twist as you pull them apart (the riper the fruit, the easier this is). The stone/pit will stick in one side, so just prise it out with your fingers & discard. Continue until you have stoned all your fruit.
 Take a pastry strip & pinch or twist it carefully, so you don’t break it, then lay it across the middle of the tart. Brush the ends with a little milk & attach to the edge of the pastry base.
 Once the pastry has turned lightly golden & puffed up, the tart should be ready.
 dessert (although clotted is my fave).

 This time of year is one of my favourites, just as everything is starting to spring & sprout in the garden, refreshing & regenerating. Buds are beginning to pop up, soon to bloom into beautiful blossoms, while the trees are turning green & growing again. The lovely Spring sunshine seems to be a bit shy this week, making it difficult to get out into the garden, so I’ve been practising my sugar skills & learning a few new techniques. Despite the lack of sunshine this week, I’ve still managed to get some sparkle in the form of sugar & edible glitter though!
 Having made a warren full of baby bunnies over Easter, I was inspired by the pretty pale pink blossom trees of Spring to create a chocolate tree. If you’ve been following me on social media, you will know I’ve been excitedly sharing various pictures of my progress. It was something I needed to try & although it took me five days from start to finish, I’m really pleased with the results, plus I’ve had some fabulous feedback – thank you so much to all you kind, lovely people (you know who you are!). All I’ll say is that I know how Richard Dreyfuss felt about his mashed potato mountain in Close Encounters!
 As it’s still a bit chilly outside, my Chicken & Leek Pie is just perfect for this inbetween weather & the bright vegetables will add some colour to chilly evenings. Leeks are a bit under-rated & have always struck me as rather pretty. With their slender bundles of long, frond-like leaves, tightly packed & tall, they go from being the darkest emerald green at one end to the palest, apple-flesh green at the roots. They can be cooked in a variety of ways, but we tend to just boil them until bland, then spend the whole meal pushing them around a plate & not eating them. What a waste!
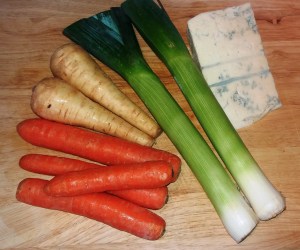
 Peel, top & tail the carrots & parsnips. Chop into bite-sized slices (I usually cut into half, then slice). Nothing needs to be perfect here, just get chopping.
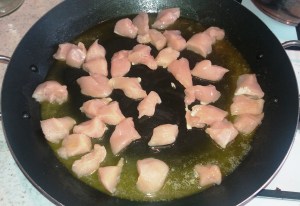
 Sprinkle the flour on top & stir thoroughly, ensuring all the chicken is coated well. The chicken will become clumpy, the oil & butter mixture will cook the flour, basically making a roux in the frying pan. This is going to make your pie filling more solid (making it easier to slice up later).
 Break up the Gorgonzola Dolce or Danish Blue cheese into pieces & dot around the pan, add the strained leeks, carrots & parsnips. Stir everything gently until thoroughly mixed. Season with a little freshly ground black pepper (you won’t need any extra salt, as there’s salt already in the butter & Gorgonzola).
 If you’re only putting a pastry lid on your pie, tip everything into a large pie dish (or individual ones if you like) & spread evenly. Set to one side while you make the pastry. If you’re making a pastry bottom for your pie, grease your dish with butter & dust with a little flour (this will make it easier to remove when cooked).
 If you’re just making the lid, dip your fingers in a cup of water & run them around the edge of the pie dish – this will act as a sort of glue to bind your pastry crust to the dish & help stop leaking (it’s no guarantee, but it does help). You don’t need to do this if you have a pastry base, as it will naturally stick to itself when you put the lid on.
 Brush lightly all over with milk to give the pastry a nice gloss while it’s cooking. If you want to decorate with leaves & shapes like I’ve done here, you can add the shapes now you’ve brushed it with milk (so they will stick).
  roasted potatoes, & a huge green salad. Any leftovers will freeze nicely or you can cut it into slices, wrapped individually for lazy lunches or picnics.