

 The seasons have started to shift, it’s almost as if you can taste it in the air, as we swap long lazy Summer days for softer sunsets & cosy nights. Hot-headed August has passed the baton to sultry September, bringing with her the bountiful & beautiful beginnings of a delicious Autumn. There is nothing as therapeutic as an early morning meander in the countryside, especially during September! Gloriously gorgeous berries adorn the brambles & hedgerows, while trees are groaning under the weight of their fruity loot. Nature is amazing, turning tiny Spring blossoms into an Autumnal array of plump berries & fragrant fruits, with a little help from her pollinator peeps of course!
One of the most deliciously juicy fruits of this season are plums, especially Victoria plums – sweet, golden centres wrapped in tart, sherry-coloured skins. We were lucky enough to be given a couple of bags of these beauties by a kind neighbour & so I decided to  create something a bit special, a sweet but tangy treat – my Plum Tuckered Pud! Now before you get all excited, this is a bit more involved than my usual “chuck it in a bowl & bake” kind of recipe. It’s easier than it sounds, I promise, but the best bit is you can make each stage in advance & fling them together at the last minute, making you look like a superstar dessert ninja. If you don’t have the time to make the pastry or can’t be bothered, you could always skip that step & buy a ready-made pastry case or ready-to-roll shortcrust pastry instead. Ready to bake it happen? Hands washed, aprons on & here we go!
What you need:
For the pastry:
175g Self Raising Flour (with extra for dusting your worktop)
60g Salted Butter, cold from the fridge
60g Sugar
1 large Free Range Egg
Zest of half an Orange & half a Lemon
For the fruit compote:
2kg Victoria Plums, washed
3 Star Anise
1 Cinnamon Stick
3 long strips of Orange Zest (I used a speed peeler)
1 ball Stem Ginger, chopped finely
100g Sugar
50ml Cold Water
2 teaspoons Ginger Syrup from the jar
A good squeeze of Lemon Juice
25g Cornflour & approx 2 tablespoons of cold water to make a liquid
For the cream topping:
250g Mascarpone Cheese
250ml Double Cream
2 generous tablespoons Greek Yoghurt
1/4 teaspoon Vanilla Extract (the good stuff)
1 generous tablespoon Lemon Curd
Fresh mint leaves to decorate
1 teaspoon Icing Sugar for dusting
What to do:
 Firstly, we’re going to make the plum compote. Half the fruit, carefully remove the stones (you can put them in the composter). Set aside a few plums in a dish, cover & pop in the fridge to keep them firm for later (these will be for your topping).
Cut the rest of the plums into quarters – leave the skins on because they naturally contain pectin, which will help the compote thicken up. Put them in a large saucepan with the sugar, water, lemon juice, star anise, cinnamon, ginger, ginger syrup & the long strips of orange zest.
 Gently heat until the sugar dissolves into the water, carefully nudging everything around the pan with a wooden spoon or spatula. Bring to a boil & simmer gently for about 15 minutes on a medium heat, stirring regularly to make sure nothing sticks to the bottom of the pan. It should reduce to a sunset-coloured jammy syrup that smells like Autumn.
 Turn down the heat, remove the spices & orange strips, then add the cornflour water. Stir swiftly into the fruit compote (not so much you splash yourself, but enough to blend everything). Once the compote has thickened up, turn off the heat immediately.
Leave to cool in the pan, without a lid on (because that will trap condensation & add unwanted moisture). When cool, transfer to a dish, cover & put in the fridge to chill.
Pre-heat the oven to 180*C (fan oven) & prepare your baking tin – I used a loose-bottomed quiche/pie tin, about 9 inches across. Smudge a little butter around the inside & edges, then sprinkle a tiny bit of flour on top, shaking it all around until you have a fine floury layer. Tip out the excess onto your worktop for rolling out your pastry.
Put the flour & sugar into a mixing bowl, then add the butter. Using your fingertips, squish the butter into the sugary flour & rub together, until you have a fine crumb-like mixture.
Break up the egg with a fork, then add that & the zest to the floury crumbs & mix together to form a soft pastry dough.
 Roll out the pastry a couple of inches larger than your tin & about half a centimetre thick. Lay it carefully over your rolling pin & gently lift onto the baking tin, allowing it to drape into the middle. Push it into the edges gently, so that it covers the entire base & sides of your tin evenly.
Cut off the excess around the edge of your tin, or you could just use your fingers to press it off against the edge. Prick a few tiny holes in the base with a fork. (Any leftover pastry can be cut into shapes & baked on a flat baking tray, dusted with a little icing sugar – perfect for nibbling).
 Grab a bit of greaseproof paper, screw it up to make it easier to shape to your tin & then loosely place on top of your pastry. Tip some baking beads or dry pasta shapes onto the paper, spreading them all across the top & filling the pastry case.
Bake in the centre of the oven for about 12-15 minutes, just until it starts to go golden.
Remove from the oven & place the tin on a cooling rack. Carefully lift out the paper & baking beads or pasta (which you can save for another time). Set them to one side on another rack to cool too.
 Tip the Mascarpone cheese, double cream, Greek yoghurt, lemon curd & vanilla extract into a large mixing bowl & briefly whisk together until thick & fluffy. It’s going to be piped on top of your dessert, so it needs to be thick enough to do so. If it’s too thick, add a little more Greek yoghurt to loosen a little (a couple of teaspoons should do the trick). Once you’re happy, pop the bowl in the fridge to chill.
Remember the leftover plums? These are going to be your dessert decorations. Cut the plums into thin slices, cover & put in the fridge.
Time to assemble! Before lifting your pastry case from the tin, here’s a tip to give it a more elegant edge. Take a sharp knife & run it around the top of the pastry, level with the tin edge, slicing off any bobbly bits. Transfer your pastry case to a pretty serving plate.
Spoon the plum compote into the pastry case, filling it to just over three quarters of the way to the top, smoothing the surface. Save any leftover compote (more on that later).
Snip the end off a piping bag (we’re going nozzle-less!) & half-fill with the Mascarpone cream, twisting the top of your bag to make it secure. Starting at the outer edge, pipe round plump splodges of the cream close together to form a bumpy circle. Then pipe more splodges on the inside, working your way towards the centre of your dessert. If you have any gaps, pipe a few smaller ones to fill them in.
 Now for those pretty plum slices we made earlier! Place the slices skin-side up at intermittent gaps across the top, like shards of sunshine peeking through the clouds. Add a couple of mint leaves at intervals – you don’t need many, just a few will do. Pop your dessert in the fridge for about ten minutes or so.
Just before serving, remove from the fridge & give it a delicate dusting of icing sugar. Slice & share!  This delicious dessert would make a pretty Autumnal centrepiece for a special dinner or celebration. Refreshingly tangy, softly spiced plum compote, crowned with a feather-light fluffy cloud of Mascarpone cream & fresh plums, all sat atop a crisp, melt-in-the-mouth pastry base. If you have any of that delicious plum compote left over, it’s a magical multi-tasker – it tastes rather lovely spread on hot buttered toast, or try a spoonful with a few slices of cheese & crackers too.
So why not make the most of the fabulous plums available this Autumn & try my pretty Plum Tuckered Pud! Stay hungry! Aimee 😉 x

 Sultry September has arrived with a slight coolness about her & although the mornings are a little chilly now, the sunrises are just as spectacular. Getting up early means I see some amazing sunrises & Autumn never fails to deliver. An array of moody clouds smooched across the sky this morning, kissing the rooftops as it gave way to the sunshine before we’d finished breakfast. The garden looks prettily overgrown at the moment, all luscious long grass, wispy branches
  & a scattering of jewel-coloured blackberries on the hedgerows, contrasting with their dark green background. They are happily growing at a rapid rate, replacing the ones that have already been plucked & packed in a pie with sweet sliced apples & cinnamon sugar.
 a good fruit pie! Although a slightly stodgy pie is very welcome at this time of year, sometimes we like something a little lighter but just as indulgent. On one of my recent shopping trips to our local shops, there were shelves stacked with punnets of pears. They looked so beautiful & fresh, with pale juniper green skins & a smattering of gold around the bottom. Obviously, I had to buy some & starting thinking of how to do them some justice in a lighter pie, recipe calculating in my head as usual. By the time I got to the checkout a few minutes later, I’d packed my basket with a selection of ingredients & headed home excitedly to start my next creation.
 The filling would have included single cream, however there was a slight incident. Upon opening the fridge, the cream pot leapt from the top shelf, unceremoniously smacking into the floor & spectacularly showering me & everything in it’s path. Cue a huge clean up operation & a slight delay in my creation. When things like this happen, I tend to have a look around to see what I can replace it with, rather than hit the shops again & I had some lovely over-ripe bananas that were the perfect replacement! My Pear & Almond Tart (Crostata di Pere e Mandorle) is a simple but pretty dessert, easy to make & the addition of the dark chocolate makes it deliciously decadent. Ready to bake it happen? Hands washed, aprons on & here we go!
 4 ripe Pears, peeled & cored
 Roll out your pastry to a couple of inches larger than the pie tin. Using your rolling pin, flop the pastry over onto it & carefully drape it over your pie tin, so it reaches all the inside edges.
 Remove your tin from the oven & put on a cooling rack. Leave the greaseproof paper & baking beans in place for at least 5 minutes (they will be hotter than the sun), then lift them out on the greaseproof paper & put in a heatproof bowl or similar to cool.
 Now to make the filling! Take the pears & halve them. Use a teaspoon to scoop out the core. Slice each half into fine, frond-like fingers. Place one half in the pastry case, rounded side up & gently press to fan them out. Add the next pear half & repeat, making sure each is nicely spaced apart.
 Scatter the chocolate pieces all over the pears evenly.
 Stir the ground almonds & flour together in a separate bowl, then fold into the wet ingredients until blended thoroughly.
 Remove & put on a cooling rack to rest. Once cool, trim off the pastry edge until level with the pie tin. Set aside while you make the decorations.
 Lift the paper up & place on a cooling rack until completely cool.

 Here we are in the middle of a perfect July & let’s face it, Summer has been a long time coming! Due to the magnificent mini-heatwave we’re having, all the pretty pots of plants are sprouting with lots of lovely flowers & fruit. Sitting on the patio having coffee early in the morning is one of the best feelings, just relaxing & starting the day with a little sunshine.
 that we have a rainbow of fabulous fruits & vegetables coming into season, all ready to inspire us into cooking something fresh & exciting. Bright berries & vivid vegetables to fill you with inner sunshine, giving you a well-deserved boost after being wrapped in woolly pullys for so long (that’s sweaters if you don’t know).
 Thanks to the temptation of my local shops, I recently stocked up on some beautifully fragrant fruits & vegetables, perfect for pairing with pastry! Forget those overloaded, soggy-bottomed, smudgy layered mouthfuls of the past (that’s where they should stay). Savoury or sweet, tarts should be sumptuously satisfying & stuffed with just enough filling to keep you happy.
 cold custard (it didn’t end well). An attentive boyfriend in my early 20s used to bring me a strawberry tart for our mid-morning coffee breaks & would always ensure they were custard-free, so I didn’t have to relive the horror. Obviously, I make sure my own home-baked versions are definitely free of custard too.
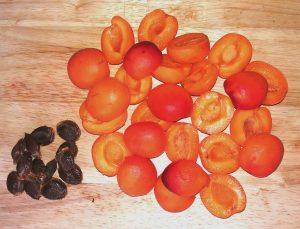 1 punnet of fresh Apricots
 Now to make the pastry! Into a large mixing bowl, add all the pastry ingredients together – the flour, eggs, sugar, butter & some zest. Get your hands in & squish everything together to form a silky soft ball of pastry.
 Wash the apricots in cold water & gently pat dry. Run a paring knife along the natural line around the middle of each fruit, then twist as you pull them apart (the riper the fruit, the easier this is). The stone/pit will stick in one side, so just prise it out with your fingers & discard. Continue until you have stoned all your fruit.
 Take a pastry strip & pinch or twist it carefully, so you don’t break it, then lay it across the middle of the tart. Brush the ends with a little milk & attach to the edge of the pastry base.
 Once the pastry has turned lightly golden & puffed up, the tart should be ready.
 dessert (although clotted is my fave).
 There is something heavenly about the heady fragrance of fresh, ripe juicy strawberries that always makes me think of Summer. When my son was young, we would spend many a sunny afternoon in a strawberry field, gently plucking plump berries from their leafy beds & enjoying their tantalising fragrance on the way home, eagerly looking forward to devouring them!
 Now we all know they go very well sandwiched in a scone with jam & cream (if you don’t, you’re missing out), so I like to include these beautiful berries in other delights too.
 For a quick impromptu dessert (unexpected guests will love this), whip up a fluffy, fat-free sponge & layer between thinly sliced strawberries & piped cream. It looks like you’ve spent all afternoon baking, but actually takes about 20 minutes from start to finish & most of that time is spent on the assembly! Dust it with icing sugar & if you really want to make it look extra fancy, make a pattern in the sugar with a hot metal skewer across the top (wear an oven glove though – the scent of burning fingers is never attractive).
 family call it this because the Italian name is crostata di mandorle e fragoline (please note, no fraggles were harmed in the making of this treat). Of course, the pastry has to be homemade with soft butter, eggs, sugar & flour – if you’re going to do these beauties justice, have a go at making your own. I’ve used various types of flour,
  Another favourite of mine are strawberry jam tarts – I have my own take on these jammy little pastry cups & this is for those over-ripened fruits, the slightly squishy, sad looking ones that have been living in your fridge for a few days & need eating. Put a spoonful of the squished berries in the bottom of pastry cases,
  spoon a little warm, seedless jam over them (only half fill, as jam tends to grow), then bake. Once cooled, just add a swirl of soft cream & a sprig of mint! I try to keep a few in an airtight container for the next day, but they somehow evaporate …. !