

![]() It’s been a funny old year so far, like one of those intense mystery novels with one dizzying plot twist after another. None of us know what’s going to happen next, the author has gone rogue & the leading characters are all bickering with each other like petulant, hungry teenagers. When everything seems to be a swirl of stress & stomach dragons are grumbling, never fear – comfort food is here! A proper dinner helps calm grumbling of all kinds, soothing those pesky stomach dragons & restoring a little peace (albeit briefly).
It’s been a funny old year so far, like one of those intense mystery novels with one dizzying plot twist after another. None of us know what’s going to happen next, the author has gone rogue & the leading characters are all bickering with each other like petulant, hungry teenagers. When everything seems to be a swirl of stress & stomach dragons are grumbling, never fear – comfort food is here! A proper dinner helps calm grumbling of all kinds, soothing those pesky stomach dragons & restoring a little peace (albeit briefly).
Preparing a meal is something I truly enjoy. It’s impossible not to feel relaxed, while creating something so comforting & satisfying. The whole process requires you to focus on each task & that in itself  seems to release any tension. It’s not as precise or technical as some recipes, but it’s sheer ease brings a sense of peace as you create a meal for your family. My adoration of Italian food began when I was a teenager & this is a rush-less ragu recipe I’ve been making for my family ever since. It is at the heart of my homemade meat lasagne, slowly baked between blankets of cheese sauce & sheets of homemade pasta, regularly shared as a Sunday dinner & often accompanied by my Husband’s focaccia (he’s quite a talented baker). Sometimes I make it with sausages, sometimes beef or both, usually whatever I’ve got in the freezer (I freeze meat in small batches for this very purpose).
 This is a family-sized recipe & will serve at least six people generously (it makes a decent six portion lasagne too, although I have stretched it to eight on occasion). Keep some handy in the freezer for when you’re short on time (make sure you use fresh beef or sausage if you intend to freeze it though, not previously frozen).
A ragu is not fast food – to me it means “Relax And Gradually Unwind”, so just take your time & go at your own pace – there’s definitely no rush. Ready to ragu? Hands washed & aprons on!
What you need:
200g Minced Beef or 4 Plain Pork Sausages, skins removed (or half beef & pork)
2 medium Carrots, washed, peeled & finely chopped
2 sticks of Celery, washed & finely chopped
1 medium Onion, skin removed, topped, tailed & finely chopped
2 tins of Plum Tomatoes & their juice
1 generous tablespoon Tomato Puree
1 or 2 dried Bay Leaves (if you’re unsure, just use one)
1 sprig fresh Rosemary (approx 6″ long), leaves chopped finely
3 or 4 cloves garlic, chopped/sliced finely
2 tablespoon Extra Virgin Olive Oil
A splash of Balsamic Vinegar (the good stuff – about a teaspoonful)
Seasoning – Sea Salt & Black Pepper, both freshly ground
What to do:
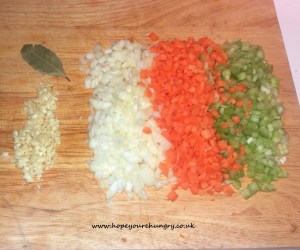
Firstly, prepare your garlic, carrots, onion & celery. Make sure you wash the carrots & celery thoroughly to remove any grit or dirt. Peel the carrots & trim the ends off them & the celery. Chop finely into mini pieces & set aside on your board.
Next, peel the garlic & onion. Top & tail the onion, then chop finely as before – you can always use the food processor for this if you prefer. Here’s a little tip from me: wear sunglasses to help reduce any tears (obviously not dark ones, you need to see).
Chop the garlic finely & then the Rosemary. Remove the spindly leaves from the stem first – I save these for making mini-tomato & vegetable kebabs.
 Heat the oil in a large skillet or deep frying pan on a medium heat. Add the carrot, celery & onion & fry for a few minutes to soften. Keep them moving around the pan, so they don’t catch & burn.
Add the meat – squeeze the sausages from the skins straight into the pan if it’s easier. Break any big chunks into finer pieces (I use tongs for this, but a wooden spoon or spatula is just as good). Stir fry until the meat is thoroughly coloured & all the pink has disappeared.
Season with a little salt & pepper, sprinkle in the garlic, Rosemary & bay leaves, giving everything a good stir (the scent is fabulous). I don’t add the garlic at the beginning, because it can burn quite quickly & lose it’s sweetness.
 Next, add the tomatoes – I tend to buy the whole plum tomatoes & squish them by hand, evenly over the pan. Yes, it’s messy but you’ll wash. Half fill each tin with cold water to swirl out those last little drops of tomato juice into the pan too – we don’t waste anything!
Add the tomato puree & a good splash of balsamic vinegar (even a few drops makes all the difference). Reduce the heat to low & let it softly simmer for about 30-40 minutes, stirring occasionally.
Give it a taste, then add a little salt & pepper as needed (depending on the sausages you use, you might not need very much). Using a clean spoon, taste it again to make sure it’s to your liking (seasoning is a personal thing).
 Once you’re happy, let it bubble away on a gentle simmer for another 30 minutes or so, until reduced to a rich, thick meaty sauce. Give your ragu another quick taste to check the seasoning is good & adjust it if you need to. To test if it’s done, drag the spoon through the middle (the parting of the ragu) – if it leaves a gap & you can see the bottom of the pan, then it’s ready!
 Get the family together, grab a fork & get stuck in! It makes a sumptuously lazy supper generously spooned over spaghetti (with a good scattering of grated Parmesan on top), or stuffed in a variety of pasta parcels & shapes. This versatile rich meat sauce is especially fabulous layered up in lasagne – here’s the link to my vegetable lasagne recipe, just swap the meat ragu for the vegetable one: https://hopeyourehungry.co.uk/perfect-pastafication/
 Sometimes, I’ll use the leftover meat sauce in a pasta bake (brilliant when you’re short on time & easily feeds two people comfortably). Pre-heat the oven to 180*C. Pop a couple of generous spoonfuls of ragu into the bottom of a small baking dish. Next, cook a couple of handfuls of fusilli (these twirly swirls make the best topping for this, as they are easily coated with the cheese sauce).
Make the cheese sauce while the pasta is cooking – melt 45g butter in a pan, then add 45g plain flour & stir well to make a thick paste. Slowly add 300ml of semi-skimmed milk, a little at a time & stir gently (I use a whisk to make  sure there are no lumps). As the sauce thickens, stir more vigorously until silky smooth. Add a small handful of grated mild cheese (approx 60g) & mix in until melted. Taste, then season accordingly with a little sea salt & freshly ground black pepper. Sprinkle generously with more grated cheese, dust with a little dried Oregano & bake for about 30 minutes.
 When it’s ready, the topping will have turned a gorgeously golden hue. Allow to cool for a few minutes before tucking in (just add a simple green salad & a little homemade focaccia for scooping up the sauce.
 When the world gets too fast, slow down the pace & make a little comfort in your own kitchen with a fabulously flavourful ragu – Relax And Gradually Unwind. Stay hungry! Aimee 😉 x


 be considered as “cucina povera”, as it is quite a hearty dish made from a few simple ingredients, doesn’t cost much to make & will feed quite a few people easily! They freeze well too & are great on baguettes for lunches (that’s if there are any leftovers – good luck with that!).
 Sometimes I’ll use dried spaghetti as a swirly, silky cushion of plump pasta for the meatballs to sit on & sometimes I’ll make my own fresh (making your own pasta can be addictive, so be warned!). Fresh pasta takes five minutes to knead & then needs half an hour to rest in the fridge, before rolling & cutting into shapes. Before you start to panic about making your own pasta, it’s really easy & I’ve written a whole blog on this – here’s the link:
  roller, so all the cutting is done for you at the turn of a handle! Any extra pasta can be dried & stored for future use. Even if you don’t have a pasta machine, you can roll it out thinly & cut into strips – make your own tagliatelle or papparadelle ribbons! Get creative with your pasta & make whatever shapes you prefer.
 like to start making a rich, jammy tomato sauce & I’ve usually got a huge pan of this blipping away in the background. Forget shop-bought jars of sauce with unpronounceable ingredients, unless you are using a jar of Passata (sieved tomatoes), then this one will sort you out & it won’t take long to make. It is probably one of the most versatile sauces you will ever make & goes with pretty much everything! Although this isn’t our family recipe, it’s a close one & tastes just as jammy. Hands washed & here we go!
 plate you prepared earlier. Repeat until all the mixture has been turned into meatballs & your plate is full.
 cooking into the bottom of the dish & leave your meatballs lovely & tender.
 If you’re cooking fresh pasta, it takes about 2-3 minutes tops. Get a large pan, boil the kettle & fill halfway up with boiling water. Add a teaspoon of Sea Salt & bring to the boil. Carefully add your pasta to the water & bring back to a rolling boil (that’s when the water rolls over from the edge of the pan to the centre).
 Spoon over a generous drenching of the tomato sauce, coating the meatballs & serve immediately! If you like, dust with a little freshly grated Parmesan – leave a little dish on the table with a spoon for people to help themselves. Or you could use a speed peeler to add a few strips of Parmesan on top instead, it’s your choice.
 Leftover meatballs & sauce will keep too – freeze the meatballs in a little sauce, either in bags or plastic tubs. Pour any leftover sauce into sterilised jars when cooled & store it in the fridge. You can use it for pizza, lasagne, pasta or just for dipping veg in (I like it on my chips). It’s great on burgers too!
 One thing I would recommend is don’t wear a white shirt while swirling sauce-laden spaghetti! If you do get tomato sauce on your clothes, try this little tip I learned: add a spot of neat washing up liquid (any brand works, although Lemon seems to be best) & chuck the shirt in the wash. If you do it straightaway, it should come out fine. This works on red wine too (you’re welcome!).
 Firstly, apologies for the delay in writing my blog, as we are in the process of having a new kitchen fitted (week three, yay!). As you’re probably aware, the kitchen is my sanctuary, my haven of foodliness & culinary creativity. It’s one of my favourite places when life gets stressful, where I go to take my mind off things & create sweetness when there is none (or knead the crap out of some dough for a bit to de-stress). When I can’t cook or bake, I tend to get a bit tetchy! I started the first week like SpongeBob on his first day at the Krusty Krab (“I’m ready!”), but rapidly transformed into Donna Corleone by the end of the second. It’s never straight-forward when you’re having building work done, even a small kitchen & no matter how organised you think you are, you’re not. As I discovered, even the most perfectly planned projects can go a bit awry & bring out your inner DeNiro.
 Until Friday morning of the second week, there was no working sink, no oven, no hob, no washing machine in place & no wine, which even for the most patient of people starts to get a bit much. None of this was made easier by sharing our lounge with most of the large kitchen appliances (which was everything but the fridge), a dining table & six chairs, along with all the usual furniture one has in a lounge & everything the cat owns too (along with one rather disgruntled cat, who was having to share with “the staff”). The kettle, microwave, toaster & slow cooker were all perched rather precariously on the dining table & washing machine, just across from the sofa. It was very cosy!
 midway into week three, with various as yet unresolved issues (such as a gaping chasm in the ceiling where the old oven fan used to be, no hob as yet & a couple of minor head injuries from the low oven vent, which has a tea towel on to cover the blood), you can imagine that we’re getting rather vexed & I’m suffering from serious Spaghetti alla Carbonara deficiency. Note to self: remember wine next time & double it, with a few whiskey chasers!
 Before the chaos began, I prepared a few meals in advance & filled the freezer with lots of luscious treasures to keep us going. Firstly, I made my staple Italian favourite: an enormous lasagne al forno. This was
  baked
baked 
 of Parmesan & Cheddar, which works really well. To give it a crispy topping, roughly grate half a crust of bread over the top & spread liberally. It can be chunky or fine, it really doesn’t matter. Sprinkle a pinch of Oregano on top, some freshly ground black pepper & bake it in the middle of the oven at 200*C for about 20 – 25 minutes. It will be crispy on top, the cheese will go golden & all that gooey cheese sauce will plump up the veg, infusing them with cheesiness. Leave it to go cold, slice into portions & freeze in individual tubs. This tastes amazing on it’s own too & is quite filling (we had it with chips from our local Chinese takeaway – gorgeous!).
 The next day, I prepared a couple of fresh chickens by filleting, skinning & cutting them into portions. This provides four chicken breasts, four legs & two carcasses with the wings on. Have a read of my article
  smoked bacon before being cooked, then frozen individually. The carcasses went into the oven with some veg, herbs & water to make stock (which was also frozen for future risottos when we have a hob). The chicken breasts were divided into two to make chicken pies & kievs, stuffed with homemade garlic & smokey bacon butter.
 a month, I buy a big pack of smoked bacon, split it into 4 or 6 rasher batches & freeze them, so I’ve always got smoked bacon for risotto or cacciatore – now I have it for garlic butter too. I have also used Proscuitto di Parma when I have leftover slices – it crisps up perfectly when fried. It makes more sense to make a large batch of the butter, rather than faffing around with piddling portions just for two kievs. The measurements are general here, depending on how much garlic you like, so go easy if you’re unsure.
 inch above the edge of the paper, leaving a couple of inches either side to twist together afterwards. Roll away from you & keep it tight, smoothing the paper with your fingers to make a sausage of butter, tucking the edge of the paper underneath it. Roll evenly until completely rolled up & twist the edges together. Wrap in clingfilm & twist the edges again. Pop it in the top freezer drawer & leave it to set for at least an hour. This will become firm & easier to slice. Once ready, cut a couple of slices & put to one side ready for stuffing, then put the rest in back in the freezer. When you need to use it again, leave it out of the freezer for about ten minutes to soften slightly before slicing.
 Using the same hand you did for flouring, sprinkle & pat the breadcrumbs onto the chicken, ensuring it is thoroughly coated on all sides. Shake off the excess & place in a plate (sprinkle a few breadcrumbs onto the plate before you do this). Repeat this process for the other chicken kievs, then cover the dish with cling film & put in the bottom of the fridge for an hour or so – raw meat should not be next to cooked or be above anything else, so I always use the bottom shelf.
 carefully, replacing them in the oven to finish cooking. Once cooled, pop a couple in a tub & freeze (pour over any escaped butter & crispy bits from the tin too). They reheat well once defrosted too – just put them in a dish in the oven at 200*C for 20 minutes or so. Make sure they are piping hot before dishing up – stick a metal skewer in the
  centre & if it’s hot to the touch, they’re ready. They go great with a huge salad & proper chunky chips. If you’re not keen on bacon or garlic, try using different stuffings in your chicken – maybe some sundried tomatoes, a couple of slices of Mozzarella & some fresh Basil leaves, or shredded spinach, Ricotta & chopped pine nuts.