

Whether it’s the weekend or Wednesday, a little indulgence is always nice & doesn’t need to be extravagant. Sometimes it’s the little things that bring the most joy & that includes a plate of satisfying comfort food.
When a delicious main course is centre stage, it usually requires a couple of supporting acts. All the best ones do – fish & chips, bacon & eggs, spaghetti & meatballs (the list is endless). Burgers always require a good bun, but they also need some serious sidekicks like crispy coated  onion rings & deliciously chunky chips. These two sides are a well-loved staple in our household & with good reason.
Firstly, the chunky chips (fondly known by our family as Aimée Chips) accompany everything from fish fingers to roast chicken. They are ridiculously easy & totally faff-free – chop them up & chuck them in the tin kind of cooking.
Secondly, there are crispy light onion rings that literally melt in the mouth. These oh-so-delicate flavoursome delicacies are perfectly  light & crisp, tasting much naughtier than they actually are. Before you start worrying about chips & onion rings being deep fried or not very healthy, the best bit is … there’s no frying required because they’re all baked! That also means no hot pans to stand & watch (because nobody has the time for all that).
Ready to bake it happen? Starting with my Aimée Chips! Hands washed, aprons on & here we go!
What you need:
6-8 medium Potatoes (nothing fancy, whatever you’ve got is fine)
Sea Salt
Freshly Ground Black Pepper
Extra Virgin Olive Oil
1 tablespoon Coarse Semolina Flour
What to do:
Pre-heat the oven to 220*C & get a large roasting tin to cook the chips in.
Wash & dry your potatoes well, leaving the skins on. Cut them into thick wedges. Don’t worry about them being exact-sized, just make them at least the thickness of your thumb. Place them all into a roasting tin.
 Drizzle well with the olive oil, then dust with a good pinch each of black pepper & sea salt, about a quarter teaspoon. Tip: if you’re preparing these in advance, do not add the salt until you are ready to cook them. The salt will make them rock hard & no amount of cooking will soften them up.
Sprinkle the coarse semolina flour over the chips, shaking everything around to coat them thoroughly. Place each potato wedge skin-side down in the tin (this helps stop them sticking to the tin, as they’re curved & touching less surface area – little bit of science-y stuff there).
Bake in the centre of the oven at 220*C for about 20-25 minutes, giving them a shake half-way through. When they’re crispy & deeply golden, remove the tin from the oven & place on a rack. To keep them warm, place another baking tray loosely over the top (leave a gap to allow steam to escape) & then reheat just before serving for about 5 minutes in a hot oven.
Onto those deliciously delectable onion rings! No frying pan required, just a large baking tray & a little baking magic. Hands washed & here we go!
What you need:
2-3 large Brown/Spanish Onions
2 large Free Range Eggs
4oz Plain Flour
2 tablespoons Greek or Natural Yoghurt (full fat or 0% fat is fine)
Sea Salt
Freshly Ground Black Pepper
Extra Virgin Olive Oil
What to do:
Pre-heat the oven to 220*C. Prepare a large baking tray – line with a sheet of greaseproof paper. I use Bacofoil Non-Stick Baking Paper for this (it’s strong & textured, so stands up to the heat without disintegrating). You don’t need to use it, but it stops your onion rings from sticking to the tin & means you use less oil.
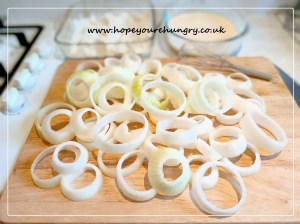
Prepare your onions – remove the tops & tails, take off the outer papery skins & cut into thick chunky slices.
Pop out the centres, then each inner onion ring, being careful not to break them. Place them onto a plate or board & set aside. The tiny chunky centres can be saved for another day – simple chop them into pieces, spread onto a tray & freeze for 10 minutes. Once frozen, tip them all into an airtight bag & pop back in the freezer – no big lumps of onion this way & no waste!
Tip the flour into a shallow dish & season with a little salt & pepper. Give it a good stir to mix well.
 In another shallow dish, crack the eggs & add the Greek Yoghurt, along with a little salt & pepper again. Give it a good whisk with a fork to break up the eggs & blend into a thick, gloopy liquid.
Take an onion ring, coating it in the yoghurt & egg mixture all over, inside & out. Shake off the excess & drop into the flour. Coat well, again making sure you cover the inside too. Don’t worry if the flour goes lumpy, that’s fine. Lift the onion ring out, shake off the excess flour & pop onto the baking tray.
 Repeat this until all the onion rings have been dipped & dunked in egg & flour. Place them all next to each other on the baking tray & don’t worry about them touching too much.
Drizzle olive oil all over the onion rings (don’t bathe it, just a light drizzle is fine) & bake in the centre of the oven for about 12-15 minutes, turning them over halfway through cooking.
 Once they’re crispy & bronzed, carefully remove the onion rings from the tray using a fork or tongs & place onto a cooling rack with a bit of greaseproof paper underneath (just in case there are any oily drips).
Remember to pop your chunky chips back in the oven for a few minutes to warm up (remove the baking tray from the top) & that’s it, they’re all done!
 Perfect piled up next to a beautiful burger or simply stacked up as a savoury snack, these crispy baked beauties are delicious sides by side anytime! Stay hungry! Aimee 😉 x

 It’s been a proper soggy start to Summery June, especially this week (it’s been raining since Monday morning & barely stopped). The weekend gave us some glorious sunshine & the opportunity to mow the lawns, pot some plants & generally have a tidy up around the garden. The plants are loving the damp weather, flourishing & flowering all around (especially the peas who have pods on their vines!). Although we all moan about it, the gardens need a proper downpour every now & then to keep them hydrated & healthy.
 On days like these, I like to make my own sunshine & bake some beautiful treats! Lusciously light sponge cakes, peachy fruit-packed pastries & velvety chocolate chip cookies all do the trick, especially with their heady perfume wafting through the house & the anticipation of tasting them later. Recently, I rediscovered a treat that we have not made for quite some time: the gorgeous grissini! These spindly, slender sticks of crisp, handmade bread are delicious with a few juicy olives, sundried tomatoes & of course a pan of my homemade tomato sauce for dunking. After a long day at work or as pre-dinner nibbles for your guests, these make the perfect carpet-picnic fayre to tide you over until dinner is ready – substantial enough to take the edge off being hungry, but light enough to not affect appetites too much.
 Now I’m not going to give you false hope here – they are one of the easiest & tastiest treats to make, but you will need to set aside a whole morning or an afternoon (which is perfect for soggy days!). As each breadstick is handmade, there is a degree of patience required – you can’t rush this & I personally find it quite relaxing, therapeutic almost. No machine required, this is all done by pure elbow grease – in fact, the only thing I will recommend is a pastry scraper (an inexpensive flat, flexible piece of plastic that will multi-task in a number of baking jobs, including wiping up worktops afterwards). If you’re doing this alone, it can take a couple of hours to make a whole batch, so I would highly recommend getting the whole family involved (especially the children – this is great for helping them learn a basic life skill).
 This recipe makes about 80-100 grissini, depending on how thin you roll them & I will tell you that the thicker ones have the most deliciously chewy texture, with just enough exterior crispiness too – these taste amazing dunked in a little aged Balsamic Vinegar & olive oil. Grissini are definitely a ‘prepare in advance’ snack, not for those requiring instant gratification, but the results of your hard work will be rather satisfying. Ready to get started? Hands washed, aprons on & here we go!
 Optional toppings:
 Start to knead the dough by placing it in front of you, pushing down & away from you with the heel of your hand. Then pull it back onto itself, give it a half turn on your worktop & repeat. Try to get into a rhythm, working at a nice pace & keep the dough moving (if you’re moving too slow here, the dough will stick to the worktop, so just slide the pastry scraper underneath & flip it back).
 Dust the inside of your bowl with a little flour & place the dough inside, giving a little dust of the fine semolina or flour on top. Smudge a little olive oil onto a sheet of cling film, cover the bowl loosely oil-side down & place in a draught-free, warm place for an hour (warm airing cupboards are brilliant if you have one). If you don’t have cling film, use a sheet of greaseproof paper oiled in the same way & cover with a tea towel.
 Once proved, your dough will have risen to at least double in size & will be slightly domed on top. Remove the clingfilm & pull the dough out onto a lightly floured worktop.
 your grissini to look rustic, handmade & not just squished out by a machine. Personally, I like to twist & twirl them to get a nice bobbly sort of texture when they’ve baked, but it’s up to you how you do it. Lay each one about half an inch apart, as they grow a little during baking.
 Remove & lift your grissini onto a cooling rack until ready to serve. Usually, I tend to bake them on a constant rotation of two trays in the oven while I’m prepping another two trays, until all the dough is used up.
 oil & generously shower with sesame seeds or the Rosemary (or both, which is very tasty). Bake as above. One of the best bonuses of this is when all your grissini are baked, there will be a tray of toasted sesame seeds & Rosemary leftover. These are truly splendid scattered over salads, cheese bakes, roasted tomatoes & even just for dunking a delicious tomato-sauce smothered grissini in. Keep leftover ones in a little ramekin or glass jar for this purpose.
 tomatoes in a saucepan & squish into smaller pieces (get your hands in there, you’ll wash). Add a good squeeze of tomato puree, a couple of cloves of freshly chopped garlic, a few fresh Basil leaves (roughly shredded) & a pinch of sugar, along with a few firm twists of black pepper (freshly ground is best) & a pinch of sea salt. Stir everything together with a glug of olive oil & reduce on a medium heat for a few minutes. Once it’s all bubbling like glossy hot lava, it’s done! Turn off the heat, give it a good stir & let it cool for a couple of minutes (as with most hot lava-like sauces, let it rest). Taste it & adjust the seasoning if you need to, then serve!


 also the time of year my Husband & I met, so we always celebrate our first date (it involved a large Harley Davidson Sportster, a couple of hundred bikers delivering Christmas presents & rather a lot of tinsel!).
  Christmas Day. Some of these multi-tasking munchies can even be used as a starter, so make a few extra (which is my mantra, as you probably know by now). One of my favourites (& apparently everyone else’s!) are baked cheesy biscuits – you can serve them simply on their own or with a dip, or even pipe some cream cheese on them & decorate with chopped chives. They are really easy to make & the recipe is in my blog called “Grate Expectations” – here’s the link for speed:
  Scoop spoonfuls of the breadcrumb mixture into each mushroom – be generous & keep going until every mushroom is crammed full, then sprinkle with a little more cheese. Any leftover breadcrumb mixture, chuck it in the fridge for later (someone always turns up late or you might fancy a midnight snack). Scatter a few pine nuts over the top (these are gorgeous & have a sort of popcorn taste to them).
 If you’re preparing them in advance, cover in cling film now & pop them in the fridge until you need them (they keep until the next day at least). Otherwise, bake in the oven for 15-20 minutes until golden & gorgeous. These are great hot or cold, either on their own or with dips, or just with a green salad as a starter.
 prepped by one of your Helpers a few days before, then stashed in the fridge in airtight containers or bags, ready to be whipped out with a delicious dip anytime! If you fancy something different, try raw crunchy cauliflower florets (one of my faves), sliced peppers, sugarsnap peas & mangetout. Give them a good wash, trim the ends & stand them in a cup. One thing I don’t do at this time of year is make dips – I really cannot be bothered & what with all the other stuff to do, just buy some nice ones & store them in the fridge until needed. Simply scoop them into individual tea cups with saucers & dinky spoons (saving your table from splodges), rather than leaving them in a plastic tray – even if they do have one of those optimistic re-sealable tops, dips always disappear first!
 Measure your spices into a cup & carefully mix together. (Sometimes, I only use half this mixture & sprinkle the rest over chunky raw potato slices, drizzled in olive oil, to make spicy wedges in the oven – bake at 220*C for 25 minutes & serve with a cooling dip, like Greek yoghurt mixed with a few chopped mint leaves).
 Take a couple of pieces of chicken, coat them in the egg & shake off the excess. Chuck them in the breadcrumb mixture & pat this onto the chicken to ensure it’s coated well. Place them into the roasting tin & repeat until you have coated all the chicken. Drizzle more olive oil over the top (drizzle, not drown).
 Spread them on a huge plate for people to help themselves – turn it into a starter with a salad, a couple of potato wedges & a yoghurt & mint dip, or leave them to cool before freezing them in a bag until needed. Job done!