

![]() It’s been a funny old year so far, like one of those intense mystery novels with one dizzying plot twist after another. None of us know what’s going to happen next, the author has gone rogue & the leading characters are all bickering with each other like petulant, hungry teenagers. When everything seems to be a swirl of stress & stomach dragons are grumbling, never fear – comfort food is here! A proper dinner helps calm grumbling of all kinds, soothing those pesky stomach dragons & restoring a little peace (albeit briefly).
It’s been a funny old year so far, like one of those intense mystery novels with one dizzying plot twist after another. None of us know what’s going to happen next, the author has gone rogue & the leading characters are all bickering with each other like petulant, hungry teenagers. When everything seems to be a swirl of stress & stomach dragons are grumbling, never fear – comfort food is here! A proper dinner helps calm grumbling of all kinds, soothing those pesky stomach dragons & restoring a little peace (albeit briefly).
Preparing a meal is something I truly enjoy. It’s impossible not to feel relaxed, while creating something so comforting & satisfying. The whole process requires you to focus on each task & that in itself  seems to release any tension. It’s not as precise or technical as some recipes, but it’s sheer ease brings a sense of peace as you create a meal for your family. My adoration of Italian food began when I was a teenager & this is a rush-less ragu recipe I’ve been making for my family ever since. It is at the heart of my homemade meat lasagne, slowly baked between blankets of cheese sauce & sheets of homemade pasta, regularly shared as a Sunday dinner & often accompanied by my Husband’s focaccia (he’s quite a talented baker). Sometimes I make it with sausages, sometimes beef or both, usually whatever I’ve got in the freezer (I freeze meat in small batches for this very purpose).
 This is a family-sized recipe & will serve at least six people generously (it makes a decent six portion lasagne too, although I have stretched it to eight on occasion). Keep some handy in the freezer for when you’re short on time (make sure you use fresh beef or sausage if you intend to freeze it though, not previously frozen).
A ragu is not fast food – to me it means “Relax And Gradually Unwind”, so just take your time & go at your own pace – there’s definitely no rush. Ready to ragu? Hands washed & aprons on!
What you need:
200g Minced Beef or 4 Plain Pork Sausages, skins removed (or half beef & pork)
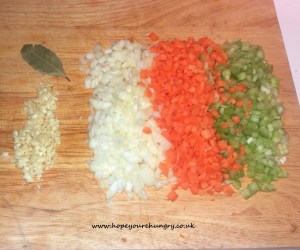
2 medium Carrots, washed, peeled & finely chopped
2 sticks of Celery, washed & finely chopped
1 medium Onion, skin removed, topped, tailed & finely chopped
2 tins of Plum Tomatoes & their juice
1 generous tablespoon Tomato Puree
1 or 2 dried Bay Leaves (if you’re unsure, just use one)
1 sprig fresh Rosemary (approx 6″ long), leaves chopped finely
3 or 4 cloves garlic, chopped/sliced finely
2 tablespoon Extra Virgin Olive Oil
A splash of Balsamic Vinegar (the good stuff – about a teaspoonful)
Seasoning – Sea Salt & Black Pepper, both freshly ground
What to do:
Firstly, prepare your garlic, carrots, onion & celery. Make sure you wash the carrots & celery thoroughly to remove any grit or dirt. Peel the carrots & trim the ends off them & the celery. Chop finely into mini pieces & set aside on your board.
Next, peel the garlic & onion. Top & tail the onion, then chop finely as before – you can always use the food processor for this if you prefer. Here’s a little tip from me: wear sunglasses to help reduce any tears (obviously not dark ones, you need to see).
Chop the garlic finely & then the Rosemary. Remove the spindly leaves from the stem first – I save these for making mini-tomato & vegetable kebabs.
 Heat the oil in a large skillet or deep frying pan on a medium heat. Add the carrot, celery & onion & fry for a few minutes to soften. Keep them moving around the pan, so they don’t catch & burn.
Add the meat – squeeze the sausages from the skins straight into the pan if it’s easier. Break any big chunks into finer pieces (I use tongs for this, but a wooden spoon or spatula is just as good). Stir fry until the meat is thoroughly coloured & all the pink has disappeared.
Season with a little salt & pepper, sprinkle in the garlic, Rosemary & bay leaves, giving everything a good stir (the scent is fabulous). I don’t add the garlic at the beginning, because it can burn quite quickly & lose it’s sweetness.
 Next, add the tomatoes – I tend to buy the whole plum tomatoes & squish them by hand, evenly over the pan. Yes, it’s messy but you’ll wash. Half fill each tin with cold water to swirl out those last little drops of tomato juice into the pan too – we don’t waste anything!
Add the tomato puree & a good splash of balsamic vinegar (even a few drops makes all the difference). Reduce the heat to low & let it softly simmer for about 30-40 minutes, stirring occasionally.
Give it a taste, then add a little salt & pepper as needed (depending on the sausages you use, you might not need very much). Using a clean spoon, taste it again to make sure it’s to your liking (seasoning is a personal thing).
 Once you’re happy, let it bubble away on a gentle simmer for another 30 minutes or so, until reduced to a rich, thick meaty sauce. Give your ragu another quick taste to check the seasoning is good & adjust it if you need to. To test if it’s done, drag the spoon through the middle (the parting of the ragu) – if it leaves a gap & you can see the bottom of the pan, then it’s ready!
 Get the family together, grab a fork & get stuck in! It makes a sumptuously lazy supper generously spooned over spaghetti (with a good scattering of grated Parmesan on top), or stuffed in a variety of pasta parcels & shapes. This versatile rich meat sauce is especially fabulous layered up in lasagne – here’s the link to my vegetable lasagne recipe, just swap the meat ragu for the vegetable one: https://hopeyourehungry.co.uk/perfect-pastafication/
 Sometimes, I’ll use the leftover meat sauce in a pasta bake (brilliant when you’re short on time & easily feeds two people comfortably). Pre-heat the oven to 180*C. Pop a couple of generous spoonfuls of ragu into the bottom of a small baking dish. Next, cook a couple of handfuls of fusilli (these twirly swirls make the best topping for this, as they are easily coated with the cheese sauce).
Make the cheese sauce while the pasta is cooking – melt 45g butter in a pan, then add 45g plain flour & stir well to make a thick paste. Slowly add 300ml of semi-skimmed milk, a little at a time & stir gently (I use a whisk to make  sure there are no lumps). As the sauce thickens, stir more vigorously until silky smooth. Add a small handful of grated mild cheese (approx 60g) & mix in until melted. Taste, then season accordingly with a little sea salt & freshly ground black pepper. Sprinkle generously with more grated cheese, dust with a little dried Oregano & bake for about 30 minutes.
 When it’s ready, the topping will have turned a gorgeously golden hue. Allow to cool for a few minutes before tucking in (just add a simple green salad & a little homemade focaccia for scooping up the sauce.
 When the world gets too fast, slow down the pace & make a little comfort in your own kitchen with a fabulously flavourful ragu – Relax And Gradually Unwind. Stay hungry! Aimee 😉 x

 blur into one another & before you know it, you’ve got a glass of fizz in one hand, a saucepan in the other & a houseful of hungry guests. Juggling your many hats is not an easy task – there’s the Work you, the Home you, the you who everyone turns to when things go backside up & then there’s the you who feeds everyone. Having a little time in reserve for yourself is rare & when you do get a bit of spare time, everyone wants a share of it. Sometimes, you have to be a bit selfish because if you don’t look after yourself, you won’t be able to look after anyone else. This time of year can be a real drain on you too, both physically & mentally, so we all need a bit of help every now & then (& a lot of coffee!).
 couple of (or ten) extra portions of everything & freeze them for future meals – there’s very little effort in peeling a few extra potatoes or chopping another couple of carrots (especially if you delegate). It’s like having your own fast food outlet in your freezer & all you’ve got to do is decide what you want for dinner! Trust me, after a long day at work & being tightly packed on a train for an hour, plus having at least a 20 minute drive home, you really don’t want to be faffing around with food when you get there. Be kind to yourself & with a little planning, you can be organised like a cooking ninja (just think of me as your Foodie Godmother).
 potatoes, crisp roasted parsnips & a golden-crusted, velvety cauliflower cheese, it really hits the spot! Leftovers are deliciously lovely – slice thinly for nibbling with cheese & crackers, layer with salad in sandwiches & a feisty mustard mayo, or chuck chunks into a creamy, cheese-enveloped pasta bake. I’ve fried it for breakfast, created some fabulous frittatas & it’s even graced a few of my homemade pizzas too!
 taste. The gorgeously gooey glaze gives it a deep rose tinted finish & the scent will definitely make you feel Christmassy! As it’s the time of year for making mulled wine too, I must confess that I have on occasion added the spices from my homemade version the night before (you can see some of the wine-coloured, slightly sozzled oranges in the photos below), with a few fresh spices thrown in – waste not, want not! This could possibly be the shimmering jewel on your table for Boxing Day & beyond. Ready to get your Glammon? Hands washed, aprons on & here we go!
 (including that paper circle around the edge), as you want all the lovely spices to impart their fragrant flavours into the meat.
 Bring to the boil gently, then turn down the heat until it’s just a bubbling simmer. It’s a bit like giving the gammon a spicy bubble bath & you don’t want any spillages.
 Put all the glaze ingredients into a mixing bowl & mash together. Make sure everything is mixed well into a gooey, gloopy syrup. Pour all over the gammon, making sure you coat it all over the top & sides thoroughly.
 rest for half an hour (I like to cover mine loosely with foil or greaseproof paper – just make a dome shape over the dish, so it doesn’t touch your glazed gammon).
 You won’t need to call your guests to the table – once your gammon is ready to dish up, there will be a queue of shiny little faces at the kitchen door waiting to taste it. If you do have any leftovers, try some of the suggestions I’ve made above (especially the pizza one – here’s the link to my pizza dough recipe to give you a bit of help:
  So there’s my gorgeously gooey & ever so slightly glamorous gammon. When you’re fed up of turkey or just fancy something spicy & special, get your Glam-mon! Stay hungry! Aimee 😉 x
 amber & ruby rouge coloured leaves in the garden. Sultry Autumnal evenings require soothing, slow-cooked, substantial suppers full of rich colour too. Working long hours or shifts, whatever your line of work or study, can have a knock-on effect when it comes to preparing a hearty, satisfying evening meal. As the nights start to draw in, we begin to crave richer & robust fayre to comfort us in the cooler evenings ahead.
 being turned into simple suppers & frozen in readiness for rewarding after-work dinners. Vegetables are sliced & chopped (my little food processor is an absolute treasure for this!), then popped into pans of water or stored in the fridge for when you just need a handful of veg. Pots of stock can defrost on a cooling rack, waiting to be whipped up into a rich, rib-sticking risotto, topped with a couple of
  roasted, crispy chicken legs. One of the best things about a risotto is there’s always enough left to make arancini for lunch the next day too, which means you’ve already covered meals for two days & there’s no waste!
 infuse into the sumptuous sauce. You can buy ready prepared chicken portions if you prefer & use whichever cut you enjoy. Chicken legs & thighs are perfect for this recipe as they are much more flavoursome, especially when they’re cooked on the bone. These portions of meat tend to be overlooked & so often wasted, yet they are a much cheaper, just as tasty alternative to chicken breast. If you do use chicken breast, you will need to reduce the cooking time as they cook quicker & the meat can go stringy (don’t worry, I’ll remind you later on in the recipe).
 6-8 cloves fresh Garlic, chopped finely or crushed
 Heat 2 tablespoons of olive oil in a large skillet or frying pan, then fry the chicken portions skin side down for about a minute. Add the bacon & fry this alongside the chicken.
 Once browned, transfer the chicken & bacon to a large casserole dish. Using scissors, snip the bacon into pieces & scatter over the chicken, then put the lid on.
 Usually, while it’s resting, I’ll pop some dinky jacket potatoes on metal skewers in the oven. By the time they’re done, the chicken will have rested sufficiently & you can dish up!
 This recipe is brilliant for freezing, just spoon leftovers into individual pots or bags & freeze (lay an open freezer bag in a bowl, then fill & seal – it won’t move around & spill sauce all over if you do it this way). Defrost & warm through when you fancy something warming (great for those evenings when you know you’re going to need a speedy supper!). Any leftover sauce is really versatile too! Simply freeze in single portion pots & use as much or as little as you need. It’s lovely ladled onto well-buttered jacket potatoes, poured over a pile of papparadelle, or even just heated up & eaten as a chunky soup with fresh crusty bread! I’ve even made a lasagne with it, layering between thin sheets of pasta & creamy cheese sauce.
 Driving home this morning, seeing the luscious much-needed rain has brought the gardens back to greenery & lowered the temperature slightly, I felt rather peaceful. Pretty flowers were less wilted & seemed to flourish, the herbs were more fragrant & our beloved willow tree had perked up again, waggling it’s beautiful branches in the Summer breeze.
 hands are cool, after washing them run your wrists under the cold tap for a few moments (trust me, it works).
 Tip the flour into a large mixing bowl & add one of the butter pieces. Rub it into the flour until it resembles fine breadcrumbs.
 Turn out your pastry onto a lightly floured worktop & shape into a rectangle. Roll away from you into a long piece, about a centimetre thick. Try to keep the edges as straight as you can, but don’t worry too much or you’ll drive yourself loopy! Using a dry pastry brush, dust off any excess flour as you go, especially when folding the layers (otherwise it may affect the recipe & you want flaky pastry, not floury).
 Take one of the three pieces of butter & cut into small chunks of about 1cm (you can just pull it apart, but the heat from your hands might melt it).
 Dust the worktop with a little more flour. Turn the pastry one turn to the right & roll out again, just as you did above.
 Lay your pastry on a piece of greaseproof paper, fold the top of the paper over your pastry & put it on a plate in the fridge for an hour (you might need to leave it longer during this heatwave we’re having, so probably add another ten minutes if you’re not sure – I’ve left it a couple of hours before & it didn’t do any harm). Get yourself a cuppa, put your feet up & read a book or something (if you’re like me, you’ve probably been whizzing around, so relax for a bit).
 Cut into two equal pieces & on one of them, brush a little melted butter all over the top & sprinkle on two thirds of the cheese.
 Brush the top of your cheesy pastry with beaten egg – just the top, not the edges, otherwise your pastry won’t rise properly.
 Place on the baking tray & repeat with the rest of the pastry, until you have a couple of trays of twirly swirls with about half an inch between them.
 Bake in the centre of the oven for about 10-12 minutes, until they have risen & turned a gorgeous golden hue. Carefully transfer them onto a cooling rack using a pallet knife or thin spatula. Remember the crunchy cheesy chips? Shake them into a dish for sprinkling on salad as a crispy garnish or just eat them as they are – Chef’s perks!
 Serve your cheesy sticks either on their own or maybe dunked in an oozy, warm baked Camembert with a glass of chilled wine (you’ve worked hard & deserve a treat). I doubt they will last long, but if you do have any leftover just pop them in an airtight container (they will keep for a couple of days, so I’m told).
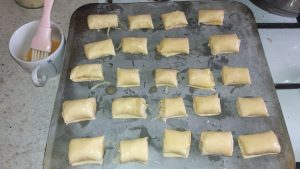 If you want to make an alternative to cheese twists, just make cheese “sausage” rolls – instead of cutting into strips, cut into wide ribbons. Lay grated cheese across the top half of the pastry ribbon, brush a line of beaten egg on the opposite edge of the pastry & roll over, carefully encasing the cheese inside. Press lightly to stick the roll together, then cut into inch long pieces & brush with egg.
  Bake at 220*C for about 10-12 minutes, until golden & risen. Transfer to a baking tray to cool for a few minutes before serving. Great for lunches, nibbles or parties.