

 There’s something truly special about Autumn mornings. Early morning walks in the local woods reveal a ravishing crop of colour – from auburn red & golden yellow leaves to deep green holly, their spiky & spectacular foliage defiantly remaining gloriously glossy amongst the backdrop of crisp, colourful leaves, deliciously damp air & thorny hedgerows bearing beautiful fruits.
 Seasonal fruits & berries are especially full of flavour, perfect for packing into an array of pastries & pretty desserts. Then there are those less-than-perfect pickings, the ones that don’t quite have the same aesthetic appeal – these are my favourites. Those punnets of berries marked down in the shops are like gold! Perfection is OK, but it doesn’t always mean flavour. Maybe they’re a bit squishy or rather over-ripe, but those berries are full to the brim with flavour & can be turned into tasty treats galore. A recent trip to the local shops resulted in a bag full of berry deliciousness, perfect for a homemade jam-session.
 This is one of my favourite & easiest ways to turn that berry bounty into a juicy jammy-crammed spread for cakes, toast & treats. It’s not overly-sweet, having a slight twangy tartness that gives it a fresh-fruit flavour. Also, you can use fresh or frozen fruit, or both – I like to mix them, topping up the fresh with frozen ones whenever needed. Now, before you start rolling your eyes & wandering off, jam making needn’t be difficult, time-consuming or messy. Trust me, I’m not one for faffing around in the kitchen – this is literally punnet-to-pan jam in under 30 minutes (not including waiting for it to cool though – I’m not a magician!). Intrigued? Hands washed, aprons on & let’s get jamming!
What you need:
400g Fresh or Frozen Raspberries
200g Fresh or Frozen Blackberries
300g Sugar (I use regular sugar, nothing fancy)
2 tablespoons Freshly Squeezed Lemon Juice (half a lemon approx*)
2 tablespoons Cold Water
(* Keep that squeezed lemon half for the end of the recipe)
3 Jam Jars & Lids (the mixture makes 2 full & 1 half jars approx)
3 Cupcake Cases (all will be revealed later)
1 Medium-sized Oven-Proof Glass Bowl
1 Stainless Steel Saucepan (not your best non-stick one)
1 Small Plate or Saucer
What to do:
Firstly, let’s do a little prep! Put the small plate or saucer into the fridge for testing your jam at the end.
Next, here’s how I sterilize jam jars. Pre-heat the oven to 165*C. Wash the jars & their lids in hot soapy water, rinse & shake off the excess water. Place them on a clean baking tray in the oven (keep the jars the right way up) & bake for 10 minutes or so. I like to get these washed & ready to go in the oven for when I start making the jam, so it saves time (multi-tasking at it’s finest!).
Remove the tray from the oven & leave on a cooling rack – do not touch the insides of the jars or lids once cooled (or you’ll have to start again).
 That’s the prep done, onto the jamming! Pop the berries into the saucepan, add the water & fresh lemon juice, then gently heat on low for a couple of minutes, stirring occasionally. This is to soften the fruit skins & allow the juices to be released. For those of you asking, “where’s the pectin?”, it’s in the lemon juice – all citrus fruits have large amounts of natural pectin in them & that’s what helps with the firming process of jam. It also saves you money, because you don’t need to buy special sugar for this recipe.
 Remove from the heat, add the sugar & stir gently to dissolve into the fruit. Put the pan back on the heat & turn it up a little, until the fruit begins to boil. Bubble away for about 15-18 minutes. Important bit – DO NOT STIR! Swirl very gently if you must, but set that spoon down!
To test the jam, scoop a teaspoonful onto the cold plate & tilt it slightly. The jam should move a little, but very slowly, if at all – that’s how you know it’s ready.
 Carefully, scoop into a clean, heat-proof glass bowl & cover with clingfilm – press it gently onto the surface of the jam, so you don’t get any condensation. If you don’t want any seeds in your jam, put a sieve over the glass bowl to strain. Rinse the seeds & tip into the composter.
Leave to cool until almost room temperature, then pop in the fridge for an hour to set.
While you’re waiting, the jam pan is looking a bit of a mess right now, so here’s how we turn it from sticky to sparkly again! Grab that half a squeezed lemon, rub it around the inside of the pan & leave it there. Add a tablespoon of bicarbonate of soda, a tablespoon of white vinegar & a good squirt of washing-up liquid – it will get fizzy & bubbly, don’t panic. Half-fill with hot water, give everything a good stir around & leave it to stand on the side for half an hour. Give it a wash in hot soapy water – all clean again! I use this method for cleaning all my stainless steel pans & trays (I also use it for cleaning the cooker top & oven, but that’s another story!).
 Time to jar up that jam! Get your freshly sterilised jars & scoop that jam into them, leaving a half inch space at the top of the jar. Place a cupcake case over the top, outer side up & press over the jar, then put the lid on & tighten. Not only does it look pretty, but it helps make a better seal & also keeps your lids from getting gooey.
Once your jam is packed into pretty jars, either store them in the fridge or a cool pantry. Once opened, definitely pop them in the fridge. I cannot say exactly how long they keep, as it doesn’t last long enough. However, it’s usually a week or two before they’re completely demolished.
 Delectably dark & a gorgeously glossy garnet shade, this beautiful berry-crammed jam is so flavoursome! Perfect spread on toast, sandwiched in a spongecake or simply spooned into pastry cups to make the jammiest of jam tarts. Try adding a tablespoonful to a cup of Greek yoghurt, swirled around to make the most vibrant fruity breakfast treat. So next time you see punnets of pretty berries looking lost & unloved, pick up a few & get jamming! Stay hungry! Aimee 😉 x

 Spring has arrived, a flourish of foliage appearing on the trees & new growth in the garden. This is also a time of Spring cleaning & doing all those jobs you wanted to do over the Winter, but it was too soggy & cold. A little bit of sunshine does everyone the power of good too. While we were out recently, we decided to have a little treat for lunch – a small cheeseburger & fries. It was not my finest decision & reminded me of a line in a film – “what’s wrong with this picture?”. The fries were hot but tasteless (no salt) & the burger was sad, cold & rather flat in every respect. You could have bounced the bun down the motorway, it was that stale! On the way home, my Husband suggested we make our own burgers. Although it’s not my forte, I said “hold my spatula!” & that’s how the delicious Dunn Burger happened (named by my wonderful Husband).
 Fast forward to today & I’ve recreated my delicious burger with a few supporting acts – homemade buns, crispy baked onion rings & my chunky “Aimée chips”. It took me a whole afternoon to make everything, but it was definitely worth it & let’s face it, if you’re going to do something, might as well do it properly. Also, I’m no expert on burgers, this is just the way I do it.
 Divide the beef into four equal pieces & gently shape each one into a ball. Be careful not to squeeze them too much, otherwise they will be tough & won’t cook properly.
 Once the bacon has started to get some colour to it, transfer the bacon to a baking tray & cover with foil.
 Once your burgers look gnarly & you’re happy with them, pile up a little cheese on each burger & cover with a large saucepan lid or cake tin for a couple of minutes – this will help to melt the cheese. If you use a cake tin, remember it will get hot, so use tongs to lift it off your burgers.


 Knead firmly for about 8-10 minutes, stretching the dough away from you with the heel of one hand & pulling it back towards you. Try not to tear the dough as you do this. Repeat & keep going until the dough is a smooth & supple ball. If you need a bit of flour as you knead, sprinkle a little onto the worktop & use the pastry scraper to loosen the dough if it gets sticky.

 prove for another 20 minutes, until they have doubled again.
 To check if your buns are baked, pick one up & tap the bottom – if it sounds hollow, they’re ready.
 top with a spoon of squished tinned tomatoes (tip them in a bowl & get your hands in). Then add slices of mozzarella or whatever cheese you like, a few mushrooms or peppers & maybe some ham. Sprinkle with a little Basil, Oregano & black pepper, dust with Parmesan & bake for 8 minutes in a hot oven (220*C) – easy mini bun pizzas! They’re perfect as a light lunch, swift supper or a simple cheesy snack.
 onion rings & deliciously chunky chips. These two sides are a well-loved staple in our household & with good reason.
 light & crisp, tasting much naughtier than they actually are. Before you start worrying
  Drizzle well with the olive oil, then dust with a good pinch each of black pepper & sea salt, about a quarter teaspoon. Tip: if you’re preparing these in advance, do not add the salt until you are ready to cook them. The salt will make them rock hard & no amount of cooking will soften them up.
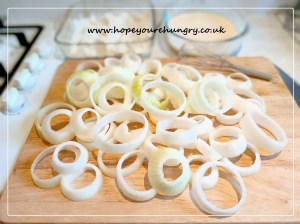 In another shallow dish, crack the eggs & add the Greek Yoghurt, along with a little salt & pepper again. Give it a good whisk with a fork to break up the eggs & blend into a thick, gloopy liquid.
 Repeat this until all the onion rings have been dipped & dunked in egg & flour. Place them all next to each other on the baking tray & don’t worry about them touching too much.
 Once they’re crispy & bronzed, carefully remove the onion rings from the tray using a fork or tongs & place onto a cooling rack with a bit of greaseproof paper underneath (just in case there are any oily drips).
 always a busy month for us, celebrating birthdays in the first few days & our anniversary later in the month (there’s much cake to be baked & eaten!). Breakfasts, lazy lunches, pasta & Prosecco have all been enjoyed on the patio, while the plants have been abundant with their produce & easily picked for dinner.
 coffee & a few kisses, before wandering back to work. This brief interlude would put a pep in my step & make the afternoon brighter – we have now have resumed our mid-day meet-ups. Even though we are all in much closer proximity at the moment, it doesn’t mean we should become territorial about sharing space with our loved ones.
 couple of this & a couple of that. We’ve all bought a tin of this, a packet of that, hoping to use it in some elaborate & exquisite dish, but shoving it to the back of the cupboard. Bits of leftover dried pasta, a random tin of beans & that twisted up tube of tomato puree with a tiny bit left. All seemed a bit pointless when you popped them in there, but now they are like gold dust! You might notice I’ve used spinach instead of Cavolo Nero or cabbage. This is simply because I like spinach on my pizza & there’s always a bit leftover, just enough to chuck in a soup or whizz into a delicious pesto, as you will know if you’ve been following my blog. Over the years, I’ve adjusted the recipe to accommodate whatever ingredients were available, but it always has the same result – soupy satisfaction!
 Add the onion, carrot & celery to the pan, mixing well with the bacon & oil. Give everything a good stir & fry for about 4-5 minutes, until slightly softened & the onion become glossy.
 Add the tomato puree, tip the chopped spinach into the pan & get stirring, mixing everything together.
 Using a clean spoon, have a taste of your soup & adjust the seasoning to your personal taste (get a clean spoon before tasting again). It’s worth noting that any stock (homemade or shop-bought), along with bacon, contain salt, so you shouldn’t need to add much. When you’re happy with the flavour, turn off the heat & tuck in!
 Although an everyday soup, it can also be turned into a souptacular starter. Got a bit of day old bread that needs using up? Make your own croutons! Cut into cubes (as chunky or dainty as you like), drizzle with a little olive oil & bake on a tray in the oven at 220*C for about 10-15 minutes (give them a shake halfway through cooking). Once bronzed & crisp, tip them onto a sheet of greaseproof paper on a cooling rack, before transferring to a serving plate for people to help themselves. Pile a few in the centre of your soup, swirl with a little olive oil & a dusting of grated Parmesan. That’s it!