

 It’s this time of year that always seems magical. Trees have an abundance of Autumnal toned leaves, as they tumble around like confetti on the breeze, swooning in swathes wherever they land. Late blooming flowers appear, their vibrant blossoms adding some freshness to the greenery that remains. Although it’s November, the sun shines just as brightly as in earlier months, spilling spectacular shades across the skies as it arrives & departs each day.
It’s also a great time of year for those comforting dishes, the ones that really hit the spot when you need it. Sumptuously slow-cooked stews, deeply filled fruit pies & crisp flaky pastries. We all have our favourites,  especially those childhood dishes that evoke fond memories of deliciousness. The mere mention of puff pastry takes me to a stool in my Mum’s kitchen, watching her create all kinds of pastry treats & especially savoury pasties. She would make shortcrust pastry ones, filled with her heavenly homemade stew (our version of a Cornish pasty). Leftovers would be lovingly wrapped in fabulously flaky pastry parcels, deliciously warm & comforting. And then there were my favourites – crisp buttery puff pastry packed with mashed potatoes, cheese & onion. There would always be some mashed potatoes leftover from the previous night’s dinner, just enough to make a few pasties for lunch the next day.
Now you all know that I prefer homemade puff pastry (all butter & no unnecessary ingredients!), but we don’t always have the time. This recipe is one that was passed on to me & one I make often for both savoury & sweet treats. It’s a faster flaky pastry with all the buttery crispness of puff pastry, but takes much less time to make. Also, don’t worry about special pastry cutters or equipment. All you need is a small side plate or saucer & a sharp knife. You should get eight good sized pasties from this recipe, so plenty to go around. Ready to bake it happen? Hands washed, aprons on & here we go!
What you need:
For the Pastry:
8oz Self-Raising Flour (plus additional for dusting your worktop)
5oz Salted Butter, cold from the fridge or at least chilled so it’s firm
100ml Cold Water
1 large Egg, beaten (for glazing the pasties)
1/2oz Melted Butter (for the tin)
For the Filling:
Approx. 8oz Potatoes, peeled & chopped into small chunks
1 tablespoon Semi-Skimmed Milk
1/2 a teaspoon Sea Salt
2oz Butter
4oz Cheese, grated (I use whatever I have in the fridge)
1 medium Red Onion, finely chopped
Freshly ground Black Pepper & a little Sea Salt
Fresh Thyme leaves (just a couple of sprigs)
What to do:
First, let’s make the pastry. Sieve the flour into a mixing bowl. Cut the butter into small pieces, dropping them directly into the flour.
 Using your fingertips, rub the butter chunks into the flour a little – we don’t want it like fine breadcrumbs, more like a rough rubble texture with plenty of lumps. This is just breaking down the butter a bit to make rolling easier.
Using a round ended knife, stir the water into the flour mixture to form a soft dough – the bowl should be clean when you’ve finished.
Tip the dough onto a lightly floured worktop & shape into a rough rectangle. Dust your rolling pin to stop it sticking & roll out the pastry until about half a centimetre thick.
Fold into thirds (fold one end into the middle, then the other over the top), turn it 90 degrees, then roll again (remember to re-dust your work surface to stop it sticking). Repeat this once more, then very loosely wrap in a sheet of greaseproof paper & place in the fridge for about 15 minutes or so. This will allow it to rest & the layers to form.
While the pastry is resting, make the mashed potatoes. Fill the kettle with water & put it on to boil. Cut the potatoes into small chunks, about a centimetre (this will help them cook faster) & chuck in a deep saucepan.
Add the sea salt & carefully tip on the boiling water from the kettle (no standing around waiting for the pan to heat up), just enough water to cover the potatoes. Put the lid on & simmer for about 8-10 minutes, until soft enough to cut easily. Drain well into a colander over the sink. Give the empty pan a quick wipe with a cloth to remove any moisture, then tip the potatoes back into the pan, ready for mashing.
Add the semi-skimmed milk & butter, then get mashing! It’s up to you how mashed you want them (personally, I prefer a bit of texture to my mash & always use a manual hand-held masher). Leave to cool with the lid off (don’t be tempted to put the lid on, as it forms condensation & you’ll end up with watery spuds).
While the mash is cooling, pre-heat the oven to 220*C & prepare your baking tray. Line it with a sheet of greaseproof paper, lightly brushed with the melted butter (the butter will add colour & crispness to the underside of the pasties as they bake).
Add the finely chopped onions & grated cheese to the potatoes, along with a little seasoning & a sprinkling of Thyme leaves. Give everything a good stir & have a quick taste to make sure you’re happy with the filling (this takes restraint, because I could just eat it from the pan at this stage). Set aside.
By now, your pastry will be ready to roll. Lightly flour your work surface & rolling pin, then roll out the pastry to about half a centimetre in thickness. Make sure it’s nice & even, but don’t worry about being too precise.
 Place your saucer or plate on the pastry, cutting neatly around the edge & repeat until you have cut out as many as you can. Where you have leftover pieces of pastry, place them on top of each other, reshape & roll out again. Sometimes, I’ll just shape these last ones with my fingers rather than cutting them out again (trust me, it will all be fine once they’re baked).
Take one of the circles & roll lightly from top to bottom, to make a more oval shape. Place a couple of spoonfuls of the potato mixture onto the lower half of the pastry, leaving about a centimetre edge of pastry uncovered. Repeat until you have all your pasties made.
 Brush a little beaten egg around the edge of the pastry & fold the top half of the pastry over, pressing the edges together to seal in your filling. From one corner of the pasty, gradually squish the edges together to form a crust, finishing at the other corner. Lift onto your prepared baking tray, prick holes with a fork in the top. Repeat this step, until you have all your pasties made.
Brush them well with the beaten egg & sprinkle on a little black pepper (or grated cheese if you like). Bake in the centre of the oven for about 25-30 minutes until gorgeously golden topped & piping hot.
 Place on a cooling rack for a few minutes – even if you’re eating them warm, they will be like the surface of the sun right now & melt your mouth. While they’re cooling a little, grab a few crisp salad leaves or some chunky chips (or both), pile them on a plate & tuck in!
Fabulously flaky pastry, filled with fluffy cheesy potatoes & crisp red onion, these delicious savoury pasties are perfect for a light lunch or lazy supper. If you do have any leftover pasties, they can be frozen once completely cooled & reheated when you fancy one (pop them in the oven at 200*C, for about 15-20 minutes until piping hot again).
 These delicious pasties also make fabulous flaky finger-foods, great for picnics & parties – just make smaller nibble-sized ones & add a spicy tomato dip for dunking! I use my tomato sauce recipe for meatballs & add a pinch of cayenne to give it a kick (recipe link here: https://hopeyourehungry.co.uk/having-a-ball/). Next time you have a cheesy comfort food craving, try my easy cheesy mashed potato pasties! Stay hungry! Aimee 😉 x

 Gazing into the garden while sipping my first coffee of the day, there is an Autumnal air about it. The early sunshine is just peaking over the rooftops, causing the dew laden lawn to shimmer in the sunlight & perfectly summing up the Summer.
 inbetween. The poor plants don’t seem to know which way to turn & our multi-tasking willow tree has been happily soaking up the excess water, whilst providing welcome cool shade to the local wildlife. There are baby olives on our little olive tree trying to ripen, green tomatoes just starting to blush red & a bounty of blackberries waiting patiently to be plucked. The garden seems to be clinging on by it’s very leaf-tips to the last days of Summer, as Autumn has quietly arrived & begun to unpack her colourful attire across the landscape.
 amazing! From the tiny to the tawny, closed cup or open, the frilly or the flat, these fabulous funghi are just waiting to be turned into delicious dishes!
 stems work well), along with any mushroom stems, parsnip, bean or pea trimmings – wash everything well to remove grit & dirt, then chuck them all in a roasting tin with 2-3 pints of cold water, a splash of olive oil & a few good grinds of black pepper & sea salt. Cover it with foil to seal in all the juices & bake at 200*C for just over an hour, then strain & that’s it. Use it fresh, stick it in the fridge for a couple of days or freeze it. Save the veggies to whizz up into soups or sauces & pour any leftovers into jars for the fridge or ice cube trays to freeze.
 Next, although I have used two types of pastry (shortcrust for the base & puff for the lid), you could use shortcrust all over or just use shop-bought puff lids if time is limited – please make sure it’s proper all-butter puff to do your pie proud. If you do fancy having a go at making your own, here’s the link to my puff pastry recipe:

 Sprinkle in the plain flour around the pan & stir fry everything together until the flour has disappeared. This is going to make a roux in the pan, as it will absorb the butter & oil in the mixture, thickening everything up nicely.
 Tip the mushroom pie filling into the pastry lined tin & spread out well. Dip your finger in a cup of cold water & run it around the edge of the pastry.
 Put the pie tin on a cooling rack for a few moments to relax before serving. That’s it! Just get everyone around the table & dig in! Meaty but meatless, this mushroom-packed pastry goes well with either a generous scoop of cheesy mashed potatoes & steamed crisp vegetables, or a zesty green salad scattered with a few spots of aged Balsamic vinegar & toasted pine nuts. Slice it up cold for a luscious leftover lunch or freeze in slices for indulgent lazy suppers after a long day at work.

 decadent desserts. On my way back from the train station on Friday, I decided to pop into my local shops to pick up a chicken for dinner & somehow got side-tracked by the most delightful fresh figs. Anyone who knows me will tell you that I can’t just pop in anywhere for one thing & will always leave with a jam-packed shopping bag, crammed full of inspirational ingredients that take my fancy.
 slender slices of sweet, jammy baked figs took over, I swiftly put two trays in my basket.
  Turn out your pastry onto a lightly floured worktop & shape into a rectangle. Roll away from you into a long piece, about a centimetre thick. Try to keep the edges as straight as you can, but don’t worry too much or you’ll drive yourself loopy! Using a dry pastry brush, dust off any excess flour as you go, especially when folding the layers (otherwise it may affect the recipe & you want flaky pastry, not floury).
 Take one of the three pieces of butter & cut into small chunks of about 1cm (you can just pull it apart, but the heat from your hands might melt it).
 Dust the worktop with a little more flour. Turn the pastry one turn to the right & roll out again, just as you did above.
 Lay your pastry on a piece of greaseproof paper, fold the top of the paper over your pastry & put it on a plate in the fridge for an hour (you might need to leave it longer during hot weather, so probably add another ten minutes if you’re not sure – I’ve left it a couple of hours before & it didn’t do any harm). If you’re like me & like to get organised, this would be a good time to make the ice-cream (my recipe is a bit further down).
 Tip the Mascarpone & Greek yoghurt into a large mixing bowl. Add the vanilla extract, one tablespoon of the lemon juice & a good pinch of the zest (you want a subtle hint of lemon here, not a “smack you round the chops” kind of taste that makes your ears flap).
 Once you’re happy with it, spoon the mixture into a couple of plastic tubs, only filling about halfway up & put the lids on.

 Driving home this morning, seeing the luscious much-needed rain has brought the gardens back to greenery & lowered the temperature slightly, I felt rather peaceful. Pretty flowers were less wilted & seemed to flourish, the herbs were more fragrant & our beloved willow tree had perked up again, waggling it’s beautiful branches in the Summer breeze.
 hands are cool, after washing them run your wrists under the cold tap for a few moments (trust me, it works).
 Tip the flour into a large mixing bowl & add one of the butter pieces. Rub it into the flour until it resembles fine breadcrumbs.
 Cut into two equal pieces & on one of them, brush a little melted butter all over the top & sprinkle on two thirds of the cheese.
 Brush the top of your cheesy pastry with beaten egg – just the top, not the edges, otherwise your pastry won’t rise properly.
 Place on the baking tray & repeat with the rest of the pastry, until you have a couple of trays of twirly swirls with about half an inch between them.
 Bake in the centre of the oven for about 10-12 minutes, until they have risen & turned a gorgeous golden hue. Carefully transfer them onto a cooling rack using a pallet knife or thin spatula. Remember the crunchy cheesy chips? Shake them into a dish for sprinkling on salad as a crispy garnish or just eat them as they are – Chef’s perks!
 Serve your cheesy sticks either on their own or maybe dunked in an oozy, warm baked Camembert with a glass of chilled wine (you’ve worked hard & deserve a treat). I doubt they will last long, but if you do have any leftover just pop them in an airtight container (they will keep for a couple of days, so I’m told).
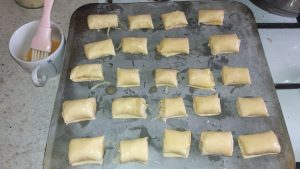 If you want to make an alternative to cheese twists, just make cheese “sausage” rolls – instead of cutting into strips, cut into wide ribbons. Lay grated cheese across the top half of the pastry ribbon, brush a line of beaten egg on the opposite edge of the pastry & roll over, carefully encasing the cheese inside. Press lightly to stick the roll together, then cut into inch long pieces & brush with egg.
  Bake at 220*C for about 10-12 minutes, until golden & risen. Transfer to a baking tray to cool for a few minutes before serving. Great for lunches, nibbles or parties.