

The Spring might seem a little way off yet, as this morning’s Wintry winds & persistent downpour are proving, however Nature is just as  persistent. Beautiful golden daffodils, delicate narcissus & tiny tête-à-tête trumpets are all blossoming on patios, windowsills & supermarket shelves, their slender sleeves tightly packed together with golden tips peeking out of the top, ready to burst into brightness! Nature is defiantly poking her tongue out at the world, with crocuses & snowdrops lining the grass verges too. It’s this beauty amongst the harshness of Winter that has been my inspiration recently, especially with the sugar art I’ve been creating. Just the scent of daffodils lifts the spirits, so I decided to try making a sugar version in their honour.

Family birthdays have been at the forefront throughout January, with three birthdays (including my Husband’s) arriving within ten days of each other – that’s a lot of cake to consider! After the end of year festivities, it’s always nice to make birthday cakes especially light, bright & slightly Spring-like. Thoughts turn to tiny flowers, pretty petite petals & floral freshness, inspiring me to create a very chocolatey, two tier birthday cake of slightly epic proportions for my Husband’s birthday (there are only two of us now, so anything  bigger than a regular cake is epic for us). The cake had four layers of rich chocolate cake in each tier & took me two days to make & decorate, but the actual decorations took just over a week & a bit to make, as they needed to dry/set before they could be added to the cake. Fred Bear, a white modelling chocolate creation I made, was sat by the cake with sugar paste balloons for the birthday boy (worry ye not readers, Fred is currently sat with some sugary friends & won’t be eaten – he took a while to make & is far too cute!).
Chilly weather always invites pudding after dinner & this recipe is  based on one my Mum used to make when I was a young girl, a flavoursome fluffy sponge cake crowning a layer of sweet fruit. Now, in those days this was made mostly with apples & earned the name Eve’s Pudding, however I’ve adapted it over the years & used other fruits (usually whatever’s in the fruit bowl that needs using up). This sumptuously sticky version is my Pearway to Heaven, made with really ripe eating apples & pears (apples & pairs is Cockney rhyming slang
  for stairs, hence it’s name). The delicious caramel syrup enveloping the fruit has a light, zesty flavour & will satisfy any sweet cravings during this cold snap, plus that fading fruit in the bowl will be used up, so no waste! If you’re buying fresh, check out any that are “wonky” or on sale – really ripe fruit has plenty of natural sweetness & requires less sugar. Ready to get your pud on? Hands washed, aprons on & here we go!
What you need:
6 Pears
4 medium Apples (eating apples, like Cox’s Pippin or similar)
3oz Salted Butter
3oz Light Muscovado Sugar
Half a ball of Stem Ginger, finely chopped
Zest of half a Lemon & an Orange, mixed together
Pinch of Ground Cinnamon
Quarter teaspoon of Vanilla Extract
For the Sponge topping:
4oz Butter
4oz Sugar
4oz Self Raising Flour (or Plain with 2 teaspoons of baking powder)
2 large Eggs
What to do:
Firstly, pre-heat the oven to 170*C & grease a casserole dish big enough to get your fruit in (a medium sized one should do). If you have the wrapper from the butter, these are brilliant for this job – I also save them & stash them in the fridge/freezer for future greasing of cake tins, etc – just fold them over butter side together & pop in a freezer bag. Once you’ve finished with them, they can go in the recycling.
 Next, prepare your fruit. Go through that fruit bowl & pick out any apples & pears that are about to walk out in protest, because they’re so ripe. The riper the fruit, the better the pudding.
Wash, dry & peel them, then remove the cores & trim away any brown bits. Chop into small bite-sized chunks, about the size of your little fingernail & put into a deep saucepan.
 Add the Muscovado sugar, butter, vanilla extract, sprinkle in the cinnamon & zest.
On a low heat, stir everything together until the butter & sugar have melted into a gooey, caramel sauce. Cook for about 5 minutes, stirring gently so as not to break up the fruit too much.
 Using a slotted spoon, scoop the fruit into the bottom of the greased casserole dish with the caramel sauce (be careful not to splash yourself, as it’s sugar & it will burn you!). There should be some liquid left over, so tip this carefully into a heatproof jug & put in the fridge to chill (you’ll be needing this later).
 Now to make the sponge cake topping! In a large mixing bowl, beat the sugar & butter together until fluffy (I do this with a wooden spoon, but you can use an electric whisk if you prefer).
Add the eggs & beat into the buttery sugar mixture until fully incorporated.
 Sift the flour into the creamy mixture & fold in (move your spoon around like a figure of eight in the bowl, scooping flour into the mixture). Make sure all the flour is combined into the cake mixture & give it a good stir at the end just to make sure.
Spoon over your fruit mixture evenly, gently spreading around to the edges (be careful not to press hard, otherwise it will sink). Don’t worry too much about any gaps at the edge, as the mixture will grow & cover these.
Bake in the centre of the oven for approximately 35-40 minutes, until risen & golden (your kitchen will smell absolutely gorgeous by now too!).
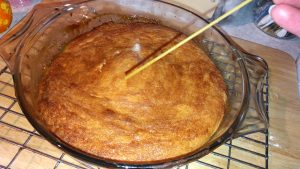 To test if your cake is ready, get a piece of spaghetti & gently poke it into the centre of the sponge. If it comes out clean, the sponge is done. If not, pop it back in the oven for a few more minutes & check again.
Once ready, place on a cooling rack to allow the pudding to rest & cool for about 10 minutes (it will be hotter than the sun & nobody wants a  mouthful of red hot lava-like fruit straight from the oven!). Trust me, it will still be warm & the sauce will soak into the bottom of the sponge cake nicely.
Scoop into bowls & serve with a drizzle of the leftover zesty caramel sauce. Add a splodge of ice-cream & get stuck in! The perfect pudding for warming up these Wintry evenings, my lightly zesty caramel version will satisfy those sweet after-dinner cravings. Try making it with plums, peaches or blackberries to create your own favourite & use up any fresh fruit that needs eating.

Next time your fruit bowl is looking a bit sad & squishy, turn it into a Pearway to Heaven Pudding! Stay hungry! A 😉 x


 until it was silky smooth (although simple to make, profiteroles need strong arms & plenty of stamina). Once baked & filled, these piled up plump little pastries would be generously glazed with glossy, rich chocolate sauce & adorned with sparkly spun sugar. I would watch in amazement as my Mum swiftly whipped a sugar-dipped fork through the air & glittery, golden sugar strands would appear as if by magic! Although I don’t tend to make spun sugar very often, I do still make proper profiteroles & once you have tried them, you’ll be hooked too. So, hands washed & aprons at the ready!
 Once cooled, your profiteroles are ready! If you are preparing them in advance, you can freeze them a few at a time in a single layer – they crisp up beautifully after a few minutes in a warm oven & you’ll be able to dish up a dessert at a moment’s notice.
 Generously drizzle warm, chocolate sauce over them & serve! You want the recipe for chocolate sauce, don’t you? It’s really easy to make & one of my favourite “chuck it all in a pan” recipes. I make jars of this & store it in the fridge or the cold pantry, then warm it up to make it runny enough to pour over cupcakes (it tastes fabulous spread on hot toast too). Here it is!
 the leaves, all the way around & it should come out. The more ripe the strawberries, the easier it is.
 When you’ve finished, you should have a beautiful strawberry sponge square cake (yes, I’m aware it’s not square, just go with it). Dust lightly with icing sugar all over the top (use a tea strainer for this & you only need about a teaspoonful of icing sugar to do the whole thing) & serve immediately.
 could just hide the rest in the fridge for nibbling on later (I think you’ve earned it!). If you don’t like strawberries, use blueberries or even your favourite jam. One of my favourite variations is to make a tiramisu filling instead of using cream, then mix some Sherry or Brandy with an equal amount of espresso coffee to drizzle over the sponge & replace the icing sugar on top with finely grated dark chocolate. Decorate with a few coffee beans & a sprig of fresh mint.