Weeks before writing this, I was already thinking about what fabulous foods to make for Christmas Day & what I could do beforehand. By  the end of November, I had already chopped, mashed & stashed an array of side dishes in readiness, cramming pots of fluffy potatoes, gorgeous gravy & cauliflower cheesiness into my freezer. Most of us work & don’t have the time to faff around in the kitchen, so a bit of prep now will make all the difference. It’s like giving yourself the gift of time! Because I’m covering a few things here, you will need some strong coffee to keep you going & a few Little Helpers to share the load (bribes at the ready if necessary!). This also works for Thanksgiving too.
If you have been following my blog, you will know I like to keep a supply of freezer-friendly food (here’s the link for speed: http://hopeyourehungry.co.uk/freezing-your-assets/ ) & Christmas is no  exception. A week or two before, I make a mountain of mashed potatoes & a giant cauliflower cheese (sometimes with broccoli), then freeze them in two-person portions (for the recipe, click on this link to my blog: https://hopeyourehungry.co.uk/super-cauli-flower-cheese-ness/). If you want your mash to look fancy, pipe into swirls on greaseproof paper before freezing (let it cool first though) & reheat when you want them! The only spuds you need to cook on Christmas Day will be roasts & maybe some steamed baby potatoes (because there’s always someone who won’t eat mash or roasts). These can be cooked along with the veg, cutting down on pans to watch & wash, & hunting for that ever elusive potato masher!

The freezer is also bulging with breadcrumbs – if a crust is going spare, it gets blitzed in the blender & bagged up (I can’t waste them & the birds are so well-fed in the garden, the trees are leaning!). Normally, I use these for coating chicken goujons or kievs, along with stuffing mushrooms or making arancini from leftover risotto, but they are also the main ingredient in stuffing.
Whilst I appreciate that some lovely person invented packet mix stuffing, if you’re serving anyone who is vegetarian or vegan then you need to check the box first. Most contain suet, which is either beef fat (& needs baking in the oven once rehydrated), or made from palm oil – it might be vegetarian but it’s not very ethical in my book! When I was a vegetarian, shop-bought stuffing went off my list  completely & I started making my own from scratch. It’s so simple, you can make it in advance & freeze it until you need it! If you prefer it inside the bird, just make your stuffing the day before, cover it & leave in the fridge. Depending on the size of your dinner party or the size of your bird, just increase quantities as required (I say “bird” because not everyone eats turkey, my family included, as we prefer chicken). Hands washed, aprons on & here goes!
What you need:
6 thick slices or crusts of Bread, blitzed in a blender (keep them chunky, not too fine)
 1 large Onion, finely chopped
1oz Salted Butter
1 tablespoon Extra Virgin Olive Oil
1 heaped tablespoon of Sage (I used fresh but you can use dried)
1 heaped teaspoon of dried Rosemary
Pinch of fresh Thyme (this is strong so you only need a bit)
Quarter of a pint of boiling water (you might not need all of this)
Seasoning to taste (freshly ground Black Pepper & Sea Salt)
[Optional: a teaspoon of Lemon Zest or a tablespoon of chopped roasted Chestnuts or Walnuts)
What to do:
Melt the butter & oil together in a large frying pan or skillet.
 Chop the onion finely & add to the butter & oil, stirring well to ensure it’s completely coated. Stir fry on a medium heat for a couple of minutes until softened & starting to colour slightly (don’t leave them, otherwise they will catch & burn). Turn off the pan.
 Sprinkle the Sage & Rosemary into the pan with a pinch of Thyme, add the breadcrumbs & stir well. The residual heat from the pan will bring everything together nicely, so just mix well. Season with a little sea salt & black pepper, stirring well again. If you’re adding the roasted chopped chestnuts or lemon zest, do this now.
Add a little of the boiling water, drizzling it around the pan & stirring to bring it all together into clumps. If it’s too dry, add a little more water & stir again. Once you feel the consistency is right, stop. It should be firm, not soggy. If you think it’s too soggy, add more breadcrumbs until firmer.
Pre-heat the oven to 200*C & if you’re making stuffing balls, lay a sheet of greaseproof paper on a baking tray. If you’re baking it in a dish, butter the inside of a casserole dish, scoop the stuffing mixture in & use a fork to make rough peaks on the top (these bits will go crispy when it bakes).
 If you’re making stuffing balls, get yourself an ice-cream scoop (spring-loaded will make your life easier & will also ensure they are all roughly the same size). Put some of the mixture into the ice-cream scoop (you don’t want to damage your pan by scraping it!) & press it in gently. Release the ball from the scoop, shape it into a nice sized ball in your hand & place on the greaseproof paper. Repeat until you’ve used the whole lot.
Bake your stuffing (whatever shape you make) in the centre of the  oven for about 15-20 minutes until golden brown on top, turning halfway. Once cooked, either serve immediately with your roast dinner, or place on a cooling rack (still on the greaseproof paper) & leave to cool completely. These can then be frozen & reheated on the day you want them. That’s the stuffing stuffed!
Next, it’s time to sort out some sides & as most of these are already done by the time Christmas arrives, there’s not that much to do on the actual day. A few days before, enlist your Little Helpers (or “Side”-Kicks?! *groan*) then go to your local Wilkinson or Poundshop, buy a couple of speed peelers & delegate a bag of veg to each person with one of these little numbers. Put some Christmas tunes on to get everyone in the mood (or some AC/DC, whatever floats your boat), get them all around the table & off they go! They can peel & prep, you can pretty much leave them to it & get on with anything else that needs doing.
A firm favourite of ours is roasted baby potatoes in their skins, along with roasted carrots & parsnips. Just prep as much veg as you need, according to the number of guests you’re expecting & leave to soak in a pan of cold water until required. Big tip here: don’t put any salt in the water, because no amount of cooking will make them soft & you’ll have rock hard roasties instead. Clean hands & aprons on!
What to do:
On a chopping board, cut the potatoes in half lengthways. If you want to give them a bit more texture, cut little slices in the curved top all the way along (hasselback style) to almost halfway through – don’t go all the way though, otherwise you’ll just have thin slices of potato! Cut the parsnips & carrots into chunky wedges, in a similar size as the potatoes – they can all go on the same tray (less washing up!). If you’re not cooking them right now, this is when you put them in some cold water until you’re ready for them. Before roasting, strain well & tip your roasting veg onto some kitchen paper to dry (because oil & water don’t mix, they spit!).
Spread some olive oil on a baking or roasting tin, put the potato halves in curved side down & then drizzle more olive oil on the top, give them a good sprinkle of the sea salt & black pepper. If you want to add some chopped Rosemary, sprinkle some on too (go easy with this stuff though, it’s quite strong). Get your hands in, toss the potatoes in the oil & seasonings, making sure they are well coated & return to their curved side down position, flat side up.
Bake them on the top shelf in a hot oven at 220*C, for about 15 minutes until they are sizzling & golden. If they have stuck a bit, just use a spatula or tongs (nothing metal though or you’ll damage your tray) & ease them away from the tin. At this point, turn them over carefully so you don’t splash yourself in hot oil & return to the oven for about 10 minutes or so until crispy, then serve. If you want to, you can always pop them on some kitchen paper to remove any excess oil, but I find a good shake in a sieve does a pretty good job & it’s not lard, so you’ll be fine.
The parsnips & carrots should be transferred to a warm heatproof dish, then while they’re still hot drizzle with a teaspoon of runny honey to glaze (drizzle, not drown remember) & they’re ready to serve.
 Once you’ve got your sides sorted, Christmas Day becomes a doddle – just take them out of the freezer the night before, pop them into an ovenproof dish to defrost & that’s it, prep done! They can be reheated in the oven while the bird is resting & the veg are roasting. This is also handy when unexpected extras turn up for dinner, because you’ll have a spare pot you can defrost (making you look like the most organised person ever & score major Brownie points!).
By now, you should have a sumptuous selection of sides prepared: mash, three types of roasties, veg for steaming & cauliflower cheese. However, there are still a couple of things that will finish off the list nicely – starting with a pimped up cranberry sauce.
Not everyone wants to make cranberry sauce from scratch (me included) & not everyone likes it, so do yourself a favour & buy a good  quality one that you like, then pimp it up with a few little tweaks. Simply scoop the whole lot into a small saucepan & break up with a wooden spoon, heating very gently. Add a shot of Sherry or Port, stirring carefully into the cranberry sauce. Sprinkle a little orange or lemon zest into the pan, about half a teaspoon, & stir gently for a minute or two. Pour it into a small dish to cool, then cover & put in the fridge until you’re ready to serve!
And lastly, all you need is a gorgeous homemade gravy! Everyone loves gravy & at this time of year, you might want to make proper gravy. It’s actually easier than you think & just needs a little patience! The best bit is you can make it before & freeze it, or make it on the day in minutes using heated stock you made previously or stock from your roast on the day. So grab a whisk & a saucepan ….
What you need:
1 pint of chicken stock (or vegetable stock)
4 heaped teaspoons of Gravy Browning (such as Bisto powder)
OR
2 tablespoons Plain Flour & 1oz Butter
A good glug of cold water (about 3 tablespoons)
What to do:
If you’re using fresh, hot stock from your roasted bird, simply ladle off  a pint into a jug. To remove any fat from the stock (that’s the golden bubbles you can see here), get yourself a few sheets of kitchen paper & touch it gently on the top – the grease will attach itself to the paper, which you can then throw away (no faffing around trying to separate it).
If you’re using the gravy browning, measure the powder in another jug (I use Bisto because my Mum uses it, so whatever you like best use that). You don’t need any seasoning, because there’s plenty in the gravy browning & also in your stock.
Pour in the cold water & mix to form a smooth brown liquid, followed by a quarter of the stock, then tip into your saucepan & heat gently for a few seconds, using the whisk to mix everything thoroughly.
If you’re using the flour & butter method, melt the butter in a pan & sprinkle the flour in to make a thick paste.

Add the rest of the hot stock carefully & keep whisking gently to prevent lumps forming. The gravy will begin to thicken up nicely now, so dip a spoon in & if it coats the back of the spoon, it’s ready.
Pour into a gravy boat or just a jug & that’s the gravy made! If you’re making it in advance, let it cool, then pour into a bag or plastic tub, seal & freeze.
And for those who like them with their Christmas dinner, here’s my Mum’s Yorkshire pudding recipe. It’s a lot easier than you think. The tip is to make sure your oven is really hot & the batter is really cold. This recipe makes a dozen & you’ll need a cupcake or patty tin for this. Here’s how to make them!
What you need:
2 large Free Range Eggs
4 1/2 oz Plain Flour
100ml Semi-Skimmed Milk, cold from the fridge
100ml Ice cold Water
Olive Oil (or Lard, your preference)
What to do:
Pre-heat the oven to 225*C. Put a drizzle of oil or a tiny knob of lard in each patty tin cup & put in the centre of the oven while you make the batter.
Tip the flour in a mixing bowl, add the eggs, milk & half of the water. Give everything a good whisk, just to combine & make a smooth runny batter. Add a little more water if too stiff – it should have the consistency of gloopy milk.
Take the tin out of the oven carefully, so you don’t spill the hot oil. Spoon or pour the batter into each patty cup & fill them up.
Carefully put the tin back in the oven & bake for about 20-25 minutes until puffed up & deeply golden.
 Remove from the oven & tip them onto a cooling rack. Either pile them up onto a plate for your dinner guests or let them go cold, bag them up & pop them in the freezer. Then when you fancy a Yorkshire pud, put them on a tray in the oven for about 4-5 minutes to reheat & crisp up – I like to use the residual heat from the turned off oven after cooking dinner. They’re also rather nice with a spoonful of jam & a drizzle of single cream (or tinned evaporated milk).
So now that your stuffing & some sides are prepared in advance, hopefully it’s taken some pressure off & you can look forward to a fuss-free festive holiday. Now, get the kettle on, put your feet up with a cuppa & relax. Stay hungry! Aimee 😉 x


 onion rings & deliciously chunky chips. These two sides are a well-loved staple in our household & with good reason.
 light & crisp, tasting much naughtier than they actually are. Before you start worrying about chips & onion rings being deep fried or not very healthy, the best bit is … there’s no frying required because they’re all baked! That also means no hot pans to stand & watch (because nobody has the time for all that).
 Drizzle well with the olive oil, then dust with a good pinch each of black pepper & sea salt, about a quarter teaspoon. Tip: if you’re preparing these in advance, do not add the salt until you are ready to cook them. The salt will make them rock hard & no amount of cooking will soften them up.
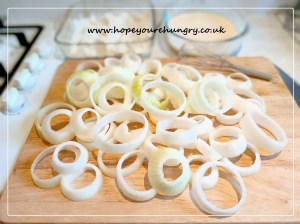 In another shallow dish, crack the eggs & add the Greek Yoghurt, along with a little salt & pepper again. Give it a good whisk with a fork to break up the eggs & blend into a thick, gloopy liquid.
 Repeat this until all the onion rings have been dipped & dunked in egg & flour. Place them all next to each other on the baking tray & don’t worry about them touching too much.
 Once they’re crispy & bronzed, carefully remove the onion rings from the tray using a fork or tongs & place onto a cooling rack with a bit of greaseproof paper underneath (just in case there are any oily drips).
 Perfect piled up next to a beautiful burger or simply stacked up as a savoury snack, these crispy baked beauties are delicious sides by side anytime! Stay hungry! Aimee 😉 x


 also the time of year my Husband & I met, so we always celebrate our first date (it involved a large Harley Davidson Sportster, a couple of hundred bikers delivering Christmas presents & rather a lot of tinsel!).
  Christmas Day. Some of these multi-tasking munchies can even be used as a starter, so make a few extra (which is my mantra, as you probably know by now). One of my favourites (& apparently everyone else’s!) are baked cheesy biscuits – you can serve them simply on their own or with a dip, or even pipe some cream cheese on them & decorate with chopped chives. They are really easy to make & the recipe is in my blog called “Grate Expectations” – here’s the link for speed:
  Scoop spoonfuls of the breadcrumb mixture into each mushroom – be generous & keep going until every mushroom is crammed full, then sprinkle with a little more cheese. Any leftover breadcrumb mixture, chuck it in the fridge for later (someone always turns up late or you might fancy a midnight snack). Scatter a few pine nuts over the top (these are gorgeous & have a sort of popcorn taste to them).
 If you’re preparing them in advance, cover in cling film now & pop them in the fridge until you need them (they keep until the next day at least). Otherwise, bake in the oven for 15-20 minutes until golden & gorgeous. These are great hot or cold, either on their own or with dips, or just with a green salad as a starter.
 prepped by one of your Helpers a few days before, then stashed in the fridge in airtight containers or bags, ready to be whipped out with a delicious dip anytime! If you fancy something different, try raw crunchy cauliflower florets (one of my faves), sliced peppers, sugarsnap peas & mangetout. Give them a good wash, trim the ends & stand them in a cup. One thing I don’t do at this time of year is make dips – I really cannot be bothered & what with all the other stuff to do, just buy some nice ones & store them in the fridge until needed. Simply scoop them into individual tea cups with saucers & dinky spoons (saving your table from splodges), rather than leaving them in a plastic tray – even if they do have one of those optimistic re-sealable tops, dips always disappear first!
 Measure your spices into a cup & carefully mix together. (Sometimes, I only use half this mixture & sprinkle the rest over chunky raw potato slices, drizzled in olive oil, to make spicy wedges in the oven – bake at 220*C for 25 minutes & serve with a cooling dip, like Greek yoghurt mixed with a few chopped mint leaves).
 Take a couple of pieces of chicken, coat them in the egg & shake off the excess. Chuck them in the breadcrumb mixture & pat this onto the chicken to ensure it’s coated well. Place them into the roasting tin & repeat until you have coated all the chicken. Drizzle more olive oil over the top (drizzle, not drown).
 Spread them on a huge plate for people to help themselves – turn it into a starter with a salad, a couple of potato wedges & a yoghurt & mint dip, or leave them to cool before freezing them in a bag until needed. Job done!

 to head to the local shops & pick up whatever is in season. Most people go shopping with a list; I like to just see what’s available, then decide what I can make from that.
 500g Stewing Meat – I prefer beef, but you can use whatever you like (adjust which herbs you use accordingly)
 Prepare the vegetables – peel, top & tail the carrots, onions & parsnips. Dice the onions. Chop the other veg into bite sized pieces – I usually cut them down the centre lengthways, then again & chop them into pieces. Share them between the two casserole dishes.
 Once it’s cooked, place the stews on a cooling rack or thick wooden chopping board. Using a fork & spoon, fish out the Thyme twigs & discard them – the leaves will have gone into the stew. If you want to thicken your gravy, my tip here is to strain some off from each pot, about half a pint each, then heat it up in a saucepan while stirring. This thickens it up nicely, without going like treacle. Then pour it back into each pot, stirring into the meat & veg,
  before serving in huge bowls with lots of fresh, thick cut bread to mop up the gravy.