

 It’s that time of year, when the hedgerows are bursting with delicious, deepest dark purple blackberries, just waiting to be plucked from their brambles. There’s something satisfying about picking fresh fruit that instantly transports me back to childhood – I would pick apples, blackberries, raspberries & cherries for my Mum to turn
  into the tastiest treats, carefully carried home (usually in my skirt turned inside out & filled with berries that stained – sorry Mum!). I’ve always grown blackberries in the garden – they are really easy to grow either in pots on the patio or along a hedgerow & the more fruit you pick, the more they seem to produce. Plus they have the prettiest little white flowers that the bees adore, so I’m doing my bit for them too!
One of the best ways to enjoy blackberries is encased in delicious pie, adorning slices of crisp apple & making them pink with their juice (although, I like to freeze a few & pop them in Prosecco to make blackberry bubbles!). Pastry making used to elude me. It is one of those voluptuous little vehicles that carry fabulous fillings into your mouth. Yet, despite it’s beautiful taste & crumbly texture, it can be a bit of a nightmare to make your own – mine used to resemble tasty cardboard! There are so many different types to choose from, then there are all the rules you should follow – keep your hands cold, only use your fingertips, don’t handle it too much, only roll it out once 28 degrees north while standing on one leg, blah blah. It’s exhausting just thinking about it!
 For sweet dishes, the basic pastry I make is just butter, flour, sugar & eggs. One of the best tips I’ve discovered is to use icing sugar – your pastry will be smooth, silky & really easy to roll. Depending on the filling, sometimes I’ll add a bit of orange or lemon zest (or both!). It’s always fabulously fluffy in the middle, with that melt-in-the-mouth buttery taste. I have used this recipe for all kinds of pastry delights & it is easy to adapt, so you can change it up as you need or leave it simple & let the filling do the talking. Hands washed, aprons on!
What you need:
12oz Self-Raising Flour (plus extra for rolling)
4oz Salted Butter, room temperature (slightly softened)
4oz Vanilla Sugar or Vanilla Icing Sugar (make your own – just pop a Vanilla pod in a jar of sugar overnight, or add 1/4 teaspoon Vanilla Extract if you don’t have time)
2 large Eggs
Optional: Zest of an Orange or a Lemon (or half of each mixed) – wash & dry them first to remove any wax or dirt (try to get unwaxed fruit if you can)
3 – 4 regular sized apples, washed, peeled, cored & thinly sliced
Large handful of blackberries, washed & drained well
2 tablespoons Vanilla Sugar (for the filling)
2 tablespoons of Milk for brushing on top
Half a teaspoon Ground Cinnamon (if you are using apples, a dusting of this fragrant spice will enhance the flavour)
What to do:
Pre-heat the oven to 190*C. Prepare your baking tin(s) – there is enough pastry here to make a large 12″ pie or a dozen small ones with lids, so it’s whatever size you are making. To prepare your baking tins, wipe the inside with butter using a piece of greaseproof paper or just your fingers, then dust with flour to coat the butter. This will make them non-stick & your pastry will pop out easily. If you are making a large pie, try using a loose bottomed pie tin (easier to transfer from tin to plate), or lay a couple of long, wide strips of greaseproof paper across each other in the bottom of the pie tin & hanging over the edge by a couple of inches (once cooked, simply lift your pie out). For smaller tartlets or pies, I’ve used patty tins & the silicone cases – they actually work quite well. Whatever tin or case you use, always place it on a baking tray for extra support & ease when removing from the oven later.
 Tip the flour into a large mixing bowl & then add the butter, eggs & 4oz of vanilla sugar or icing sugar. If you are using orange & lemon zest, add that too. Get your hands in the bowl & start mixing, squishing everything together to distribute evenly & make a pliable ball of pastry. Dust a worktop with flour & place the dough on top. Dust your rolling pin too (you don’t want the pastry to stick to it!).
Cut the pastry ball in two & set one aside (this will make the top of  your pie). Take the other pastry ball & roll it out, turn it & then roll again. If it’s a bit sticky, add another dusting of flour underneath before rolling – use a pallet knife to slide underneath if necessary. Try not to add too much flour to the worktop though, because it will combine with your pastry & become dry. Once rolled, transfer it to the prepared
  baking tin, making sure that there is no air between the pastry & tin. Use a floured finger to press it gently into all the corners or curves if using a fluted tin, or the dusted handle of a wooden spoon works really well.
 Once your pie case is prepared, add the filling. I use regular, uncooked ripe apples or pears that have been peeled & cored, then sliced thinly & fanned out over the bottom of the pastry case. Top with a few luscious blackberries, dusted with a little cinnamon & a good sprinkling of vanilla sugar. Don’t over-fill your pie case – just one layer of sliced fruit & a few berries is sufficient – too much filling will make it soggy underneath (never a good look!) & the pastry won’t cook.
Roll out the pastry top slightly larger than the base, then use your  rolling pin to lift it & gently roll it over the pie. Pinch & press the edges together into a pretty pattern using your fingers, all the way around until it is sealed up nicely. If you feel like being a bit creative, cut out shapes with the trimmings to decorate – add after brushing with milk, then brush them too. When I’m making a pie with blackberries in, I like to decorate with flowers, because they look a bit like blackberries & sometimes I’ll add pastry leaves too. It’s just to use up any leftover pastry trimmings – no need to throw them away, just create some pretty shapes for the top.

Brush with a little milk, then prick holes in the top with a sharp knife or a fork. Sprinkle a little vanilla sugar over the top. Bake it in the middle of the oven for about 25 minutes, until it is golden & the filling will be all bubbling out of the tiny holes you made. Don’t worry about the little pools of filling – they will bake into the pastry in the oven & it will be crispy, golden & lovely.
 After baking, remove your pie from the oven & place on a cooling rack. Leave it in the tin for a few minutes, as it will be easier to remove once it has cooled down a bit. Even if you are going to eat it hot, you don’t want to be burning your mouth – fruit fillings especially will be like molten lava & tend to be hotter than the sun, so give it a moment & save yourself (& your guests) some pain! If you’re going to eat it cold, just leave it to cool completely in the tin before cutting it.
 If you’ve used a loose-bottomed tin, just push the base up from underneath & ease your pie onto a serving plate or board. Slide a pallet knife gently underneath the pie to separate it from the actual tin base. If you’ve use the greaseproof paper method, simply lift it out & transfer to a plate, then slice, serve & share! There are a number of ways to eat this delicious pie, but simple is always best – serve warm with a scoop of soft vanilla ice-cream.
So next time you have an abundance of blackberries, forget the crumble & pack them in a pie! Stay hungry! 😉 Aimee x

 It’s been a very busy couple of weeks here, so apologies for the delay in writing – we had three birthdays within the first three days of August, plus there are a few more to come & a wedding anniversary at the end of the month. The anticipation of August arriving always hits me as July begins & reminds me of when I was younger – birthday parties being planned by my Mum, all kinds of pastries & party foods being prepared & she would always bake me a lovely birthday cake. One year, she made me a fabulous cake in the shape of a punk rocker’s head, covered in fluffy buttercream & complete with a magnificent multi-coloured mohican hair style! Everyone loved it & we all had different coloured tongues by the end of the party! If only I had a photo of that cake, but it didn’t last very long!
 My Grandma used to make the most amazing velvety rich chocolate cake, which was a well-loved family favourite. It was truly lovely – light, creamy chocolate buttercream would sandwich the fluffy, moist layers of cake together & completely coat the outside in a smooth, simple layer. Grandma would freeze some, so she always had a slice ready for unexpected visitors (you never know when you will need cake!).
 have a play around to find your favourite too – my Husband absolutely loves the coffee & walnut version of this cake. One tip I will share is to go easy on the wet ingredients, as they will affect the moisture of the cake & you might just end up with a soggy mess. Cake is all about balance, so remember that when you are baking & you won’t go far wrong.
 melted, let it cool for a few moments before pouring it into your buttercream (otherwise it will curdle & you will have to start again). Give it a good whisk (get the electric one out for this), until the chocolate is mixed in & then add a tablespoon of milk, just to give it a silky smooth consistency & a nice satin sheen. It should be easy to work with & thick, so you can either pipe it onto your cake or use a pallet knife to spread it onto the layers.
 If you make cupcakes instead of a large cake, these are more portable & you can make all kinds of fabulous treats! Create cupcakes with googly eyes using mini marshmallows & different sizes of chocolate buttons, or make cupcake shoes adorned with pretty pink cookie flowers.
 Even in Summertime, soggy mornings make me think of massive mugs of heavenly hot chocolate, teeming with a mountain of mini marshmallows on a cloud of whipped cream, dusted with chocolate shavings. It’s guaranteed to put a smile on even the sourest of faces, especially if there’s a chunky chocolate chip cookie to dunk in it. I must admit, I like my hot chocolate made the old-fashioned way – boiled milk, slowly poured over flakes of grated chocolate & whisked up until silky smooth with a delicate foamy froth. After one of these & a cookie, I can take on the world (albeit slowly!).
 Over the weekend, I was invited to a beautiful ladies’ afternoon tea at one of my lovely friend’s homes & took some of these naughty chocolate chip delights as a little gift for her (fresh flowers are nice, but you can’t really eat them!). These are based on a blondie recipe & are really rich & indulgent, because they are full to the brim with so much chocolate, then swirled & drizzled with more chocolate (just to make sure there’s enough in them!). The chocolate chip & peanut butter version was a kind of happy mishap – I was experimenting with the recipe & added a splodge of smooth peanut butter into each scoop, encasing that nutty, buttery centre in the cookie dough.
  As they bake in the oven, the peanut butter starts to melt & infuse the cookies (& kitchen) with that nutty flavour & sweet scent. Of course, they are drizzled with melted chocolate too & a few chopped, salted peanuts sprinkled generously on top – the slight saltiness complements the chocolate so well! These are not for the faint-hearted, nor are they for everyday munching really – they should be a treat, or for those days when you’re just feeling a bit pants & want a “pick me up”. If I’m feeling particularly decadent, I’ll make some with plain chocolate chunks & shards of stem ginger (my favourite), or chopped dried apricots with white chocolate pieces. The choices are as endless as your imagination! The best bit? They are really easy & take minutes to make. Hands washed, aprons on & here we go!
 Get yourself a medium sized metal ice-cream scoop (one with a spring loaded handle is best), then scoop dollops of cookie dough up & drop them onto the greaseproof lined baking tray. Leave a good couple of inches between them all – they will grow! If you want to save some for another day, you can always freeze a few scoops at this stage & just defrost them when you fancy a treat.
 Bake in the centre of the oven for between 16-18 minutes, then gently transfer the cookies onto a cooling rack. If you put the tin next to the cooling rack, you can actually pull the greaseproof paper onto the rack & then move the cookies directly onto the rack after. They will be soft until they cool, so be careful as they are more delicate than they look.

 If I had to count how many single portion meals I can get from one fresh chicken, I would have to say at least ten – yes, you read that correctly: ten! That’s ten individual meals from one regular sized chicken. I’m not Merlin the Magician, I’m just a mere mortal woman who insists on getting value for money & doesn’t like waste.
 Not only is it ridiculously more expensive (think of the wine you could buy!), but learning to do it yourself is a great skill to have & it’s very satisfying knowing that you’ve got meals in the freezer for when you can’t be bothered to cook.
 2-3 large Carrots
 Get yourself a large metal colander & place over a deep pan that covers all the little holes (I use my pasta pan for this) & tip in the carcass, veg & stock to strain through. I usually strain it again through a fine sieve to remove any sediment & that’s the stock done!
  That fabulously fragrant, golden stock will make a generous risotto for four people, or two portions of risotto & at least another four generous portions of beautiful arancini balls
 Then there are the very versatile chicken breasts – these are almost double the size of the ones you get in those pre-prepared packs! Usually, I can make four kievs per chicken (coating them in homemade breadcrumbs from leftover crusts),

 The first pasta I ever made was a very soupy looking lasagne when I was a teenager & it didn’t improve much until my twenties – it tasted very nice, but you needed a spoon to eat it. My pasta skills have progressed a bit since then & I am happy to say, you don’t need a spoon to eat my lasagne anymore (although I do recommend wearing an elasticated waistband).
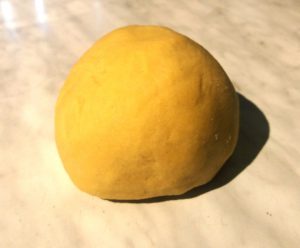 The recipe I use is 100g of strong ’00’ flour (or strong bread flour) & one large egg, per person (so if you’re cooking for three people, that’s three eggs & 300g of flour). However, I like to mix half flour with half fine semolina, which gives it that gorgeous golden, sunshine yellow colour (& everyone likes a little sunshine).
 work surface. Make a well in the middle, crack your eggs in carefully & combine them a little before using clean, cool fingertips to bring the flour in from the sides & gently combine into a lovely golden dough (it’s messy, but that’s half the fun).
 Knead for about five minutes until flexible, then wrap in cling film & leave to rest in the fridge for half an hour. After that, you can roll it out, stuff it with some fabulous fillings, or cut into ribbons (such as tagliatelle) & even hang some up to dry for another day (if you don’t have a rack, use a clean clothes horse). It’s that simple! If you do save some, remember to store in the fridge because it’s got fresh egg in it.
 To make ravioli, roll the dough out until it’s almost thin enough to see through. Lay it down on a flour dusted surface (sprinkle some semolina too – this will stop it sticking). Then simply add small splodges of your filling (about a teaspoonful), roughly an inch apart, down one side of the pasta sheet – sometimes I use a piping bag to do this (less mess & a bit quicker). Dip your finger in a cup of cold water, run it along the edge & between the fillings, before folding the other side of the pasta over the top. Press the edges down firmly, using a cupping action with
  the side of your hand to separate the fillings into individual bumps & remove any air. Cut them into little parcels using a ravioli or pizza cutter (or even a small cookie cutter) & set aside on a plate or board, again dusted with flour or semolina (or both).
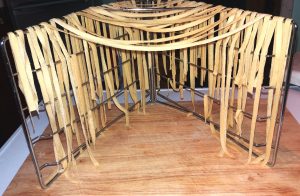 cook in about 2-3 minutes, so pick one out & have a taste to check – obviously, if you’re cooking ravioli or similar stuffed pasta, use your judgement on this & make sure the filling is piping hot. Then drain (saving a cup of the water) & serve as you like it- spoon on some sauce, or just add a drizzle of extra virgin olive oil & a sprinkle of black pepper. If your sauce is a bit too thick, add some of the cooking water to loosen it up a bit & make it silky smooth (you really don’t need much). All you need to do then is eat it!
 Speaking of sauce, usually I make my family recipe tomato sauce for this, but sometimes there’s a bag of salad that needs using up – perfect for homemade pesto. Try blitzing a couple of generous handfuls of fresh washed rocket, basil & spinach in a blender (I’ve used all sorts of leafy greens & lovely veggies from the fridge for this over the years). Add a good drizzle of olive oil, a few pine nuts (almonds or walnuts are good substitutes) & about an ounce of grated hard Italian cheese – I use either Parmesan or Grana Padana (sometimes a mixture of both), but it’s down to your personal taste here. You don’t need any salt – Parmesan will add that flavour. Add a little of the pasta water to thin it out a bit & spoon over your handmade ravioli!