

It’s fabulous Friday, the weekend is almost here (we call it the Preekend because it’s pre-weekend), so I like to make something special. When I was a young girl, both my Mum & Grandma would  bake all kinds of wonderful delicious treats, including the most beautifully light, crisp choux pastry (pâte à choux). I remember sitting in the kitchen, watching in amazement as my Mum vigorously beat the dough with such ease, making it seem so effortless. Of course, I learned later on there is a lot of effort that goes into them – although simple to make, profiteroles need plenty of stamina!
The best bit was when these plump little pastries would be generously glazed with glossy, gooey chocolate sauce & adorned with homemade sparkly spun sugar. My Mum swiftly whipped a molten sugar-dipped fork through the air & glittery, golden sugar strands would appear as if  by magic! Although I don’t tend to make spun sugar very often, I do still make proper profiteroles & once you have tried them, you’ll be hooked too. Ready to bake it happen? Hands washed & aprons on!
What you need:
4oz Plain Flour
2oz Salted Butter (plus extra for greasing trays)
A quarter of a pint of cold Water
3 large Eggs
600ml fresh Double Cream (for filling)
What to do:
Pre-heat the oven to 220*C.
Place the butter in a medium sized saucepan & add the water. Gently heat until the butter is completely melted, then bring to the boil.
Remove the pan from the heat & add the flour, stirring well.
Put the pan back on the heat, stirring continuously until the mixture comes together into a ball in the pan, then leave to cool.
Beat the eggs in a separate bowl.
Once the mixture has cooled, this is where you need your muscles! Grab a wooden spoon & gradually add the eggs a bit at a time, while beating them vigorously into the mixture, until you have a silky smooth golden dough. Then you’re ready to pipe!
Prepare your baking trays – smudge with a little butter, then run them under cold water & tip off the excess (you need a film of moisture to create steam in the oven to help raise them).
Tip your choux paste into a piping bag with round nozzle attachment (usually about 1cm sized). Sometimes, I like to use a star nozzle because it gives extra texture (which attracts more chocolate sauce later – planning ahead!). If you stand your piping bag over a tall mug or jug, folding the edges over the top to hold it in place, you can do this with ease & avoid losing your choux paste. Once filled, get rid of any excess air from the bag & twist the top tightly closed (after all that hard work, you don’t want your bag bursting!).
Pipe the mixture into round little dollops about an inch big, leaving an inch or two gap between each of them so they can grow.
Bake for 20 minutes until risen & slightly golden. Tip onto a wire rack & while they’re still warm, make a little hole in the side of each (gently poke the end of a knife in). Leave to cool.
 Once cooled, your profiteroles are ready! If you are preparing them in advance, you can freeze them unfilled & a few at a time in a single layer. They crisp up beautifully in a warm oven for a couple of minutes & you’ll be able to dish up a dessert at a moment’s notice.
Fill your piping bag with whipped cream & pipe into the tiny hole you made in each profiterole, until just full. Stack them up on your plate or put them in the fridge in a covered dish, but don’t leave them too long as they will go soggy.
 Generously drizzle warm, chocolate sauce over them & serve! You want the recipe for chocolate sauce, don’t you? It’s really easy to make & one of my favourite “chuck it all in a pan” recipes. I make jars of this & store it in the fridge or the cold pantry, then warm it up to make it runny enough to pour over cupcakes (it tastes fabulous spread on hot toast too). Here it is!
What you need:
4oz Butter, cut into small chunks
8oz Plain Chocolate, chopped into chunks
14oz tin of sweetened Condensed Milk
What to do:
Pour the milk into a dry small saucepan, add the butter & chocolate chunks.
Heat gently on low, slowly stirring with a whisk & making sure everything is combined, for about four or five minutes. It should be glossy, smooth & silky.
That’s it! Your sauce is ready, so pour it into a nice serving jug or sauce boat just before the dessert is plated up. This also makes a fabulous fondue with chunks of pineapple, whole strawberries or fluffy marshmallows dipped in (elasticated waistbands are advisable though).
 They even freeze well (unfilled), so you can have a stash ready for unexpected guests or just as a treat when you fancy them.
Those plump little pastries melt in a crisp, gooey cream & chocolatey mouthful within seconds, although they always linger much longer in my memory. Stay hungry! 😉 Aimee x

 Early mornings are the best time of day for me, when everyone else is either sleeping or getting ready to go out. It’s usually dark when I leave & I love catching that inky blue sky as it slowly melts into an array of pretty pinks & golds. It’s a serene time of day for me & as Christmas is getting closer, people are bustling about, bags bulging & feet burning, so I like to soak up the calm before the chaos.
 little cute creatures from my homemade modelling chocolate, ready to be wrapped & hopefully not eaten. This time of year can become a bit of a whirlwind of things to do & when this happens, I find it soothing to put on an apron & bake a cake. Cake should be created with care, not rushed but relished & enjoyed. A happy Cook makes a happy cake!
 known for, my Lemon Drizzle Cake. Lighter-than-air layers of lemon cake & whipped buttercream that seem to evaporate like a zesty zephyr with every mouthful. It tastes like freshly squeezed sunshine & sherbet lemons, almost defying you not to feel brighter & more cheery as you eat it. This recipe is for a seven inch three layered cake, perfect for afternoon tea with friends or a celebration of your own & yes, even Christmas!

 Add one egg, beating well until your mixture is glossy & fluffy. Repeat with the rest of the eggs, one at a time.
 Using the spatula, press it into the butter & scoop from the sides of the bowl, folding & pressing until all the sugar is squished into the butter to form a very stiff paste.
 Strain 100ml of the lemon juice into a measuring jug. Add the sugar evenly until the liquid has risen to 150ml – you should have an equal stripe of sugar & lemon juice in the jug.
 Time to start assembling your cake! Get yourself a lovely serving plate & remove the buttercream from the fridge. I’m going to give you a couple of tips here that I’ve learned over the years too.
 Using a stem of spaghetti or a skewer, poke several holes all over the cake.
 Take the next layer of cake, flip it over as before & carefully lay it on top of the buttercream, making sure it’s level & even.
 Sprinkle strands of fresh lemon zest all over the top of your cake, with a few on the plate around the edge. That’s it, your cake is ready to slice & share! I recommend keeping it as simple as this for an afternoon treat with friends, but if it’s for a birthday or celebration, decorate as you like!
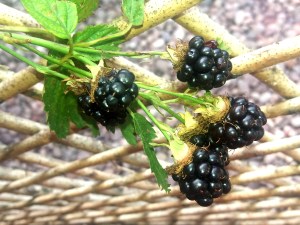 Gazing into the garden while sipping my first coffee of the day, there is an Autumnal air about it. The early sunshine is just peaking over the rooftops, causing the dew laden lawn to shimmer in the sunlight & perfectly summing up the Summer.
 inbetween. The poor plants don’t seem to know which way to turn & our multi-tasking willow tree has been happily soaking up the excess water, whilst providing welcome cool shade to the local wildlife. There are baby olives on our little olive tree trying to ripen, green tomatoes just starting to blush red & a bounty of blackberries waiting patiently to be plucked. The garden seems to be clinging on by it’s very leaf-tips to the last days of Summer, as Autumn has quietly arrived & begun to unpack her colourful attire across the landscape.
 amazing! From the tiny to the tawny, closed cup or open, the frilly or the flat, these fabulous funghi are just waiting to be turned into delicious dishes!
 stems work well), along with any mushroom stems, parsnip, bean or pea trimmings – wash everything well to remove grit & dirt, then chuck them all in a roasting tin with 2-3 pints of cold water, a splash of olive oil & a few good grinds of black pepper & sea salt. Cover it with foil to seal in all the juices & bake at 200*C for just over an hour, then strain & that’s it. Use it fresh, stick it in the fridge for a couple of days or freeze it. Save the veggies to whizz up into soups or sauces & pour any leftovers into jars for the fridge or ice cube trays to freeze.
 Next, although I have used two types of pastry (shortcrust for the base & puff for the lid), you could use shortcrust all over or just use shop-bought puff lids if time is limited – please make sure it’s proper all-butter puff to do your pie proud. If you do fancy having a go at making your own, here’s the link to my puff pastry recipe:

 Sprinkle in the plain flour around the pan & stir fry everything together until the flour has disappeared. This is going to make a roux in the pan, as it will absorb the butter & oil in the mixture, thickening everything up nicely.
 Tip the mushroom pie filling into the pastry lined tin & spread out well. Dip your finger in a cup of cold water & run it around the edge of the pastry.
 Put the pie tin on a cooling rack for a few moments to relax before serving. That’s it! Just get everyone around the table & dig in! Meaty but meatless, this mushroom-packed pastry goes well with either a generous scoop of cheesy mashed potatoes & steamed crisp vegetables, or a zesty green salad scattered with a few spots of aged Balsamic vinegar & toasted pine nuts. Slice it up cold for a luscious leftover lunch or freeze in slices for indulgent lazy suppers after a long day at work.

 Summer has arrived & although the sunshine has been a bit shy just lately, there are some fabulous fruits in the shops right now, ripe for the picking. Summer for me has always meant strawberries & as a child, I would love to both pick & eat them. We grew them in pots in the garden & sometimes would go strawberry picking at a local farm, but they were always lusciously lovely & the mere scent of strawberries brings back those memories instantly! Sunny Summer afternoons spent sitting on the grass, sipping a glass of my Mum’s homemade elderflower fizz (now there’s a recipe!) & pretending it was the finest Champagne, the hum of bumble bees buzzing around & warm sunshine on my face, whilst indulging in a beautiful blanket banquet. This would obviously include a bowl of freshly picked strawberries, washed & dunked in a little sugar before being devoured. This is why I always smell strawberries before buying them (& probably why I get such funny looks from other shoppers!). The sweeter the scent, the sweeter the berry! Sometimes the simplest of treats is the most delicious & satisfying to all the senses – we don’t just eat food with our mouths, all the other senses chip in too!
 One of my all time favourite treats is a petite pretty pastry, filled to the brim & adorned with ripe, ruby red strawberries. To call it a jam tart would not do justice to them, as the jam is simply the sweet glue that bonds these beautiful berries together within the pastry cup. These delicate delicacies are another of my childhood favourites & tremendously easy to make, all it takes is a little preparation & of course a little patience too. They also work well with a variety of berries or fruit – try cherries, raspberries, blackberries or blueberries, or why not pineapple, apricots or apples! Ready to bake it happen? Hands washed, aprons on & here we go!
 Now to prepare your strawberries – give them a w
 Stand the strawberries on their plumper end & slice the edges off, then set aside for later (pop them in the fridge on a plate covered up, especially if it’s a warm day). Keep the ends to make dinky decorations for your baked tarts. Slice up the rest of the strawberries into thin slices. Again, set aside in a dish for later, but separately from your strawberry hearts (in case they give out any juice).
 There are a couple of ways to make the pretty heart-shaped strawberry slices like I have. Either use a small heart-shaped cutter or plunger if you have one or, as the strawberry is naturally shaped that way, simply cut a little V out of the top of the slice & trim the edges to a point at the bottom of the berry. Make sure you wash your hands after this stage & dry well.
 Once rolled, take a circle cookie cutter slightly larger than your patty tin & cut out twelve circles. Place each circle in the prepared tin & using the end of your rolling pin, gently dab each one into place.
 Place the tarts in the centre of the oven & bake for 8-10 minutes, until the jam is bubbling around the berries & the pastry has turned a golden hue.
 To get the strawberry pastry decorations I made, you’re going to need a small calyx cutter (or small star) & a small heart cutter. You can buy these online or at any good baking retailer.
 When cooked, use a pallet knife to carefully lift the pastry strawberries onto a cooling rack. They should lift easily off the greaseproof paper, plus you have a clean baking tray – no washing up! Leave to rest until completely cooled. You can make these the day before & pop them in an airtight container until you’re ready to use them.
 Place the pastry strawberry on top, tilting it at a slight angle & a strawberry heart on either side of the cream. Repeat until you have decorated them all & set them onto a pretty plate. If you’re serving them later, cover them & keep in the fridge until then. They will keep overnight (as long as nobody eats them!).
 That’s it! Perfect served as part of an elegant afternoon tea, a special soiree, or simply as a sumptuous strawberry treat with a chilled glass of fizz, these plump little pastries will certainly bring some sunshine to your day! Stay hungry! A 😉 x
 persistent. Beautiful golden daffodils, delicate narcissus & tiny tête-à-tête trumpets are all blossoming on patios, windowsills & supermarket shelves, their slender sleeves tightly packed together with golden tips peeking out of the top, ready to burst into brightness! Nature is defiantly poking her tongue out at the world, with crocuses & snowdrops lining the grass verges too. It’s this beauty amongst the harshness of Winter that has been my inspiration recently, especially with the sugar art I’ve been creating. Just the scent of daffodils lifts the spirits, so I decided to try making a sugar version in their honour.
 bigger than a regular cake is epic for us). The cake had four layers of rich chocolate cake in each tier & took me two days to make & decorate, but the actual decorations took just over a week & a bit to make, as they needed to dry/set before they could be added to the cake. Fred Bear, a white modelling chocolate creation I made, was sat by the cake with sugar paste balloons for the birthday boy (worry ye not readers, Fred is currently sat with some sugary friends & won’t be eaten – he took a while to make & is far too cute!).
 for stairs, hence it’s name). The delicious caramel syrup enveloping the fruit has a light, zesty flavour & will satisfy any sweet cravings during this cold snap, plus that fading fruit in the bowl will be used up, so no waste! If you’re buying fresh, check out any that are “wonky” or on sale – really ripe fruit has plenty of natural sweetness & requires less sugar. Ready to get your pud on? Hands washed, aprons on & here we go!
 Next, prepare your fruit. Go through that fruit bowl & pick out any apples & pears that are about to walk out in protest, because they’re so ripe. The riper the fruit, the better the pudding.
 Add the Muscovado sugar, butter, vanilla extract, sprinkle in the cinnamon & zest.
 Using a slotted spoon, scoop the fruit into the bottom of the greased casserole dish with the caramel sauce (be careful not to splash yourself, as it’s sugar & it will burn you!). There should be some liquid left over, so tip this carefully into a heatproof jug & put in the fridge to chill (you’ll be needing this later).
 Now to make the sponge cake topping! In a large mixing bowl, beat the sugar & butter together until fluffy (I do this with a wooden spoon, but you can use an electric whisk if you prefer).
 Sift the flour into the creamy mixture & fold in (move your spoon around like a figure of eight in the bowl, scooping flour into the mixture). Make sure all the flour is combined into the cake mixture & give it a good stir at the end just to make sure.
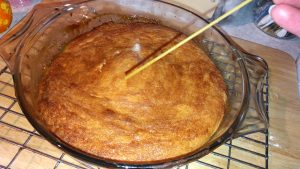 To test if your cake is ready, get a piece of spaghetti & gently poke it into the centre of the sponge. If it comes out clean, the sponge is done. If not, pop it back in the oven for a few more minutes & check again.
 mouthful of red hot lava-like fruit straight from the oven!). Trust me, it will still be warm & the sauce will soak into the bottom of the sponge cake nicely.


 meal to prepare, satisfying those cravings for fried fast food without actually being fried. Leftovers can be frozen for future lazy suppers, lunchtime wraps with salad or even sliced & tossed in pasta with a little homemade tomato sauce & a few roasted peppers. To pané means to coat in a little flour, egg & breadcrumbs (in my last blog, I did this with arancini to make crispy risotto balls). The only tip I will give is you need to keep one hand for the dry ingredients & one for the wet, otherwise you’ll end up with panéed fingers!
 2 large Chicken Breasts (you can get 8-10 pieces from this)
 Drizzle the remainder of the oil generously over the chicken portions & place the tin in the centre of the oven for about 20 minutes. Halfway through cooking, give it a good shake to loosen them from the tin & flip them over. Because it’s thin, the chicken will cook faster & the crumb coating will stop it drying out.
 sharp knife to check they are piping hot before eating), or simply layer them cold in a sandwich, wrap or salad for lunch the next day. Try adding a teaspoon of pesto
 blur into one another & before you know it, you’ve got a glass of fizz in one hand, a saucepan in the other & a houseful of hungry guests. Juggling your many hats is not an easy task – there’s the Work you, the Home you, the you who everyone turns to when things go backside up & then there’s the you who feeds everyone. Having a little time in reserve for yourself is rare & when you do get a bit of spare time, everyone wants a share of it. Sometimes, you have to be a bit selfish because if you don’t look after yourself, you won’t be able to look after anyone else. This time of year can be a real drain on you too, both physically & mentally, so we all need a bit of help every now & then (& a lot of coffee!).
 couple of (or ten) extra portions of everything & freeze them for future meals – there’s very little effort in peeling a few extra potatoes or chopping another couple of carrots (especially if you delegate). It’s like having your own fast food outlet in your freezer & all you’ve got to do is decide what you want for dinner! Trust me, after a long day at work & being tightly packed on a train for an hour, plus having at least a 20 minute drive home, you really don’t want to be faffing around with food when you get there. Be kind to yourself & with a little planning, you can be organised like a cooking ninja (just think of me as your Foodie Godmother).
 potatoes, crisp roasted parsnips & a golden-crusted, velvety cauliflower cheese, it really hits the spot! Leftovers are deliciously lovely – slice thinly for nibbling with cheese & crackers, layer with salad in sandwiches & a feisty mustard mayo, or chuck chunks into a creamy, cheese-enveloped pasta bake. I’ve fried it for breakfast, created some fabulous frittatas & it’s even graced a few of my homemade pizzas too!
 taste. The gorgeously gooey glaze gives it a deep rose tinted finish & the scent will definitely make you feel Christmassy! As it’s the time of year for making mulled wine too, I must confess that I have on occasion added the spices from my homemade version the night before (you can see some of the wine-coloured, slightly sozzled oranges in the photos below), with a few fresh spices thrown in – waste not, want not! This could possibly be the shimmering jewel on your table for Boxing Day & beyond. Ready to get your Glammon? Hands washed, aprons on & here we go!
 (including that paper circle around the edge), as you want all the lovely spices to impart their fragrant flavours into the meat.
 Bring to the boil gently, then turn down the heat until it’s just a bubbling simmer. It’s a bit like giving the gammon a spicy bubble bath & you don’t want any spillages.
 Put all the glaze ingredients into a mixing bowl & mash together. Make sure everything is mixed well into a gooey, gloopy syrup. Pour all over the gammon, making sure you coat it all over the top & sides thoroughly.
 rest for half an hour (I like to cover mine loosely with foil or greaseproof paper – just make a dome shape over the dish, so it doesn’t touch your glazed gammon).
 You won’t need to call your guests to the table – once your gammon is ready to dish up, there will be a queue of shiny little faces at the kitchen door waiting to taste it. If you do have any leftovers, try some of the suggestions I’ve made above (especially the pizza one – here’s the link to my pizza dough recipe to give you a bit of help:
  So there’s my gorgeously gooey & ever so slightly glamorous gammon. When you’re fed up of turkey or just fancy something spicy & special, get your Glam-mon! Stay hungry! Aimee 😉 x
 Autumn has well & truly painted the garden some beautiful bronze, ruby & amber colours this year. Our little cherry tree saplings seem to be in some sort of Fall foliage competition with each other, while the tomato plants are still heavy with their fruits, defiantly resisting the change in seasons. The warm October sunshine has kept the garden blooming with bright bold colours, especially the vivid, almost flamingo pink clematis flowers climbing their frame. Even the potted chrysanthemums have tiny buds of deepest magenta & pure white emerging from their greenery.
 day of the week as possible, prepping meals, writing, baking cakes for people & creating various sugar art, which means I get to relax on Friday. Recently, my Husband took me out for a couple of lovely weekend day trips (we’ve been a bit like ships that pass in the night in the last few weeks), which involved walking for miles & indulging in some well-deserved treats, so it was really nice to spend some time together. Friday nights are great for getting all the family together & having a relaxing dinner, but trying to get everyone in the same room at the same time can be a bit difficult, as we all work different shifts & have various commitments.
 The guys love a homemade sweet & sour chicken with fluffy egg fried rice, along with a few bowls of locally bought prawn crackers (even I draw the line somewhere & the Chinese restaurant up the road makes the most lovely huge, crispy crackers, so it would be rude not to buy them).
  The best bit is it takes very little time to prep & cook – you can generously feed four hungry people in well under half an hour (because Friday nights mean you want food fast!). It also tastes amazing as a vegetarian dish & I like to make a huge pan full of the sauce – maybe add a handful of cashew nuts, bean sprouts or sliced water chestnuts too (my fave).
  Stir fry the chicken slices for a couple of minutes until opaque (no pink bits, just white).
 Pour in the tomato ketchup, all around the pan & add the honey, balsamic & a few spots of soy sauce (I prefer the light one, but you can use the dark if you like).
 Serve your sweet & sour & the fluffy egg-fried rice in separate serving dishes for everyone to help themselves at the table, or just spoon some onto individual plates, with a plentiful supply of crispy prawn crackers for dunking. Usually this is when I have to tell my guys to wait until I’ve dished up, because they’re jostling behind me with plates, ready to tuck in! If you do have any leftovers, either box them up for lunch tomorrow or freeze them for those lazy nights when you want something nice, but don’t have time to cook.
 amber & ruby rouge coloured leaves in the garden. Sultry Autumnal evenings require soothing, slow-cooked, substantial suppers full of rich colour too. Working long hours or shifts, whatever your line of work or study, can have a knock-on effect when it comes to preparing a hearty, satisfying evening meal. As the nights start to draw in, we begin to crave richer & robust fayre to comfort us in the cooler evenings ahead.
 being turned into simple suppers & frozen in readiness for rewarding after-work dinners. Vegetables are sliced & chopped (my little food processor is an absolute treasure for this!), then popped into pans of water or stored in the fridge for when you just need a handful of veg. Pots of stock can defrost on a cooling rack, waiting to be whipped up into a rich, rib-sticking risotto, topped with a couple of
  roasted, crispy chicken legs. One of the best things about a risotto is there’s always enough left to make arancini for lunch the next day too, which means you’ve already covered meals for two days & there’s no waste!
 infuse into the sumptuous sauce. You can buy ready prepared chicken portions if you prefer & use whichever cut you enjoy. Chicken legs & thighs are perfect for this recipe as they are much more flavoursome, especially when they’re cooked on the bone. These portions of meat tend to be overlooked & so often wasted, yet they are a much cheaper, just as tasty alternative to chicken breast. If you do use chicken breast, you will need to reduce the cooking time as they cook quicker & the meat can go stringy (don’t worry, I’ll remind you later on in the recipe).
 6-8 cloves fresh Garlic, chopped finely or crushed
 Heat 2 tablespoons of olive oil in a large skillet or frying pan, then fry the chicken portions skin side down for about a minute. Add the bacon & fry this alongside the chicken.
 Once browned, transfer the chicken & bacon to a large casserole dish. Using scissors, snip the bacon into pieces & scatter over the chicken, then put the lid on.
 Usually, while it’s resting, I’ll pop some dinky jacket potatoes on metal skewers in the oven. By the time they’re done, the chicken will have rested sufficiently & you can dish up!
 This recipe is brilliant for freezing, just spoon leftovers into individual pots or bags & freeze (lay an open freezer bag in a bowl, then fill & seal – it won’t move around & spill sauce all over if you do it this way). Defrost & warm through when you fancy something warming (great for those evenings when you know you’re going to need a speedy supper!). Any leftover sauce is really versatile too! Simply freeze in single portion pots & use as much or as little as you need. It’s lovely ladled onto well-buttered jacket potatoes, poured over a pile of papparadelle, or even just heated up & eaten as a chunky soup with fresh crusty bread! I’ve even made a lasagne with it, layering between thin sheets of pasta & creamy cheese sauce.
 decadent desserts. On my way back from the train station on Friday, I decided to pop into my local shops to pick up a chicken for dinner & somehow got side-tracked by the most delightful fresh figs. Anyone who knows me will tell you that I can’t just pop in anywhere for one thing & will always leave with a jam-packed shopping bag, crammed full of inspirational ingredients that take my fancy.
 slender slices of sweet, jammy baked figs took over, I swiftly put two trays in my basket.
  Turn out your pastry onto a lightly floured worktop & shape into a rectangle. Roll away from you into a long piece, about a centimetre thick. Try to keep the edges as straight as you can, but don’t worry too much or you’ll drive yourself loopy! Using a dry pastry brush, dust off any excess flour as you go, especially when folding the layers (otherwise it may affect the recipe & you want flaky pastry, not floury).
 Take one of the three pieces of butter & cut into small chunks of about 1cm (you can just pull it apart, but the heat from your hands might melt it).
 Dust the worktop with a little more flour. Turn the pastry one turn to the right & roll out again, just as you did above.
 Lay your pastry on a piece of greaseproof paper, fold the top of the paper over your pastry & put it on a plate in the fridge for an hour (you might need to leave it longer during hot weather, so probably add another ten minutes if you’re not sure – I’ve left it a couple of hours before & it didn’t do any harm). If you’re like me & like to get organised, this would be a good time to make the ice-cream (my recipe is a bit further down).
 Tip the Mascarpone & Greek yoghurt into a large mixing bowl. Add the vanilla extract, one tablespoon of the lemon juice & a good pinch of the zest (you want a subtle hint of lemon here, not a “smack you round the chops” kind of taste that makes your ears flap).
 Once you’re happy with it, spoon the mixture into a couple of plastic tubs, only filling about halfway up & put the lids on.