

Most of us buy bread, usually for ease & because quite frankly, we all lead busy lives & don’t always have the time to make our own. There’s definitely no shame in that! All the hard work has been done by some kindly, experienced baker & it’s even been sliced for us. Personally, I like to have a bit of both – bake my own & buy some for convenience too. I find making bread a relaxing experience, a chance to lose myself in thought (that’s when I get all my best ideas) & tone up my arms at the same time – bonus! No fancy machines, equipment or unpronounceable ingredients, just good old fashioned elbow-grease & a bit of flour, water & yeast.

Having baked my own bread for a few decades now (who’s counting?!), I know it can be quite daunting to those who haven’t tried it. Sometimes the mere thought of baking bread can send people into a tizz. “Isn’t it messy?”, “don’t you need special equipment?” & “doesn’t it takes hours to make?” are some of the questions I’m often asked. The answers are yes (getting messy is part of the fun), no, you don’t need special equipment & no, it doesn’t take hours. Also, you don’t need to sit & watch over it – I make the dough, get on with other things while it’s proving & then go back to it.

This recipe is for my Dunn Buns & they take less than a couple of hours to make, from start to finish. Plus, you can bake them in advance (they freeze very well & retain their fluffy interior). These gorgeously glossy topped buns are made with an enriched dough, meaning they don’t fall apart when crammed with a filling & hold their crumbs when sliced, making them perfect for burgers, breaded chicken & of course, bacon & eggs too. They are pillowy soft with a smooth golden top & retain their shape as you eat (there’s nothing worse than when your bun goes flat & doughy).
Let’s get those beautiful buns baked & bronzed. Ready to bake it happen? Hands washed, aprons on & here we go!
What you need:
500g Strong White Bread Flour (plus extra for kneading, etc)
10g Fast Acting Yeast
1 large Free Range Egg
300ml Lukewarm Water
1 large tablespoon Extra Virgin Olive Oil (keep the bottle handy for later)
1/2 teaspoon Sea Salt
A little melted butter for the tin (or a butter wrapper will do)
For the topping:
2 heaped teaspoons Sesame Seeds
1 large Free Range Egg, beaten with a pinch of Sea Salt
What to do:
Pre-heat the oven to 220*C & line a large baking tray with greaseproof paper. Brush the greaseproof paper with the melted butter or give it rub all over with a butter wrapper (I always keep a few wrappers in the fridge, ready for greasing baking tins & such). You can go without the greaseproof layer if you like. I find it helps keep the bun bottoms soft, while still giving them colour.
Mix the flour, sea salt & yeast into a large mixing bowl.
Crack the egg into a measuring jug & top up with the lukewarm water to just about 400ml. Give everything a whisk with a fork to break up the egg & blend it into the water. If it gets a little frothy on top, that’s fine.
Tip the egg & water mixture into the flour, along with the olive oil. Give everything a good mix with the fork, making sure you get right to the bottom of the bowl.
Once it’s all gathered into a sticky dough, tip it onto a lightly floured worktop. I use a pastry scraper to make sure I get all the dough out of the bowl. You will need a bit more flour as you go along, as it will be quite sticky to start. Set your mixing bowl aside, you’ll need it later.
 Knead firmly for about 8-10 minutes, stretching the dough away from you with the heel of one hand & pulling it back towards you. Try not to tear the dough as you do this. Repeat & keep going until the dough is a smooth & supple ball. If you need a bit of flour as you knead, sprinkle a little onto the worktop & use the pastry scraper to loosen the dough if it gets sticky.

When you’re finished kneading, dust a little flour into the bottom of your original mixing bowl & place your dough inside, sprinkle a little flour on top & cover with either clingfilm lightly coated in olive oil or a dry tea-towel/cloth.
Leave the bowl in a draught-free, warm place to prove for about an hour, until you can see a little dome on the top where it’s risen & grown to almost twice the size.

Once your dough has proved, tip it out onto a lightly floured work surface (keep the oiled clingfilm/cloth from the bowl, you’ll need it again in a moment). Give the dough a quick knead for a moment to knock out any big bubbles (don’t over-do it though, just a few seconds is fine).
Divide into eight equal pieces & gently roll into balls. Set them onto the greaseproof-lined baking tray, spacing them a few inches apart (they will need room to grow). Cover lightly with the clingfilm/tea-towel again & leave them to  prove for another 20 minutes, until they have doubled again.
Remove the cling film, delicately brush the tops with the beaten egg using very light strokes (they will be a bit squishy & jiggly, so be gentle) & scatter the sesame seeds over them.
Bake in the centre of the oven for about 12-15 minutes, until beautifully bronzed on top & the sesame seeds are all toasted.
 To check if your buns are baked, pick one up & tap the bottom – if it sounds hollow, they’re ready.
Remove from the baking tray & place on a cooling rack. Let them cool completely (I know it’s hard to resist, but it will give you tummy ache if you don’t let them cool). That’s it, your buns are done! Slice, sandwich & serve! They will keep for a day in an airtight container or you can always pop a few cooled buns into airtight bags & freeze on the day you bake them.
 They are perfect packed with bacon, sausage & eggs for breakfast or even better, layered with burgers, cheese & salad for a weekend treat. Sometimes, I make miniature versions of these with smaller fillings (perfect for picnics).
If you do have any leftover buns, try making my mini “Dunn Bun” pizzas! Slice a bun into three generous slices, rub half a garlic clove onto each &  top with a spoon of squished tinned tomatoes (tip them in a bowl & get your hands in). Then add slices of mozzarella or whatever cheese you like, a few mushrooms or peppers & maybe some ham. Sprinkle with a little Basil, Oregano & black pepper, dust with Parmesan & bake for 8 minutes in a hot oven (220*C) – easy mini bun pizzas! They’re perfect as a light lunch, swift supper or a simple cheesy snack.
However you eat them, these bronzed & bun-tiful glossy buns are always a fabulous treat! Stay hungry! Aimee 😉 x

 onion rings & deliciously chunky chips. These two sides are a well-loved staple in our household & with good reason.
 light & crisp, tasting much naughtier than they actually are. Before you start worrying
  Drizzle well with the olive oil, then dust with a good pinch each of black pepper & sea salt, about a quarter teaspoon. Tip: if you’re preparing these in advance, do not add the salt until you are ready to cook them. The salt will make them rock hard & no amount of cooking will soften them up.
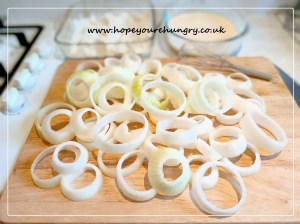 In another shallow dish, crack the eggs & add the Greek Yoghurt, along with a little salt & pepper again. Give it a good whisk with a fork to break up the eggs & blend into a thick, gloopy liquid.
 Repeat this until all the onion rings have been dipped & dunked in egg & flour. Place them all next to each other on the baking tray & don’t worry about them touching too much.
 Once they’re crispy & bronzed, carefully remove the onion rings from the tray using a fork or tongs & place onto a cooling rack with a bit of greaseproof paper underneath (just in case there are any oily drips).