

 Spring has arrived, a flourish of foliage appearing on the trees & new growth in the garden. This is also a time of Spring cleaning & doing all those jobs you wanted to do over the Winter, but it was too soggy & cold. A little bit of sunshine does everyone the power of good too. While we were out recently, we decided to have a little treat for lunch – a small cheeseburger & fries. It was not my finest decision & reminded me of a line in a film – “what’s wrong with this picture?”. The fries were hot but tasteless (no salt) & the burger was sad, cold & rather flat in every respect. You could have bounced the bun down the motorway, it was that stale! On the way home, my Husband suggested we make our own burgers. Although it’s not my forte, I said “hold my spatula!” & that’s how the delicious Dunn Burger happened (named by my wonderful Husband).
It’s been almost 27 years since I last made a proper beef burger. My Son was a baby, we had gone fishing for the weekend (aka sunbathing with benefits) & took along some of my homemade meatballs. Someone suggested we make them into burgers instead & they ended up on the grill next to the trout we had caught. A little surf & turf barbeque ensued & the rest is history.
 Fast forward to today & I’ve recreated my delicious burger with a few supporting acts – homemade buns, crispy baked onion rings & my chunky “Aimée chips”. It took me a whole afternoon to make everything, but it was definitely worth it & let’s face it, if you’re going to do something, might as well do it properly. Also, I’m no expert on burgers, this is just the way I do it.
To make it easier for you to recreate this dish, I’ve split everything into three sections: burgers, buns & sides. Not everyone is going to want the buns or side dishes, so this recipe is just for the beef burgers & I’ve put links to the others at the bottom.
Ready to bake it happen? Hands washed, aprons on & here we go!
What you need (this makes 4 burgers):
500g Minced Beef (10-15% fat content – if you cut the fat, you cut the flavour)
8 rashers Streaky Smoked Bacon
A little Sea Salt & freshly ground Black Pepper
Extra Virgin Olive Oil (for extra pepperiness)
25g Salted Butter
50g Grated Cheese (I used Medium Cheddar)
Optional Extras:
Mustard
Ketchup or Relish
Pickles (I used pickled Cornichons & sliced them)
Crisp Iceberg Lettuce, washed & patted dry
Large Tomatoes, sliced
What to do:
Get 5 pieces of greaseproof paper ready for your raw burgers, approx 6 inchs square – one for each burger & one spare.
 Divide the beef into four equal pieces & gently shape each one into a ball. Be careful not to squeeze them too much, otherwise they will be tough & won’t cook properly.
Put each ball onto a square of greaseproof paper & put the spare piece on top. Press down evenly to flatten out your burger slightly, until about a half an inch thick. Remove the top square of paper & use your hands to shape the burger into a circle, flattening down any uneven areas gently. Repeat with the other three burgers.
Wash & dry your hands again, then sprinkle a little sea salt & pepper over each burger, flipping them over & repeating on the other side.
Stack them up with the greaseproof paper still on them, put them on a plate & wrap in clingfilm. Place in the fridge for about 30 minutes to rest, as this will help them hold their shape when you cook them later.
Remove the burgers from the fridge & set them aside while you cook the bacon. Heat a large frying pan or skillet on a medium heat & add the bacon rashers. There’s no need to add oil at this stage, you want them to render their fat into the pan. Do not be afraid of the fat – fat is flavour & this is a treat (you won’t be eating burgers for every meal every day).
 Once the bacon has started to get some colour to it, transfer the bacon to a baking tray & cover with foil.
Add half the butter to the frying pan & place your burgers into the pan. Press each one with a spatula, so they make full contact with the hot surface.
Cook for approximately 4-5 minutes each side. Now I like my burgers cooked well-done, so if you like them more on the rare side, cook them for less time. When you flip the burgers, press again for a moment to maintain contact with the pan & if desired, add the rest of the butter.
 Once your burgers look gnarly & you’re happy with them, pile up a little cheese on each burger & cover with a large saucepan lid or cake tin for a couple of minutes – this will help to melt the cheese. If you use a cake tin, remember it will get hot, so use tongs to lift it off your burgers.
When the cheese is melted, they’re ready to serve & it’s time to pack those flavour layers into your bun!
Serve these delicious burgers with a side of chunky chips, crispy baked onion rings & a generous green salad. Usually, I make a dish of homemade mayonnaise too, just for dunking the chips & onion rings in.
Fabulously flavoursome, this fine burger is a tower of taste. You might need both hands for this one! Stay hungry! Aimee 😉 x
PS: Here are the links for the buns & sides:
For the buns – You’d Better Bun-lieve It!
For the side dishes – Sides by Side!
 onion rings & deliciously chunky chips. These two sides are a well-loved staple in our household & with good reason.
 light & crisp, tasting much naughtier than they actually are. Before you start worrying
  Drizzle well with the olive oil, then dust with a good pinch each of black pepper & sea salt, about a quarter teaspoon. Tip: if you’re preparing these in advance, do not add the salt until you are ready to cook them. The salt will make them rock hard & no amount of cooking will soften them up.
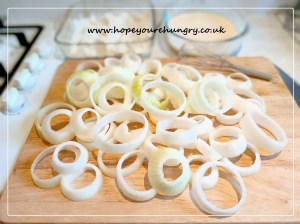 In another shallow dish, crack the eggs & add the Greek Yoghurt, along with a little salt & pepper again. Give it a good whisk with a fork to break up the eggs & blend into a thick, gloopy liquid.
 Repeat this until all the onion rings have been dipped & dunked in egg & flour. Place them all next to each other on the baking tray & don’t worry about them touching too much.
 Once they’re crispy & bronzed, carefully remove the onion rings from the tray using a fork or tongs & place onto a cooling rack with a bit of greaseproof paper underneath (just in case there are any oily drips).
 It’s this time of year that always seems magical. Trees have an abundance of Autumnal toned leaves, as they tumble around like confetti on the breeze, swooning in swathes wherever they land. Late blooming flowers appear, their vibrant blossoms adding some freshness to the greenery that remains. Although it’s November, the sun shines just as brightly as in earlier months, spilling spectacular shades across the skies as it arrives & departs each day.
 especially those childhood dishes that evoke fond memories of deliciousness. The mere mention of puff pastry takes me to a stool in my Mum’s kitchen, watching her create all kinds of pastry treats & especially savoury pasties. She would make shortcrust pastry ones, filled with her heavenly homemade stew (our version of a Cornish pasty). Leftovers would be lovingly wrapped in fabulously flaky pastry parcels, deliciously warm & comforting. And then there were my favourites – crisp buttery puff pastry packed with mashed potatoes, cheese & onion. There would always be some mashed potatoes leftover from the previous night’s dinner, just enough to make a few pasties for lunch the next day.
 Using your fingertips, rub the butter chunks into the flour a little – we don’t want it like fine breadcrumbs, more like a rough rubble texture with plenty of lumps. This is just breaking down the butter a bit to make rolling easier.
 Place your saucer or plate on the pastry, cutting neatly around the edge & repeat until you have cut out as many as you can. Where you have leftover pieces of pastry, place them on top of each other, reshape & roll out again. Sometimes, I’ll just shape these last ones with my fingers rather than cutting them out again (trust me, it will all be fine once they’re baked).
 Brush a little beaten egg around the edge of the pastry & fold the top half of the pastry over, pressing the edges together to seal in your filling. From one corner of the pasty, gradually squish the edges together to form a crust, finishing at the other corner. Lift onto your prepared baking tray, prick holes with a fork in the top. Repeat this step, until you have all your pasties made.
 Place on a cooling rack for a few minutes – even if you’re eating them warm, they will be like the surface of the sun right now & melt your mouth. While they’re cooling a little, grab a few crisp salad leaves or some chunky chips (or both), pile them on a plate & tuck in!
 These delicious pasties also make fabulous flaky finger-foods, great for picnics & parties – just make smaller nibble-sized ones & add a spicy tomato dip for dunking! I use my tomato sauce recipe for meatballs & add a pinch of cayenne to give it a kick (recipe link here:
 always a busy month for us, celebrating birthdays in the first few days & our anniversary later in the month (there’s much cake to be baked & eaten!). Breakfasts, lazy lunches, pasta & Prosecco have all been enjoyed on the patio, while the plants have been abundant with their produce & easily picked for dinner.
 coffee & a few kisses, before wandering back to work. This brief interlude would put a pep in my step & make the afternoon brighter – we have now have resumed our mid-day meet-ups. Even though we are all in much closer proximity at the moment, it doesn’t mean we should become territorial about sharing space with our loved ones.
 couple of this & a couple of that. We’ve all bought a tin of this, a packet of that, hoping to use it in some elaborate & exquisite dish, but shoving it to the back of the cupboard. Bits of leftover dried pasta, a random tin of beans & that twisted up tube of tomato puree with a tiny bit left. All seemed a bit pointless when you popped them in there, but now they are like gold dust! You might notice I’ve used spinach instead of Cavolo Nero or cabbage. This is simply because I like spinach on my pizza & there’s always a bit leftover, just enough to chuck in a soup or whizz into a delicious pesto, as you will know if you’ve been following my blog. Over the years, I’ve adjusted the recipe to accommodate whatever ingredients were available, but it always has the same result – soupy satisfaction!
 Add the onion, carrot & celery to the pan, mixing well with the bacon & oil. Give everything a good stir & fry for about 4-5 minutes, until slightly softened & the onion become glossy.
 Add the tomato puree, tip the chopped spinach into the pan & get stirring, mixing everything together.
 Using a clean spoon, have a taste of your soup & adjust the seasoning to your personal taste (get a clean spoon before tasting again). It’s worth noting that any stock (homemade or shop-bought), along with bacon, contain salt, so you shouldn’t need to add much. When you’re happy with the flavour, turn off the heat & tuck in!
 Although an everyday soup, it can also be turned into a souptacular starter. Got a bit of day old bread that needs using up? Make your own croutons! Cut into cubes (as chunky or dainty as you like), drizzle with a little olive oil & bake on a tray in the oven at 220*C for about 10-15 minutes (give them a shake halfway through cooking). Once bronzed & crisp, tip them onto a sheet of greaseproof paper on a cooling rack, before transferring to a serving plate for people to help themselves. Pile a few in the centre of your soup, swirl with a little olive oil & a dusting of grated Parmesan. That’s it!
 Gazing into the garden while sipping my first coffee of the day, there is an Autumnal air about it. The early sunshine is just peaking over the rooftops, causing the dew laden lawn to shimmer in the sunlight & perfectly summing up the Summer.
 inbetween. The poor plants don’t seem to know which way to turn & our multi-tasking willow tree has been happily soaking up the excess water, whilst providing welcome cool shade to the local wildlife. There are baby olives on our little olive tree trying to ripen, green tomatoes just starting to blush red & a bounty of blackberries waiting patiently to be plucked. The garden seems to be clinging on by it’s very leaf-tips to the last days of Summer, as Autumn has quietly arrived & begun to unpack her colourful attire across the landscape.
 amazing! From the tiny to the tawny, closed cup or open, the frilly or the flat, these fabulous funghi are just waiting to be turned into delicious dishes!
 stems work well), along with any mushroom stems, parsnip, bean or pea trimmings – wash everything well to remove grit & dirt, then chuck them all in a roasting tin with 2-3 pints of cold water, a splash of olive oil & a few good grinds of black pepper & sea salt. Cover it with foil to seal in all the juices & bake at 200*C for just over an hour, then strain & that’s it. Use it fresh, stick it in the fridge for a couple of days or freeze it. Save the veggies to whizz up into soups or sauces & pour any leftovers into jars for the fridge or ice cube trays to freeze.
 Next, although I have used two types of pastry (shortcrust for the base & puff for the lid), you could use shortcrust all over or just use shop-bought puff lids if time is limited – please make sure it’s proper all-butter puff to do your pie proud. If you do fancy having a go at making your own, here’s the link to my puff pastry recipe:

 Sprinkle in the plain flour around the pan & stir fry everything together until the flour has disappeared. This is going to make a roux in the pan, as it will absorb the butter & oil in the mixture, thickening everything up nicely.
 Tip the mushroom pie filling into the pastry lined tin & spread out well. Dip your finger in a cup of cold water & run it around the edge of the pastry.
 Put the pie tin on a cooling rack for a few moments to relax before serving. That’s it! Just get everyone around the table & dig in! Meaty but meatless, this mushroom-packed pastry goes well with either a generous scoop of cheesy mashed potatoes & steamed crisp vegetables, or a zesty green salad scattered with a few spots of aged Balsamic vinegar & toasted pine nuts. Slice it up cold for a luscious leftover lunch or freeze in slices for indulgent lazy suppers after a long day at work.


 meal to prepare, satisfying those cravings for fried fast food without actually being fried. Leftovers can be frozen for future lazy suppers, lunchtime wraps with salad or even sliced & tossed in pasta with a little homemade tomato sauce & a few roasted peppers. To pané means to coat in a little flour, egg & breadcrumbs (in my last blog, I did this with arancini to make crispy risotto balls). The only tip I will give is you need to keep one hand for the dry ingredients & one for the wet, otherwise you’ll end up with panéed fingers!
 2 large Chicken Breasts (you can get 8-10 pieces from this)
 Drizzle the remainder of the oil generously over the chicken portions & place the tin in the centre of the oven for about 20 minutes. Halfway through cooking, give it a good shake to loosen them from the tin & flip them over. Because it’s thin, the chicken will cook faster & the crumb coating will stop it drying out.
 sharp knife to check they are piping hot before eating), or simply layer them cold in a sandwich, wrap or salad for lunch the next day. Try adding a teaspoon of pesto
 I’ve been designing cake, making tiny tea sets & small sugar bunnies to sit on the top, I’ve also been writing & doing numerous things at the same time, like the multi-tasking ninja that I am. When the weather is unpredictable, there is one thing you need to be able to rely on & that’s a rich, rib-sticking dinner to warm you through!
 It’s efficient, versatile & quick to cook. Making pasta is one of my favourite things to do & it’s something we make together as a family. When my Son is home, we make pasta & pizzas, all congregating in the kitchen & chatting simultaneously, whilst we work on creating dinner. It’s what cooking is all about for me & that’s how our children learn, by cooking with us. There are times when stress will start to invade your life & making pasta is one of the best things to de-stress, relax & take your mind off everything.
 Because my Husband works shifts, I like to make a variety of dinners & freeze them in two-portion pots, ready to be whipped out of the freezer at a moment’s notice. Usually, the freezer has at least one whole drawer filled with a selection of lasagnes & they’re all different. There’s the lasagne al forno, which is the one with meat (usually beef), a sumptuous spinach & cream cheese layered lovely & then, one of my favourites: vegetable lasagne! I have been a vegetarian a couple of times & this luxurious layered dish is one of my favourite indulgences! It’s lighter & quicker to make than a meat lasagne, but fabulously filling & you can create this velvety vegetable version in around half the time. Plus you can make it in advance & freeze it in individual pots for those evenings when you need instant pasta gratification. Fancy a go? Hands washed & aprons on!
 Take the seeds & any white pith out of the peppers (save the seeds & you can plant them in eggboxes on the windowsill). Chop the peppers into bite-sized pieces. It doesn’t need to be perfect or anything. Add them to the dish with the courgettes in.
 Add the tomato puree, Basil & Oregano, along with the sugar & a good pinch of the black pepper & sea salt to season your vegetable ragu. Give everything a good stir to distribute the puree & seasonings thoroughly.
 As the sauce thickens up, you should start to feel some resistance with the whisk. Keep whisking (swap hands if your wrist aches) & when you are satisfied with the thickness, add a couple of ounces of the grated mild cheddar & whisk until melted. Turn off the heat.
 Here’s a tip to help you fit your dried pasta sheets to those rounded corners of your dish. Take your dried lasagne sheet & snap off the top corner edge with your thumb, about 1cm in. Lay the lasagne sheet with the missing edge nearest the corner, then take the piece you snapped off & turn it around, placing it in the corner with the pointy end towards the middle of the dish. You’re welcome! All these years, we’ve all been trying to make it fit & then a few years ago, I decided to use up some random pieces & that was it!
 Cover the ragu with a layer of lasagne, making your corners fit as above.
 Spread it evenly with the back of the spoon you used before, then sprinkle liberally with the mixed grated cheese. This will give you a gorgeous, crispy cheesy topping. Sprinkle a good pinch of dried Oregano over the top, squeezing it in the tips of your fingers as you do so, to release the pungent fragrance of this wonderful herb.
 Serve with a huge green salad & maybe a few chunky chips, if you feel the need. Any leftovers can be packed up into pots for lunches (hot or cold, it’s rather nice), or frozen for lazy late night suppers, curled up on the sofa with a glass of wine.
 cooking builds during the day, making dinner that much more enticing. Pasta is undeniably one of my favourite foods! It’s easy to prepare & a pleasure to eat, especially when it’s crammed full of flavoursome fillings or dressed in a rich, sumptuous sauce, or both! When I discovered these pretty pasta shells on a random shopping trip some years ago, I had already decided what kind of fillings I would make, the sauce, the herbs, everything – all before reaching the checkout! Now I appreciate not everyone gets excited by a bag of pasta (I have a dedicated pasta
  shelf in the pantry), but they inspired me to create something wholesome & filling – proper rib-sticking, colourful comfort food to warm you on a chilly day like today, without taking all day to make. This recipe for Stuffed Conchiglioni is something we enjoy making together as a family & definitely eating together! They can be made in advance & the best bit is there’s going to be plenty of leftovers for lunches (hot or cold) & maybe a couple of pots for the freezer, for those “can’t be bothered” nights. So here goes – hands washed & aprons on!
 500g of dried Conchiglioni (1.1lb)
 Chuck in the chopped onion & bacon pieces, stir fry for a few minutes, keeping the onion moving so that it doesn’t catch & burn. If any liquid forms around the bacon, simply strain it off & discard. Add a little more olive oil if needed. Once cooked, leave to cool for a few minutes.
 Tip the breadcrumbs into a large mixing bowl, along with the cream cheese. Add the fried bacon & onion, mixing thoroughly to create a lovely thick stuffing. Cover the bowl with a plate & leave while your pasta cooks.
 cook according to the instructions on the pack.
 might want to prep another, slightly smaller dish for any extra shells (OK, there are always extra shells, trust me on this).
 Lay each stuffed shell in the prepared dish, then carry on stuffing until you’ve filled them all. At this point, you can cover them in cling film & put them in the fridge until you want to eat them – they will keep until the next day.
 Add the tomato puree, the sugar & seasoning to taste (you won’t need much salt, so go easy on this). Add a couple of teaspoons of dried Basil (or rip up about half a dozen leaves of fresh & chuck them in). Give everything a good stir & reduce to a gentle simmer for about half an hour with a lid loosely on, stirring occasionally.
 Spoon your sauce generously all over the stuffed shells, making sure they are just covered & no bits are peeking out. Dot chunks of Mozzarella all over the top & add a sprinkling of dried Oregano.
 some fresh, crusty bread, get everyone to the table & get stuck in! Usually, my guys magically appear in the kitchen while I’m dishing up, grabbing a slice of warm bread to munch on & dunking it in the sauce.
 So next time you feel the chill on a dull day, whip up some colourful, comforting Conchiglioni! Stay hungry 😉 A x