

![]() It’s been a funny old year so far, like one of those intense mystery novels with one dizzying plot twist after another. None of us know what’s going to happen next, the author has gone rogue & the leading characters are all bickering with each other like petulant, hungry teenagers. When everything seems to be a swirl of stress & stomach dragons are grumbling, never fear – comfort food is here! A proper dinner helps calm grumbling of all kinds, soothing those pesky stomach dragons & restoring a little peace (albeit briefly).
It’s been a funny old year so far, like one of those intense mystery novels with one dizzying plot twist after another. None of us know what’s going to happen next, the author has gone rogue & the leading characters are all bickering with each other like petulant, hungry teenagers. When everything seems to be a swirl of stress & stomach dragons are grumbling, never fear – comfort food is here! A proper dinner helps calm grumbling of all kinds, soothing those pesky stomach dragons & restoring a little peace (albeit briefly).
Preparing a meal is something I truly enjoy. It’s impossible not to feel relaxed, while creating something so comforting & satisfying. The whole process requires you to focus on each task & that in itself  seems to release any tension. It’s not as precise or technical as some recipes, but it’s sheer ease brings a sense of peace as you create a meal for your family. My adoration of Italian food began when I was a teenager & this is a rush-less ragu recipe I’ve been making for my family ever since. It is at the heart of my homemade meat lasagne, slowly baked between blankets of cheese sauce & sheets of homemade pasta, regularly shared as a Sunday dinner & often accompanied by my Husband’s focaccia (he’s quite a talented baker). Sometimes I make it with sausages, sometimes beef or both, usually whatever I’ve got in the freezer (I freeze meat in small batches for this very purpose).
 This is a family-sized recipe & will serve at least six people generously (it makes a decent six portion lasagne too, although I have stretched it to eight on occasion). Keep some handy in the freezer for when you’re short on time (make sure you use fresh beef or sausage if you intend to freeze it though, not previously frozen).
A ragu is not fast food – to me it means “Relax And Gradually Unwind”, so just take your time & go at your own pace – there’s definitely no rush. Ready to ragu? Hands washed & aprons on!
What you need:
200g Minced Beef or 4 Plain Pork Sausages, skins removed (or half beef & pork)
2 medium Carrots, washed, peeled & finely chopped
2 sticks of Celery, washed & finely chopped
1 medium Onion, skin removed, topped, tailed & finely chopped
2 tins of Plum Tomatoes & their juice
1 generous tablespoon Tomato Puree
1 or 2 dried Bay Leaves (if you’re unsure, just use one)
1 sprig fresh Rosemary (approx 6″ long), leaves chopped finely
3 or 4 cloves garlic, chopped/sliced finely
2 tablespoon Extra Virgin Olive Oil
A splash of Balsamic Vinegar (the good stuff – about a teaspoonful)
Seasoning – Sea Salt & Black Pepper, both freshly ground
What to do:
Firstly, prepare your garlic, carrots, onion & celery. Make sure you wash the carrots & celery thoroughly to remove any grit or dirt. Peel the carrots & trim the ends off them & the celery. Chop finely into mini pieces & set aside on your board.

Next, peel the garlic & onion. Top & tail the onion, then chop finely as before – you can always use the food processor for this if you prefer. Here’s a little tip from me: wear sunglasses to help reduce any tears (obviously not dark ones, you need to see).
Chop the garlic finely & then the Rosemary. Remove the spindly leaves from the stem first – I save these for making mini-tomato & vegetable kebabs.
 Heat the oil in a large skillet or deep frying pan on a medium heat. Add the carrot, celery & onion & fry for a few minutes to soften. Keep them moving around the pan, so they don’t catch & burn.
Add the meat – squeeze the sausages from the skins straight into the pan if it’s easier. Break any big chunks into finer pieces (I use tongs for this, but a wooden spoon or spatula is just as good). Stir fry until the meat is thoroughly coloured & all the pink has disappeared.
Season with a little salt & pepper, sprinkle in the garlic, Rosemary & bay leaves, giving everything a good stir (the scent is fabulous). I don’t add the garlic at the beginning, because it can burn quite quickly & lose it’s sweetness.
 Next, add the tomatoes – I tend to buy the whole plum tomatoes & squish them by hand, evenly over the pan. Yes, it’s messy but you’ll wash. Half fill each tin with cold water to swirl out those last little drops of tomato juice into the pan too – we don’t waste anything!
Add the tomato puree & a good splash of balsamic vinegar (even a few drops makes all the difference). Reduce the heat to low & let it softly simmer for about 30-40 minutes, stirring occasionally.
Give it a taste, then add a little salt & pepper as needed (depending on the sausages you use, you might not need very much). Using a clean spoon, taste it again to make sure it’s to your liking (seasoning is a personal thing).
 Once you’re happy, let it bubble away on a gentle simmer for another 30 minutes or so, until reduced to a rich, thick meaty sauce. Give your ragu another quick taste to check the seasoning is good & adjust it if you need to. To test if it’s done, drag the spoon through the middle (the parting of the ragu) – if it leaves a gap & you can see the bottom of the pan, then it’s ready!
 Get the family together, grab a fork & get stuck in! It makes a sumptuously lazy supper generously spooned over spaghetti (with a good scattering of grated Parmesan on top), or stuffed in a variety of pasta parcels & shapes. This versatile rich meat sauce is especially fabulous layered up in lasagne – here’s the link to my vegetable lasagne recipe, just swap the meat ragu for the vegetable one: https://hopeyourehungry.co.uk/perfect-pastafication/
 Sometimes, I’ll use the leftover meat sauce in a pasta bake (brilliant when you’re short on time & easily feeds two people comfortably). Pre-heat the oven to 180*C. Pop a couple of generous spoonfuls of ragu into the bottom of a small baking dish. Next, cook a couple of handfuls of fusilli (these twirly swirls make the best topping for this, as they are easily coated with the cheese sauce).
Make the cheese sauce while the pasta is cooking – melt 45g butter in a pan, then add 45g plain flour & stir well to make a thick paste. Slowly add 300ml of semi-skimmed milk, a little at a time & stir gently (I use a whisk to make  sure there are no lumps). As the sauce thickens, stir more vigorously until silky smooth. Add a small handful of grated mild cheese (approx 60g) & mix in until melted. Taste, then season accordingly with a little sea salt & freshly ground black pepper. Sprinkle generously with more grated cheese, dust with a little dried Oregano & bake for about 30 minutes.
 When it’s ready, the topping will have turned a gorgeously golden hue. Allow to cool for a few minutes before tucking in (just add a simple green salad & a little homemade focaccia for scooping up the sauce.
 When the world gets too fast, slow down the pace & make a little comfort in your own kitchen with a fabulously flavourful ragu – Relax And Gradually Unwind. Stay hungry! Aimee 😉 x

 It’s early Summer & thoughts turn to sunny weekends & lazy days, sipping something refreshing in the garden & eating delicious food together. The comforting fragrance of freshly baked bread, garden-grown herbs & sweet garlic wafting through the air, always reminds me of sunny picnics on the patio. While the Husband is gardening his socks off (with refreshing intermissions of something chilled), I enjoy creating a few treats for us to indulge in later.
 This version is a fabulously fruity version, topped with ripe baby tomatoes. As they bake, they become darker, slightly softened & a little jammy, resembling cabachon rubies mounted in a golden cloud of fluffy focaccia. Pardon my poetics, but this type of food can be inspiring! Ready to bake it happen? Hands washed, aprons on & let’s dough it!
 Knead the dough for about ten minutes, stretching it by pushing away with the heel of your hand & pulling it back over itself. Turn the dough slightly & repeat. If you’ve got a good sticky dough, you might need a dusting of flour occasionally as you’re doing this – be careful not to overdo this, otherwise it will alter the recipe & become unpleasant. Remember, the effort you put into the kneading now will result in a fluffy, well-risen bread later, so give it some elbow grease – just think of those toned arms!
 When your dough has doubled in size, it’s ready for the next stage. Simply take the oiled film off & scoop your dough onto a lightly floured work surface, making sure you remove all remnants from the bowl (you’ve put a lot of work into this, so don’t waste any!).
 Dot the tomato halves all over the top, round side up & sprinkle evenly with the chopped garlic, a good pinch of freshly ground black pepper & sea salt. Remove the Rosemary leaves from the stem & either leave whole or chop roughly, before sprinkling them on top too.
 Transfer to a chopping board & slice into focaccia fingers, ready for dipping & devouring! Add a few accompaniments & turn it into a mini feast – try a few sundried tomatoes, fragrant olives, salami, Proscuitto & a few cheeses. Place the board in the centre of the table & let people help themselves. Perfect for a relaxed afternoon treat or a light lunch. Next time you’re feeling kneady, just dough it! Stay hungry! Aimee 😉 x
 Early mornings are the best time of day for me, when everyone else is either sleeping or getting ready to go out. It’s usually dark when I leave & I love catching that inky blue sky as it slowly melts into an array of pretty pinks & golds. It’s a serene time of day for me & as Christmas is getting closer, people are bustling about, bags bulging & feet burning, so I like to soak up the calm before the chaos.
 little cute creatures from my homemade modelling chocolate, ready to be wrapped & hopefully not eaten. This time of year can become a bit of a whirlwind of things to do & when this happens, I find it soothing to put on an apron & bake a cake. Cake should be created with care, not rushed but relished & enjoyed. A happy Cook makes a happy cake!
 known for, my Lemon Drizzle Cake. Lighter-than-air layers of lemon cake & whipped buttercream that seem to evaporate like a zesty zephyr with every mouthful. It tastes like freshly squeezed sunshine & sherbet lemons, almost defying you not to feel brighter & more cheery as you eat it. This recipe is for a seven inch three layered cake, perfect for afternoon tea with friends or a celebration of your own & yes, even Christmas!

 Add one egg, beating well until your mixture is glossy & fluffy. Repeat with the rest of the eggs, one at a time.
 Using the spatula, press it into the butter & scoop from the sides of the bowl, folding & pressing until all the sugar is squished into the butter to form a very stiff paste.
 Strain 100ml of the lemon juice into a measuring jug. Add the sugar evenly until the liquid has risen to 150ml – you should have an equal stripe of sugar & lemon juice in the jug.
 Time to start assembling your cake! Get yourself a lovely serving plate & remove the buttercream from the fridge. I’m going to give you a couple of tips here that I’ve learned over the years too.
 Using a stem of spaghetti or a skewer, poke several holes all over the cake.
 Take the next layer of cake, flip it over as before & carefully lay it on top of the buttercream, making sure it’s level & even.
 Sprinkle strands of fresh lemon zest all over the top of your cake, with a few on the plate around the edge. That’s it, your cake is ready to slice & share! I recommend keeping it as simple as this for an afternoon treat with friends, but if it’s for a birthday or celebration, decorate as you like!
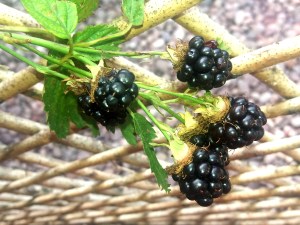
 Sultry September has arrived with a slight coolness about her & although the mornings are a little chilly now, the sunrises are just as spectacular. Getting up early means I see some amazing sunrises & Autumn never fails to deliver. An array of moody clouds smooched across the sky this morning, kissing the rooftops as it gave way to the sunshine before we’d finished breakfast. The garden looks prettily overgrown at the moment, all luscious long grass, wispy branches
  & a scattering of jewel-coloured blackberries on the hedgerows, contrasting with their dark green background. They are happily growing at a rapid rate, replacing the ones that have already been plucked & packed in a pie with sweet sliced apples & cinnamon sugar.
 a good fruit pie! Although a slightly stodgy pie is very welcome at this time of year, sometimes we like something a little lighter but just as indulgent. On one of my recent shopping trips to our local shops, there were shelves stacked with punnets of pears. They looked so beautiful & fresh, with pale juniper green skins & a smattering of gold around the bottom. Obviously, I had to buy some & starting thinking of how to do them some justice in a lighter pie, recipe calculating in my head as usual. By the time I got to the checkout a few minutes later, I’d packed my basket with a selection of ingredients & headed home excitedly to start my next creation.
 The filling would have included single cream, however there was a slight incident. Upon opening the fridge, the cream pot leapt from the top shelf, unceremoniously smacking into the floor & spectacularly showering me & everything in it’s path. Cue a huge clean up operation & a slight delay in my creation. When things like this happen, I tend to have a look around to see what I can replace it with, rather than hit the shops again & I had some lovely over-ripe bananas that were the perfect replacement! My Pear & Almond Tart (Crostata di Pere e Mandorle) is a simple but pretty dessert, easy to make & the addition of the dark chocolate makes it deliciously decadent. Ready to bake it happen? Hands washed, aprons on & here we go!
 4 ripe Pears, peeled & cored
 Roll out your pastry to a couple of inches larger than the pie tin. Using your rolling pin, flop the pastry over onto it & carefully drape it over your pie tin, so it reaches all the inside edges.
 Remove your tin from the oven & put on a cooling rack. Leave the greaseproof paper & baking beans in place for at least 5 minutes (they will be hotter than the sun), then lift them out on the greaseproof paper & put in a heatproof bowl or similar to cool.
 Now to make the filling! Take the pears & halve them. Use a teaspoon to scoop out the core. Slice each half into fine, frond-like fingers. Place one half in the pastry case, rounded side up & gently press to fan them out. Add the next pear half & repeat, making sure each is nicely spaced apart.
 Scatter the chocolate pieces all over the pears evenly.
 Stir the ground almonds & flour together in a separate bowl, then fold into the wet ingredients until blended thoroughly.
 Remove & put on a cooling rack to rest. Once cool, trim off the pastry edge until level with the pie tin. Set aside while you make the decorations.
 Lift the paper up & place on a cooling rack until completely cool.

 Gazing into the garden while sipping my first coffee of the day, there is an Autumnal air about it. The early sunshine is just peaking over the rooftops, causing the dew laden lawn to shimmer in the sunlight & perfectly summing up the Summer.
 inbetween. The poor plants don’t seem to know which way to turn & our multi-tasking willow tree has been happily soaking up the excess water, whilst providing welcome cool shade to the local wildlife. There are baby olives on our little olive tree trying to ripen, green tomatoes just starting to blush red & a bounty of blackberries waiting patiently to be plucked. The garden seems to be clinging on by it’s very leaf-tips to the last days of Summer, as Autumn has quietly arrived & begun to unpack her colourful attire across the landscape.
 amazing! From the tiny to the tawny, closed cup or open, the frilly or the flat, these fabulous funghi are just waiting to be turned into delicious dishes!
 stems work well), along with any mushroom stems, parsnip, bean or pea trimmings – wash everything well to remove grit & dirt, then chuck them all in a roasting tin with 2-3 pints of cold water, a splash of olive oil & a few good grinds of black pepper & sea salt. Cover it with foil to seal in all the juices & bake at 200*C for just over an hour, then strain & that’s it. Use it fresh, stick it in the fridge for a couple of days or freeze it. Save the veggies to whizz up into soups or sauces & pour any leftovers into jars for the fridge or ice cube trays to freeze.
 Next, although I have used two types of pastry (shortcrust for the base & puff for the lid), you could use shortcrust all over or just use shop-bought puff lids if time is limited – please make sure it’s proper all-butter puff to do your pie proud. If you do fancy having a go at making your own, here’s the link to my puff pastry recipe:

 Sprinkle in the plain flour around the pan & stir fry everything together until the flour has disappeared. This is going to make a roux in the pan, as it will absorb the butter & oil in the mixture, thickening everything up nicely.
 Tip the mushroom pie filling into the pastry lined tin & spread out well. Dip your finger in a cup of cold water & run it around the edge of the pastry.
 Put the pie tin on a cooling rack for a few moments to relax before serving. That’s it! Just get everyone around the table & dig in! Meaty but meatless, this mushroom-packed pastry goes well with either a generous scoop of cheesy mashed potatoes & steamed crisp vegetables, or a zesty green salad scattered with a few spots of aged Balsamic vinegar & toasted pine nuts. Slice it up cold for a luscious leftover lunch or freeze in slices for indulgent lazy suppers after a long day at work.

 Sweltering Summer is here & the garden is flourishing fabulously, although the heatwave has played havoc with plans for doing any gardening! The bees have been busy collecting their nectar & blossoms are blooming in abundance, inspiring me to create some Summery sugar art.
 or sassy, shoes are a wonderful way to bring a smile & shouldn’t just be for your feet! Since I began making my fancy footwear, I have tried all kinds of techniques, tools & templates, but always end up using a pair of my favourite shoes as a general guide. If I’m honest, I prefer to make each one “freehand” so I’m creating something unique & special each time.
 buttercream frosting & although they have evolved considerably since then, I still like to make my little cupcake shoes for special occasions. These sumptuously sweet stilettos are really easy to make & baking beginner friendly – the hardest part is deciding how to decorate them. Because I wanted this to be for everyone’s level of ability, I would suggest using ready-made biscuits for the sole & heel in this recipe. Ready to bake it happen? Hands washed, aprons on & here we go!
 A few drops of your favourite food colour (try using the gel colours, as the ones from the supermarket tend to make your mixture go watery & the colours weak – I used PME Cake Decorating natural food colours for this recipe).
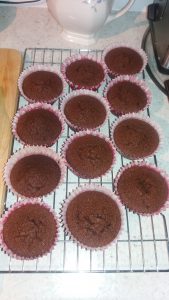 Remove your cupcakes from the tray & pop them onto a cooling rack. Leave until fully cooled.
 Once you’re happy with your buttercream, pop in a piping bag with your preferred nozzle & get swirling! For a large swirl covering the whole cake, start at the outer edge & pipe slowly around your cupcake, heading towards the centre & finish with a swirl in the middle. If you’re not sure how, my tip is to practise on a piece of greaseproof paper a few times beforehand. You can always scoop the buttercream back into the piping bag when you’re ready (no point in wasting all that hard work you’ve put in!).
 Put the cupcakes on the serving plate or board that you will be using to present them (once they’re made, you want to be able to move them easily). Leave a couple of inches space between them.
 Next time you’re having a few friends over for a special occasion, why not kick it off with some handmade sweet shoe treats & make my Cupcake Chocolat-toes! Stay hungry! A 😉 x
 Summer has arrived & although the sunshine has been a bit shy just lately, there are some fabulous fruits in the shops right now, ripe for the picking. Summer for me has always meant strawberries & as a child, I would love to both pick & eat them. We grew them in pots in the garden & sometimes would go strawberry picking at a local farm, but they were always lusciously lovely & the mere scent of strawberries brings back those memories instantly! Sunny Summer afternoons spent sitting on the grass, sipping a glass of my Mum’s homemade elderflower fizz (now there’s a recipe!) & pretending it was the finest Champagne, the hum of bumble bees buzzing around & warm sunshine on my face, whilst indulging in a beautiful blanket banquet. This would obviously include a bowl of freshly picked strawberries, washed & dunked in a little sugar before being devoured. This is why I always smell strawberries before buying them (& probably why I get such funny looks from other shoppers!). The sweeter the scent, the sweeter the berry! Sometimes the simplest of treats is the most delicious & satisfying to all the senses – we don’t just eat food with our mouths, all the other senses chip in too!
 One of my all time favourite treats is a petite pretty pastry, filled to the brim & adorned with ripe, ruby red strawberries. To call it a jam tart would not do justice to them, as the jam is simply the sweet glue that bonds these beautiful berries together within the pastry cup. These delicate delicacies are another of my childhood favourites & tremendously easy to make, all it takes is a little preparation & of course a little patience too. They also work well with a variety of berries or fruit – try cherries, raspberries, blackberries or blueberries, or why not pineapple, apricots or apples! Ready to bake it happen? Hands washed, aprons on & here we go!
 Now to prepare your strawberries – give them a w
 Stand the strawberries on their plumper end & slice the edges off, then set aside for later (pop them in the fridge on a plate covered up, especially if it’s a warm day). Keep the ends to make dinky decorations for your baked tarts. Slice up the rest of the strawberries into thin slices. Again, set aside in a dish for later, but separately from your strawberry hearts (in case they give out any juice).
 There are a couple of ways to make the pretty heart-shaped strawberry slices like I have. Either use a small heart-shaped cutter or plunger if you have one or, as the strawberry is naturally shaped that way, simply cut a little V out of the top of the slice & trim the edges to a point at the bottom of the berry. Make sure you wash your hands after this stage & dry well.
 Once rolled, take a circle cookie cutter slightly larger than your patty tin & cut out twelve circles. Place each circle in the prepared tin & using the end of your rolling pin, gently dab each one into place.
 Place the tarts in the centre of the oven & bake for 8-10 minutes, until the jam is bubbling around the berries & the pastry has turned a golden hue.
 To get the strawberry pastry decorations I made, you’re going to need a small calyx cutter (or small star) & a small heart cutter. You can buy these online or at any good baking retailer.
 When cooked, use a pallet knife to carefully lift the pastry strawberries onto a cooling rack. They should lift easily off the greaseproof paper, plus you have a clean baking tray – no washing up! Leave to rest until completely cooled. You can make these the day before & pop them in an airtight container until you’re ready to use them.
 Place the pastry strawberry on top, tilting it at a slight angle & a strawberry heart on either side of the cream. Repeat until you have decorated them all & set them onto a pretty plate. If you’re serving them later, cover them & keep in the fridge until then. They will keep overnight (as long as nobody eats them!).
 That’s it! Perfect served as part of an elegant afternoon tea, a special soiree, or simply as a sumptuous strawberry treat with a chilled glass of fizz, these plump little pastries will certainly bring some sunshine to your day! Stay hungry! A 😉 x
 It’s been a proper soggy start to Summery June, especially this week (it’s been raining since Monday morning & barely stopped). The weekend gave us some glorious sunshine & the opportunity to mow the lawns, pot some plants & generally have a tidy up around the garden. The plants are loving the damp weather, flourishing & flowering all around (especially the peas who have pods on their vines!). Although we all moan about it, the gardens need a proper downpour every now & then to keep them hydrated & healthy.
 On days like these, I like to make my own sunshine & bake some beautiful treats! Lusciously light sponge cakes, peachy fruit-packed pastries & velvety chocolate chip cookies all do the trick, especially with their heady perfume wafting through the house & the anticipation of tasting them later. Recently, I rediscovered a treat that we have not made for quite some time: the gorgeous grissini! These spindly, slender sticks of crisp, handmade bread are delicious with a few juicy olives, sundried tomatoes & of course a pan of my homemade tomato sauce for dunking. After a long day at work or as pre-dinner nibbles for your guests, these make the perfect carpet-picnic fayre to tide you over until dinner is ready – substantial enough to take the edge off being hungry, but light enough to not affect appetites too much.
 Now I’m not going to give you false hope here – they are one of the easiest & tastiest treats to make, but you will need to set aside a whole morning or an afternoon (which is perfect for soggy days!). As each breadstick is handmade, there is a degree of patience required – you can’t rush this & I personally find it quite relaxing, therapeutic almost. No machine required, this is all done by pure elbow grease – in fact, the only thing I will recommend is a pastry scraper (an inexpensive flat, flexible piece of plastic that will multi-task in a number of baking jobs, including wiping up worktops afterwards). If you’re doing this alone, it can take a couple of hours to make a whole batch, so I would highly recommend getting the whole family involved (especially the children – this is great for helping them learn a basic life skill).
 This recipe makes about 80-100 grissini, depending on how thin you roll them & I will tell you that the thicker ones have the most deliciously chewy texture, with just enough exterior crispiness too – these taste amazing dunked in a little aged Balsamic Vinegar & olive oil. Grissini are definitely a ‘prepare in advance’ snack, not for those requiring instant gratification, but the results of your hard work will be rather satisfying. Ready to get started? Hands washed, aprons on & here we go!
 Optional toppings:
 Start to knead the dough by placing it in front of you, pushing down & away from you with the heel of your hand. Then pull it back onto itself, give it a half turn on your worktop & repeat. Try to get into a rhythm, working at a nice pace & keep the dough moving (if you’re moving too slow here, the dough will stick to the worktop, so just slide the pastry scraper underneath & flip it back).
 Dust the inside of your bowl with a little flour & place the dough inside, giving a little dust of the fine semolina or flour on top. Smudge a little olive oil onto a sheet of cling film, cover the bowl loosely oil-side down & place in a draught-free, warm place for an hour (warm airing cupboards are brilliant if you have one). If you don’t have cling film, use a sheet of greaseproof paper oiled in the same way & cover with a tea towel.
 Once proved, your dough will have risen to at least double in size & will be slightly domed on top. Remove the clingfilm & pull the dough out onto a lightly floured worktop.
 your grissini to look rustic, handmade & not just squished out by a machine. Personally, I like to twist & twirl them to get a nice bobbly sort of texture when they’ve baked, but it’s up to you how you do it. Lay each one about half an inch apart, as they grow a little during baking.
 Remove & lift your grissini onto a cooling rack until ready to serve. Usually, I tend to bake them on a constant rotation of two trays in the oven while I’m prepping another two trays, until all the dough is used up.
 oil & generously shower with sesame seeds or the Rosemary (or both, which is very tasty). Bake as above. One of the best bonuses of this is when all your grissini are baked, there will be a tray of toasted sesame seeds & Rosemary leftover. These are truly splendid scattered over salads, cheese bakes, roasted tomatoes & even just for dunking a delicious tomato-sauce smothered grissini in. Keep leftover ones in a little ramekin or glass jar for this purpose.
 tomatoes in a saucepan & squish into smaller pieces (get your hands in there, you’ll wash). Add a good squeeze of tomato puree, a couple of cloves of freshly chopped garlic, a few fresh Basil leaves (roughly shredded) & a pinch of sugar, along with a few firm twists of black pepper (freshly ground is best) & a pinch of sea salt. Stir everything together with a glug of olive oil & reduce on a medium heat for a few minutes. Once it’s all bubbling like glossy hot lava, it’s done! Turn off the heat, give it a good stir & let it cool for a couple of minutes (as with most hot lava-like sauces, let it rest). Taste it & adjust the seasoning if you need to, then serve!

 Spring has arrived. It’s like we’ve just opened a window after Winter, a breathe of beautiful freshness after the cold snap. This time of year is the most exciting for me, when the sleepy seeds & bulbs are stirring in the ground, springing from the soil & bringing a new season of flowers, vegetables & recipes! There are always lovely smiling faces at my local shops too & although I only popped in for eggs, I always end up with a basket full of goodies
  (including a potted Oregano to add to my ever increasing hoard of herbs on the patio, but not the walnuts that I only remembered as I pulled into the driveway). Whilst waiting at the checkout, I got chatting with one of our Derbyshire Fire & Rescue Fire Fighters (hi Anna!). It never ceases to amaze me how our Fire Fighters head off into potentially highly dangerous situations (obviously they have lots of training & nerves of steel), so huge thanks & appreciation for their service!
 been making for many years. When I worked in an office, I would bake cakes for client meetings & once made this for an important new client – I shelled the walnuts myself & a piece accidentally got in the cake, which obviously ended up in her slice! This recipe began as a few scribbles in the back of a notebook one afternoon, when I decided to bake & discovered a lack of sugar, so used golden syrup instead (one of my best experiments!). Before we get started, I just want to address the type of sugar for this particular recipe. Because golden caster sugar is not always easy to find, I tend to use light golden Demerara or Vanilla sugar (just put regular sugar in a jar with a snapped vanilla pod overnight). It blends perfectly without any grittiness, but if you’re concerned just chuck it into a coffee grinder to make it fine. Ready to get baking? Hands washed & aprons on, here we go!
 6oz Unsalted Butter (room temperature)
 Once all your eggs are combined, sift in the flour & then fold into the mixture. Folding is just stirring in a figure of eight style around the bowl, until your dry ingredients are mixed into the wet.
 Slide a pallet knife around the edge of the cake to loosen it from the tin, then tip it onto your (oven gloved) hand, peel off the greaseproof paper from the base (pull it back onto itself, not straight up or you’ll break your cake) & place the cake carefully onto the cooling rack, bottom side down. Repeat with the other one & leave to go completely cold.
 Carefully place the top layer of cake onto the buttercream, pressing gently down & making sure it’s even all the way around.
 Leave to set for ……. as if I’d make you wait! Get slicing & sharing your beautiful baking! If you do have any leftovers, wrap in cling film & freeze for an afternoon treat. Whether you’re celebrating or just fancy a slice of sweetness, why not “Espresso yourself” & whip up my Coffee & Walnut cake to share! Stay hungry! Aimee 😉 x
 persistent. Beautiful golden daffodils, delicate narcissus & tiny tête-à-tête trumpets are all blossoming on patios, windowsills & supermarket shelves, their slender sleeves tightly packed together with golden tips peeking out of the top, ready to burst into brightness! Nature is defiantly poking her tongue out at the world, with crocuses & snowdrops lining the grass verges too. It’s this beauty amongst the harshness of Winter that has been my inspiration recently, especially with the sugar art I’ve been creating. Just the scent of daffodils lifts the spirits, so I decided to try making a sugar version in their honour.
 bigger than a regular cake is epic for us). The cake had four layers of rich chocolate cake in each tier & took me two days to make & decorate, but the actual decorations took just over a week & a bit to make, as they needed to dry/set before they could be added to the cake. Fred Bear, a white modelling chocolate creation I made, was sat by the cake with sugar paste balloons for the birthday boy (worry ye not readers, Fred is currently sat with some sugary friends & won’t be eaten – he took a while to make & is far too cute!).
 for stairs, hence it’s name). The delicious caramel syrup enveloping the fruit has a light, zesty flavour & will satisfy any sweet cravings during this cold snap, plus that fading fruit in the bowl will be used up, so no waste! If you’re buying fresh, check out any that are “wonky” or on sale – really ripe fruit has plenty of natural sweetness & requires less sugar. Ready to get your pud on? Hands washed, aprons on & here we go!
 Next, prepare your fruit. Go through that fruit bowl & pick out any apples & pears that are about to walk out in protest, because they’re so ripe. The riper the fruit, the better the pudding.
 Add the Muscovado sugar, butter, vanilla extract, sprinkle in the cinnamon & zest.
 Using a slotted spoon, scoop the fruit into the bottom of the greased casserole dish with the caramel sauce (be careful not to splash yourself, as it’s sugar & it will burn you!). There should be some liquid left over, so tip this carefully into a heatproof jug & put in the fridge to chill (you’ll be needing this later).
 Now to make the sponge cake topping! In a large mixing bowl, beat the sugar & butter together until fluffy (I do this with a wooden spoon, but you can use an electric whisk if you prefer).
 Sift the flour into the creamy mixture & fold in (move your spoon around like a figure of eight in the bowl, scooping flour into the mixture). Make sure all the flour is combined into the cake mixture & give it a good stir at the end just to make sure.
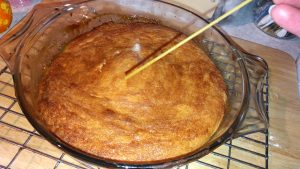 To test if your cake is ready, get a piece of spaghetti & gently poke it into the centre of the sponge. If it comes out clean, the sponge is done. If not, pop it back in the oven for a few more minutes & check again.
 mouthful of red hot lava-like fruit straight from the oven!). Trust me, it will still be warm & the sauce will soak into the bottom of the sponge cake nicely.