

Whether it’s the weekend or Wednesday, a little indulgence is always nice & doesn’t need to be extravagant. Sometimes it’s the little things that bring the most joy & that includes a plate of satisfying comfort food.
When a delicious main course is centre stage, it usually requires a couple of supporting acts. All the best ones do – fish & chips, bacon & eggs, spaghetti & meatballs (the list is endless). Burgers always require a good bun, but they also need some serious sidekicks like crispy coated  onion rings & deliciously chunky chips. These two sides are a well-loved staple in our household & with good reason.
Firstly, the chunky chips (fondly known by our family as Aimée Chips) accompany everything from fish fingers to roast chicken. They are ridiculously easy & totally faff-free – chop them up & chuck them in the tin kind of cooking.
Secondly, there are crispy light onion rings that literally melt in the mouth. These oh-so-delicate flavoursome delicacies are perfectly  light & crisp, tasting much naughtier than they actually are. Before you start worrying about chips & onion rings being deep fried or not very healthy, the best bit is … there’s no frying required because they’re all baked! That also means no hot pans to stand & watch (because nobody has the time for all that).
Ready to bake it happen? Starting with my Aimée Chips! Hands washed, aprons on & here we go!
What you need:
6-8 medium Potatoes (nothing fancy, whatever you’ve got is fine)
Sea Salt
Freshly Ground Black Pepper
Extra Virgin Olive Oil
1 tablespoon Coarse Semolina Flour
What to do:
Pre-heat the oven to 220*C & get a large roasting tin to cook the chips in.
Wash & dry your potatoes well, leaving the skins on. Cut them into thick wedges. Don’t worry about them being exact-sized, just make them at least the thickness of your thumb. Place them all into a roasting tin.
 Drizzle well with the olive oil, then dust with a good pinch each of black pepper & sea salt, about a quarter teaspoon. Tip: if you’re preparing these in advance, do not add the salt until you are ready to cook them. The salt will make them rock hard & no amount of cooking will soften them up.
Sprinkle the coarse semolina flour over the chips, shaking everything around to coat them thoroughly. Place each potato wedge skin-side down in the tin (this helps stop them sticking to the tin, as they’re curved & touching less surface area – little bit of science-y stuff there).
Bake in the centre of the oven at 220*C for about 20-25 minutes, giving them a shake half-way through. When they’re crispy & deeply golden, remove the tin from the oven & place on a rack. To keep them warm, place another baking tray loosely over the top (leave a gap to allow steam to escape) & then reheat just before serving for about 5 minutes in a hot oven.
Onto those deliciously delectable onion rings! No frying pan required, just a large baking tray & a little baking magic. Hands washed & here we go!
What you need:
2-3 large Brown/Spanish Onions
2 large Free Range Eggs
4oz Plain Flour
2 tablespoons Greek or Natural Yoghurt (full fat or 0% fat is fine)
Sea Salt
Freshly Ground Black Pepper
Extra Virgin Olive Oil
What to do:
Pre-heat the oven to 220*C. Prepare a large baking tray – line with a sheet of greaseproof paper. I use Bacofoil Non-Stick Baking Paper for this (it’s strong & textured, so stands up to the heat without disintegrating). You don’t need to use it, but it stops your onion rings from sticking to the tin & means you use less oil.
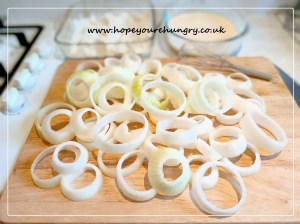
Prepare your onions – remove the tops & tails, take off the outer papery skins & cut into thick chunky slices.
Pop out the centres, then each inner onion ring, being careful not to break them. Place them onto a plate or board & set aside. The tiny chunky centres can be saved for another day – simple chop them into pieces, spread onto a tray & freeze for 10 minutes. Once frozen, tip them all into an airtight bag & pop back in the freezer – no big lumps of onion this way & no waste!
Tip the flour into a shallow dish & season with a little salt & pepper. Give it a good stir to mix well.
 In another shallow dish, crack the eggs & add the Greek Yoghurt, along with a little salt & pepper again. Give it a good whisk with a fork to break up the eggs & blend into a thick, gloopy liquid.
Take an onion ring, coating it in the yoghurt & egg mixture all over, inside & out. Shake off the excess & drop into the flour. Coat well, again making sure you cover the inside too. Don’t worry if the flour goes lumpy, that’s fine. Lift the onion ring out, shake off the excess flour & pop onto the baking tray.
 Repeat this until all the onion rings have been dipped & dunked in egg & flour. Place them all next to each other on the baking tray & don’t worry about them touching too much.
Drizzle olive oil all over the onion rings (don’t bathe it, just a light drizzle is fine) & bake in the centre of the oven for about 12-15 minutes, turning them over halfway through cooking.
 Once they’re crispy & bronzed, carefully remove the onion rings from the tray using a fork or tongs & place onto a cooling rack with a bit of greaseproof paper underneath (just in case there are any oily drips).
Remember to pop your chunky chips back in the oven for a few minutes to warm up (remove the baking tray from the top) & that’s it, they’re all done!
 Perfect piled up next to a beautiful burger or simply stacked up as a savoury snack, these crispy baked beauties are delicious sides by side anytime! Stay hungry! Aimee 😉 x


 meal to prepare, satisfying those cravings for fried fast food without actually being fried. Leftovers can be frozen for future lazy suppers, lunchtime wraps with salad or even sliced & tossed in pasta with a little homemade tomato sauce & a few roasted peppers. To pané means to coat in a little flour, egg & breadcrumbs (in my last blog, I did this with arancini to make crispy risotto balls). The only tip I will give is you need to keep one hand for the dry ingredients & one for the wet, otherwise you’ll end up with panéed fingers!
 2 large Chicken Breasts (you can get 8-10 pieces from this)
 Drizzle the remainder of the oil generously over the chicken portions & place the tin in the centre of the oven for about 20 minutes. Halfway through cooking, give it a good shake to loosen them from the tin & flip them over. Because it’s thin, the chicken will cook faster & the crumb coating will stop it drying out.
 sharp knife to check they are piping hot before eating), or simply layer them cold in a sandwich, wrap or salad for lunch the next day. Try adding a teaspoon of pesto