

Happy New Year everyone! Hope you all had a fabulous holiday & you’re feeling refreshed! The festive season has finally finished & so has over-indulgence of all varieties. January always brings everyone back to reality with a bit of a bump. As I write this, people everywhere are making rules for themselves under the guise of “New Year’s resolutions”, vowing never to drink anything alcoholic ever again, not to let anything sugary pass their lips, or to dance in fountains in a fairy costume (which is a bit dangerous in this weather & makes your wings soggy). December always seems to be used as an excuse for excess, leaving January to pick up the pieces (as long as they are small & fat-free apparently).
Now I’m not going to start admonishing people for being a bit generous with their portion sizing (that would be the pot calling the kettle), nor am I going to jump on the juicing wagon (think of your teeth people!). There are two things to remember if you want to look after yourself: (1) your body’s “In” door is a lot bigger than it’s “Out” door (I’m being polite here), & (2) that age old saying: everything in moderation. Personally, I don’t do diets & prefer to simply eat until I’ve had enough, leave what I can’t finish & never deny myself anything (within reason obviously). So, if you’re looking for fat-free dinky diet recipes, you’re going to be slightly disappointed here!

Food is the fuel to our body’s engine & some get it revving up more than others! Working lunches are usually a wilted, mystery sandwich from the local shop, accompanied by a packet of crisps, something posing as a sweet (that actually tastes like chocolate-coated cardboard with a bit of birdseed) & a diet Coke. You’re probably thinking about lunch right now – maybe your day started with a bowl of cereal & a bucket of coffee, so the dragon in your stomach is starting to growl. Rather than reaching for a rice cake or some other such food of the devil, a bit of prep the day before will sort you right out! Who bought bags of salad to go with the mountain of cheese over the festive season? Still in date & probably unopened? Thought so. And did you also have a roast dinner on New Year’s Day? Leftovers languishing in the fridge (with those veg you didn’t cook) are just waiting to be transformed into luscious lunches to keep your motor running. Right, get your hands washed & aprons on!
What you need:
Half a bag of dried Pasta, about 250g (all those leftover bits you’ve been saving will do!)
1 jar Green Pesto
1 ball of Mozzarella or a tub of Bocconcini, drained
200g Pine Nuts
A couple of large spoonfuls of Roasted Veg (recipe further down)
A couple of handfuls of Salad Leaves (Rocket, Baby Spinach, etc – whatever’s in your fridge)
A couple of handfuls of leftover Roast Chicken (optional)
Freshly ground Black Pepper
Sea Salt (for the pasta water)
Extra Virgin Olive Oil
For the Roasted Veg:
1 each Red, Green & Yellow Peppers, deseeded & chopped chunky
1 punnet Mushrooms, wiped clean with a damp cloth & halved
1 Courgette, topped & tailed, sliced chunky
1 Red Onion, topped & tailed, outer skin removed & chopped chunky
1 punnet Cherry Tomatoes
2-3 cloves Garlic, chopped finely or left whole (to be smudged onto a slice of warm, thick, fresh bread later maybe)
A few slices of leftover French bread, ripped into chunks
Dried Oregano
Extra Virgin Olive Oil
Freshly ground Black Pepper
What to do:
Firstly, pre-heat the oven to 220*C.
Prep your veg as above & chuck them in a lasagne dish or similar (a large pie dish will do). With the cherry tomatoes, halve them or at least poke a knife into them to make a vent (this is handy if you’re eating them hot – you don’t want exploding molten lava tomato in your mouth!).
Chuck in the chunks of bread (if it’s a day or two old, it’s brilliant for this). Drizzle a good glug of olive oil over the top, sprinkle on the garlic, pepper & Oregano, then get your hands in & make sure it’s all covered nicely. You don’t need salt for this, because it will just draw all the moisture out of the veg & leave it in a puddle.
 Bake in the oven for about 20-25 minutes, giving everything a turn halfway through with a spoon.
Once cooked, leave to one side while you prep everything else. These can be also kept in an airtight container in the fridge or frozen (great with some fresh focaccia & a bit of Balsamic vinegar drizzled on top).
In a dry frying pan, toast your pine nuts. Be very careful here & don’t have the pan too high. Keep moving the nuts about until they change  from a creamy colour to golden. Put them on a plate to cool.
Fill the kettle & put it on. Once boiled, pour it into a large saucepan, chuck in some sea salt (about a teaspoonful should be sufficient) & give it a quick stir with a wooden spoon. Add the pasta & bring to a rolling boil, cooking according to the instructions on the packet.
Once cooked, your pasta should be firm to the bite. Strain & put back into the pan with a glug of olive oil. Give it a shake & a stir (the oil will stop it going into a big pasta lump). Set aside to cool for a bit (especially if you’re making it the night before work, otherwise you’ll just have a pot of steam & soggy stuff for lunch).
Get your lunchboxes ready – you can buy packs of those resealable little plastic tubs from your local supermarket or Wilkinsons & they are perfect for this!
Now, here’s where you can make different pasta salads for some variety (because the same thing will be boring). Get four or five lunchboxes or bowls & divide the pasta equally into them all.
 Tip the whole jar of pesto into the pasta (yes, all of it). Give it a good stir around, completely coating all the pasta.
Drain your Mozzarella & rip up into small, bite-sized pieces (sometimes I use Bocconcino, which are little Mozzarella balls). Chuck some into a couple of the pasta lunchboxes.
In two other lunchboxes, add a couple of spoonfuls of the roasted veg & mix in gently.  If you’ve got roast chicken in the fridge that needs eating, rip some of that up & add some to the pasta without Mozzarella.
Grab a couple of handfuls of salad leaves & put in each pasta box you want them in. Rather than waste any of that leftover salad, chuck it in the blender to be whizzed up with a few untoasted pine nuts, a good grating of Parmesan cheese & a drizzle of olive oil, et voilà! – homemade pesto! Spoon into a jar, stick it in the fridge & save it for another day (try it on hot baby new potatoes, it’s delicious).
Sprinkle pine nuts over them all, adding more where you want & less where you don’t (it’s your lunch, so make it how you like it).
Dust them all with a few grinds of the black pepper, then cram the lids on top (I usually get my hands in & gently mix it up beforehand). Put in the fridge until you need it.
In the morning, just grab a box before you leave & that’s lunch done! Plus you might save a bit of money too (always a bonus).

There are lots of variations that you could try, so just raid the fridge & cupboards, use your favourite foods to give you a bit of inspiration & get creating!
So let’s start the New Year with a shot of colour & a luscious lunchbox of flavourful pasta! Stay hungry! Aimee 😉 x
 been following my blog, you’ll have most of your Christmas cooking prepared by now too (well done you!). This part is all about the main event: a beautifully basted bird, & whether you prefer turkey, chicken or something else completely, you want it to be perfect. It’s like a spectacular Sunday lunch, only with more people (& more wine). Whether you’re having a full-on festive feast or not, everyone will be looking forward to spending a few days with their family & friends.
 pterodactyl (it was a bit of a beast & needed two people to wedge it into the oven), along with joints of beef, pork & Quorn, plus a glazed gammon joint & various crates of veg – this involved several days, two kitchens & a bottle of Sherry! Despite all the chaos, dinner would be done & I somehow managed to keep smiling – it’s a bit like being a swan on a pond, all calm & graceful on the top, but paddling like mad under the water!
 2-3 medium/large Carrots
 Next you need to fill the cavity of the chicken – again, this helps the chicken cook evenly & it also flavours it nicely too. There are various fillings you can use, but ultimately it’s down to personal choice – some people prefer traditional sage & onion stuffing, some prefer using a few fresh herbs & vegetables. If you made some of my homemade sage & onion stuffing for this, simply spoon it into the cavity until full. If you prefer your stuffing separate, bundle together a couple of thin carrot & celery sticks with the leaves on, along with the herbs (saving a couple of Sage leaves) & put inside the chicken cavity.
 If you’re using bacon, layer your bacon rashers across the chicken breast, starting at the top & working your way down, with each rasher overlapping the previous one. This is good if the skin has split on your chicken – it will keep your breast meat moist & the bacon will crisp up nicely at the end of cooking. Wash your hands well again afterwards (they’ll be sparkling by now!).
 Lay a couple of equal sized foil strips on top of each other, with the dull sides on the inside (the side that goes next to the chicken), then fold the top over about a centimetre all the way along. Do this a couple of times, then mash them together well to make sure they don’t come undone in the oven. If you have a larger sheet of foil, just put a crease or fold in the middle, leaving the central part un-creased. Put over the tin, making sure it forms a dome over the top & doesn’t touch the chicken, then press firmly around the edges of the tin so that none of that lovely steam can escape. This is what makes your stock, infusing with the bird & veg to produce a fragrant, flavoursome fluid for making gorgeous gravy later.
 When you’re happy that it’s crisped enough, remove your roasting tin from the oven & place on a cooling rack (I use a grill tray with a wire rack in it for this, to catch any drips). Replace the foil lid & seal around the tin to protect the meat from drying out, then let it rest for at least half an hour. By resting the bird, the meat relaxes nicely & becomes beautifully tender. Traditionally, you should let the bird rest for the same amount of time it was in the oven, but I leave it as long as it takes to cook the accompanying side dishes.
 If you’ve been following my previous blogs, this is where you grab a well-deserved glass of something nice, give yourself a pat on the back & relax, because all your sides will be prepared! Just pop them in ovenproof dishes, then warm them through in the oven while your roasties cook (bet you’re glad you did all that prep now!). Obviously, this is also when you tell everyone else to keep out of the kitchen while you’re working hard (on your G&T hopefully) & send them off to set tables, find tablecloths, fill glasses – anything to keep them busy & give you a five minute breather.
 a pint into a jug (keep the rest in the pan, put the lid on & leave to cool, then freeze). To remove any fat from the stock (that’s the golden bubbles you can see here), get yourself a few sheets of kitchen paper & touch it gently on the top – the grease will attach itself to the paper, which you can then throw away (no faffing around trying to separate it).
 When everything is ready & you’re happy with it, get your Little Helpers in to distribute dishes to the table (maybe have some extra treats to reward them for their support).


 until it was silky smooth (although simple to make, profiteroles need strong arms & plenty of stamina). Once baked & filled, these piled up plump little pastries would be generously glazed with glossy, rich chocolate sauce & adorned with sparkly spun sugar. I would watch in amazement as my Mum swiftly whipped a sugar-dipped fork through the air & glittery, golden sugar strands would appear as if by magic! Although I don’t tend to make spun sugar very often, I do still make proper profiteroles & once you have tried them, you’ll be hooked too. So, hands washed & aprons at the ready!
 Once cooled, your profiteroles are ready! If you are preparing them in advance, you can freeze them a few at a time in a single layer – they crisp up beautifully after a few minutes in a warm oven & you’ll be able to dish up a dessert at a moment’s notice.
 Generously drizzle warm, chocolate sauce over them & serve! You want the recipe for chocolate sauce, don’t you? It’s really easy to make & one of my favourite “chuck it all in a pan” recipes. I make jars of this & store it in the fridge or the cold pantry, then warm it up to make it runny enough to pour over cupcakes (it tastes fabulous spread on hot toast too). Here it is!
 the leaves, all the way around & it should come out. The more ripe the strawberries, the easier it is.
 When you’ve finished, you should have a beautiful strawberry sponge square cake (yes, I’m aware it’s not square, just go with it). Dust lightly with icing sugar all over the top (use a tea strainer for this & you only need about a teaspoonful of icing sugar to do the whole thing) & serve immediately.
 could just hide the rest in the fridge for nibbling on later (I think you’ve earned it!). If you don’t like strawberries, use blueberries or even your favourite jam. One of my favourite variations is to make a tiramisu filling instead of using cream, then mix some Sherry or Brandy with an equal amount of espresso coffee to drizzle over the sponge & replace the icing sugar on top with finely grated dark chocolate. Decorate with a few coffee beans & a sprig of fresh mint.
 the end of November, I had already chopped, mashed & stashed an array of side dishes in readiness, cramming pots of fluffy potatoes, gorgeous gravy & cauliflower cheesiness into my freezer. Most of us work & don’t have the time to faff around in the kitchen, so a bit of prep now will make all the difference. It’s like giving yourself the gift of time! Because I’m covering a few things here, you will need some strong coffee to keep you going & a few Little Helpers to share the load (bribes at the ready if necessary!). This also works for Thanksgiving too.
 exception. A week or two before, I make a mountain of mashed potatoes & a giant cauliflower cheese (sometimes with broccoli), then freeze them in two-person portions (for the recipe, click on this link to my blog:
 completely & I started making my own from scratch. It’s so simple, you can make it in advance & freeze it until you need it! If you prefer it inside the bird, just make your stuffing the day before, cover it & leave in the fridge. Depending on the size of your dinner party or the size of your bird, just increase quantities as required (I say “bird” because not everyone eats turkey, my family included, as we prefer chicken). Hands washed, aprons on & here goes!
 1 large Onion, finely chopped
 Sprinkle the Sage & Rosemary into the pan with a pinch of Thyme, add the breadcrumbs & stir well. The residual heat from the pan will bring everything together nicely, so just mix well. Season with a little sea salt & black pepper, stirring well again. If you’re adding the roasted chopped chestnuts or lemon zest, do this now.
 If you’re making stuffing balls, get yourself an ice-cream scoop (spring-loaded will make your life easier & will also ensure they are all roughly the same size). Put some of the mixture into the ice-cream scoop (you don’t want to damage your pan by scraping it!) & press it in gently. Release the ball from the scoop, shape it into a nice sized ball in your hand & place on the greaseproof paper. Repeat until you’ve used the whole lot.
 oven for about 15-20 minutes until golden brown on top, turning halfway. Once cooked, either serve immediately with your roast dinner, or place on a cooling rack (still on the greaseproof paper) & leave to cool completely. These can then be frozen & reheated on the day you want them. That’s the stuffing stuffed!
 Once you’ve got your sides sorted, Christmas Day becomes a doddle – just take them out of the freezer the night before, pop them into an ovenproof dish to defrost & that’s it, prep done! They can be reheated in the oven while the bird is resting & the veg are roasting. This is also handy when unexpected extras turn up for dinner, because you’ll have a spare pot you can defrost (making you look like the most organised person ever & score major Brownie points!).
 quality one that you like, then pimp it up with a few little tweaks. Simply scoop the whole lot into a small saucepan & break up with a wooden spoon, heating very gently. Add a shot of Sherry or Port, stirring carefully into the cranberry sauce. Sprinkle a little orange or lemon zest into the pan, about half a teaspoon, & stir gently for a minute or two. Pour it into a small dish to cool, then cover & put in the fridge until you’re ready to serve!
 Remove from the oven & tip them onto a cooling rack. Either pile them up onto a plate for your dinner guests or let them go cold, bag them up & pop them in the freezer. Then when you fancy a Yorkshire pud, put them on a tray in the oven for about 4-5 minutes to reheat & crisp up – I like to use the residual heat from the turned off oven after cooking dinner. They’re also rather nice with a spoonful of jam & a drizzle of single cream (or tinned evaporated milk).

 also the time of year my Husband & I met, so we always celebrate our first date (it involved a large Harley Davidson Sportster, a couple of hundred bikers delivering Christmas presents & rather a lot of tinsel!).
  Christmas Day. Some of these multi-tasking munchies can even be used as a starter, so make a few extra (which is my mantra, as you probably know by now). One of my favourites (& apparently everyone else’s!) are baked cheesy biscuits – you can serve them simply on their own or with a dip, or even pipe some cream cheese on them & decorate with chopped chives. They are really easy to make & the recipe is in my blog called “Grate Expectations” – here’s the link for speed:
  Scoop spoonfuls of the breadcrumb mixture into each mushroom – be generous & keep going until every mushroom is crammed full, then sprinkle with a little more cheese. Any leftover breadcrumb mixture, chuck it in the fridge for later (someone always turns up late or you might fancy a midnight snack). Scatter a few pine nuts over the top (these are gorgeous & have a sort of popcorn taste to them).
 If you’re preparing them in advance, cover in cling film now & pop them in the fridge until you need them (they keep until the next day at least). Otherwise, bake in the oven for 15-20 minutes until golden & gorgeous. These are great hot or cold, either on their own or with dips, or just with a green salad as a starter.
 prepped by one of your Helpers a few days before, then stashed in the fridge in airtight containers or bags, ready to be whipped out with a delicious dip anytime! If you fancy something different, try raw crunchy cauliflower florets (one of my faves), sliced peppers, sugarsnap peas & mangetout. Give them a good wash, trim the ends & stand them in a cup. One thing I don’t do at this time of year is make dips – I really cannot be bothered & what with all the other stuff to do, just buy some nice ones & store them in the fridge until needed. Simply scoop them into individual tea cups with saucers & dinky spoons (saving your table from splodges), rather than leaving them in a plastic tray – even if they do have one of those optimistic re-sealable tops, dips always disappear first!
 Measure your spices into a cup & carefully mix together. (Sometimes, I only use half this mixture & sprinkle the rest over chunky raw potato slices, drizzled in olive oil, to make spicy wedges in the oven – bake at 220*C for 25 minutes & serve with a cooling dip, like Greek yoghurt mixed with a few chopped mint leaves).
 Take a couple of pieces of chicken, coat them in the egg & shake off the excess. Chuck them in the breadcrumb mixture & pat this onto the chicken to ensure it’s coated well. Place them into the roasting tin & repeat until you have coated all the chicken. Drizzle more olive oil over the top (drizzle, not drown).
 Spread them on a huge plate for people to help themselves – turn it into a starter with a salad, a couple of potato wedges & a yoghurt & mint dip, or leave them to cool before freezing them in a bag until needed. Job done!
 There are some things that just don’t do it for me & that includes anything with really over-dried fruit in it – shop bought mince pies, heavily laden fruit cakes that are more fruit than cake (that’s just plain wrong), & anything with shrivelled up sultanas in it. Scones, buns, cakes or fruit bread should all be graced with sweet, sumptuous fruits & nothing dried of any description.
 There are a variety of treats you can rustle up with these little beauties & on a Sunday morning, if my Husband isn’t making croissants (his speciality), I will make my Sultana Swirlies. They’re pretty much twirls of enriched dough with squishy sultanas in a swirl of sugar, butter & cinnamon. If you don’t have the time to make the dough, use pre-made all butter puff pastry (the good stuff) instead. So get your apron on & here’s the recipe!
 coffee cup along with the tea bag, pour on the boiling water & stir well. Put a lid on it (a saucer or small plate will do) & leave to one side for a couple of hours at least. If you want them to really plump up, do this just before bedtime the night before & leave them until you’re ready to use them (I’ve left them for 24 hours before, so they will be fine).
 While the dough is proving & your sultanas are soaking, relax. There’s not much you can do here, so put the oven on to 220*C, put the kettle on & make yourself a cuppa. Prepare your baking trays – brush with butter & flour them, or line them with greaseproof paper. I’ve used pizza tins for this & they work quite well.
 Using a sharp knife, cut the sausage in half, then cut each half in half again. You should be left with about 16 slices, each one about an inch thick. Lay them in a circle on a prepared baking tray to make a flower shape, leaving about an inch gap between them. Press them down slightly to flatten them a bit.
 Cover loosely with greased clingfilm to protect them, then leave them on a draught-free worktop to prove again for about half an hour. They will have doubled in size again & filled the tins completely.
 – to test if dough is cooked, give it a tap on the bottom & it should sound hollow.
 glorious, bringing with it a bright, albeit chilly, day & …. (drumroll please) …. a new hob! After being hob-less for eight very long weeks now, you can imagine my eager anticipation! With a fresh biscotti & coffee in hand, I sat fantasising about heavenly hob cooking: silky Spaghetti alla Carbonara, rich risotto & fat, fluffy pancakes – it was as if my Fairy Godmother had popped in for a coffee & brought Prosecco instead!
 While the two great guys from a well-known electrical company (think spicy food) turned up & got to work fitting the new hob, I discovered they had been on the road since 6.30am with no breakfast or coffee (& they were still smiling!). Obviously, I had baked & there was a selection of biscotti & breakfast bars for them to share, as my way of thanking them (I did the Mum thing too, packing them off with a little bag of goodies). Big thanks to Michael & Steve, you are stars!
 coffee, Grappa & of course, the Biscotti! Biscotti are one of our favourite treats, especially as they travel well & can resist a good dunking in a drink. When you’re having a relaxing afternoon break sipping your caffè macchiato, you want a good solid biscuit to dunk. That first, almost trepid, dip as you submerge it a little into the steamy liquid & the smug relief you feel as you retrieve it is quickly replaced with sheer horror, as you helplessly watch collapsing chunks plunge back into your cup! It’s happened to us all & when your dunk is sunk, no matter how
  fast you try to spoon it out, it’s gone to the bottom of that cup faster than a brick & is now a murky, mushy mess waiting for you to sup up.
 lovelies as a mere biscuit doesn’t do them justice! Here’s a bit of history for you: Biscotti comes from an old Latin word “biscoctus”, which basically means twice-baked. In the old days, storage options were quite limited & so by cooking them twice, the biscotti would keep for a lot longer & still be good to eat (I knew those Latin lessons would come in handy one day!). For a while, I’ve been buying them from a little local supermarket & at one point, we had a serious stock pile in the pantry (just in case there was a world shortage, you know). Recently however, they didn’t have any & our stash was running low, so my Husband (who adores them as much as I do) suggested I make some. Challenge accepted! This recipe is for a nutty biscotti called Cantuccini & although I’ve adapted it slightly, it’s as close to a traditional recipe that I can get, so I hope our Italian friends like it as much as we do! Hands washed, aprons on!
 on a baking tray & evenly spread the almonds (& hazelnuts too if you’re using them). Place the tray in the oven & let them toast up for about ten minutes, until their colour deepens slightly & you can smell their toastiness. Once done, turn the oven down to 150*C & remove the nuts from the oven. Gently ease the greaseproof paper, with the nuts on top, onto a chopping board (not a plastic one!). Leave to cool for about five minutes or so.
 Wearing oven gloves, pick up a small handful of the nuts & gently massage together in your hands, which will remove some of the papery skin easily. Chop the nuts into large pieces – you want to be able to taste the nuts in your Biscotti, so take it easy when chopping. Set to one side for later.
 Get a couple of medium-sized mixing bowls – one for the dry ingredients, one for the wet. In one bowl, sift the baking powder & flour together. In the second bowl, crack the eggs in, add the sugar & vanilla extract. Whisk well for a couple of minutes or so by hand until it becomes a creamy coloured, glossy mixture, then gradually pour in the melted butter & whisk again as you do so.
 Turn the dough onto a lightly floured worktop & shape into a flattish sausage shape, about half an inch deep & roughly three inches wide. Carefully transfer onto a baking tray lined with
 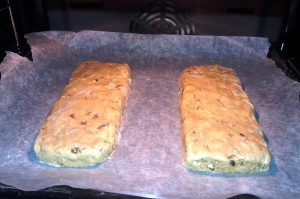 greaseproof paper, cutting the sausage into two equal portions if necessary & leaving a couple of inches gap between the two on the tray. Make sure any escaping nuts are squished back into the dough, otherwise they might burn & spoil your biscotti.
 Place in the centre of the oven & bake for about 25-30 minutes, until firm & slightly risen. Slide them onto a cooling rack & leave for about 10 minutes or so, keeping the greaseproof paper on the baking tray for later.
 half an inch wide. Return them to the greaseproof lined baking tray, standing up & slightly separated, then pop them back in the oven for about 20 minutes for round two, until lightly golden & bronzed on top. I like to turn the tray around halfway through, just to make sure they are toasted all around.
 Remove from the oven, leave to cool completely on a wire rack & your biscotti are ready! They make great gifts, or will keep for a week or so in a jar (if you hide them, otherwise they last about an hour if you’re lucky!). I also like to use them as a base for no-bake cheesecakes (I make a mean lemon cheesecake with these crumbled up).
 Traditionally, Biscotti are dipped in a glass of gorgeous Vin Santo wine, but these unsinkable beauties can be enjoyed with a coffee whenever you need a nutty nibble. So for a dastardly dunk, be brave with a bellissimo Biscotti! Stay hungry 😉 Aimee x
 technically hob-less, which doesn’t help when we fancy a fry up. It’s the simple stuff you miss when you don’t have a working hob, like cooking a proper breakfast. Even a basic boiled egg has become a rarity, which isn’t good when it’s boiled egg & soldiers season! All the stress of this project has taken it’s toll (obviously made worse with the hob issues), so I’ve had to get even more creative in the kitchen (I’ve been baking plenty of bread & taking my stress out on the dough!).
 couldn’t even fry an egg, she suggested baking eggs on a tray in the oven, a bit like a hot plate & it works really well (obviously, because Mums are always right). So this Monday morning, I decided to start the day with a “bake up” instead of a “fry up”! I defrosted a few frozen rashers of smoked bacon, laid them out on a baking tray (no oil required) & put them in the oven to crisp up. Several sizzling minutes later, the bronzed bacon rashers had given up their oil onto the tray, ready to plop some eggs
  into. Now I didn’t want runaway random shaped eggs & I don’t have any fancy cooking rings like those you see on TV shows (or the budget!), so I used a couple of stainless steel pastry/cookie cutters instead with the flat side down. They work perfectly! As I like my eggs cooked through (yolk should be runny, but not the white thank you very much!), halfway through cooking just after they turned white, I spoon a little hot bacon fat over them. The rings keep it in place, making sure the tops get cooked nicely & you don’t have to flip your eggs half way through (risking a burst yolk in the tray). Obviously, you can use whatever shape you like – dinosaur, star or flower, as long as they’re ovenproof! Another bonus to cooking
  this way is that you don’t need to stand watching pans, you just chuck it all in the oven! When I put the eggs in, I also like to place a dinky dish of baked beans in the oven too, along with a couple of croissants (a bit like posh beans on toast). So in about fifteen minutes, we had an effortless breakfast bake up & minimal washing up afterwards – bonus!
 add a little more Balsamic if you think it needs it. That’s all you need to make luscious, lovely sauce, ready to drizzle on a bacon butty! Squeeze some into a small cup or dish with a spoon, so everyone can help themselves to a splodge. I’ve not bought brown sauce since & just keep a good supply of tomato ketchup handy. There are other ways to enhance the flavour, just have a play with different ingredients using the ketchup as a base.
 suppertime stodge, whether it’s a rich roast dinner or luscious layers of cheesy lasagne, but not everyone has the time when they get home.
 crumble topping (I usually make extra just to keep in reserve). There are bags of breadcrumbs, an array of pots & portions of lasagne, meatballs, homemade garlic & bacon butter, along with generous pots of cauliflower cheese, mashed potatoes, chicken stock, random rashers of smoked bacon & homemade gravy. If you add to that the pizzas & chicken dishes I’ve made too, like kievs & cacciatore, it’s like my own little freezer shop at home!
 Making a huge steak, ale & mushroom stew at the weekend, then freezing it in individual pots means instant pie filling anytime! Just take a couple out of the freezer to defrost in the morning, then knock up a bit of pastry when you get home & bake in the oven for a speedy version of a slow-cooked, sumptuous pie.
 Once cooked, drain & tip them back into the pan (or casserole dish if you’ve microwaved them). Add a generous chunk of butter, the cream cheese, grated cheese & about half the milk, then get mashing! Take your time, there’s no rush. Mash by hand until smooth, firm & creamy. Add a little more milk if you need it, but not too much or it will become runny – you want chunk-free, scoopable mash.
 Dust with a good pinch of dried herbs, then bake it in the oven at 200*C for about 10 minutes. The cheesy crumb topping will go all golden & crispy, with fluffy, buttery, cheese infused mash underneath. Once cooked, either allow to cool completely for freezing, or dish up & dig in!
 By cooking just one extra portion of food for each meal & freezing it, you’re giving yourself time to do other things, even if it is just putting your feet up with a glass of wine in the evening.
 This time of year gives us some stunning pink sunsets & amazing natural colours to brighten up our meals on those frosty days. The fruits are dark, rich & intense; the vegetables are vivid, flavoursome & versatile. It’s Nature’s way of getting those essential nutrients into us via such attractive packaging (most of which you can eat too!). Working or not, lunches can often be random sandwiches with questionable fillings, or pasties filled with even more questionable meat. Sometimes we need to set aside half an hour to whip up something a bit more substantial than a shop-bought sandwich from the local garage on your way to work (I’m not judging, we’ve all done it).
 This savoury tart is crammed full of luscious cheese & finely chopped beetroot adorns the filling with beautiful deep amethyst & magenta colours. Everyone knows how much I love cheese, so I began my experiment with a positive attitude. I adapted the recipe, mainly because my experience with grating anything by hand usually ends up with me grating my knuckles or a fingernail. The original recipe had grated beetroot & just one cheese, so I’ve added a few more to give it a more rounded flavour & it’s good to use up various bits of leftover cheese (apparently leftover cheese is a thing in some homes!). Ready to bake it happen? Hands washed, aprons on & here we go!
 Make the pastry: tip the flour into a large mixing bowl, add the butter & crack in the egg. Get your hands in & mix it all together to form a firm dough. On a lightly floured worktop, roll out the dough to about 5mm thickness & make sure it is larger than the tin you are using (a couple of inches extra all around should be enough).
 Grab a sheet of greaseproof paper & screw it up, then unravel it & lay it over your pastry in the tin. In a previous blog, I’ve mentioned about baking blind, so if this is something you will do often then I suggest you get some ceramic baking beads. If not, use a couple of handfuls of dried pasta such as fusilli or penne. Tip them onto the greaseproof paper, then bake in the centre of the oven for about 10 minutes.
 This beautiful beetroot tart is perfect for packed lunches & keeps for a couple of days wrapped up in the fridge or you can always freeze some. Serve in slices, either on it’s own or with a gorgeous green salad & well-buttered jacket potato. Even though I don’t like beetroot, I actually adore this & it adds a semi-sweetness to the soft, creamy cheese filling. Obviously, my Husband loves it too, so I make two & there’s plenty to go around.
 Another version of this cheese-crammed tart is to use leftover vegetables from the fridge too, including any roasted veggies you cooked the night before (I’ve always got a jar of these, because I roast them up for pizzas). Got two or three rashers of smoked bacon in the fridge? Snip into bits, fry them in a drizzle of olive oil & chuck them in the bottom of the baked pastry case, add pieces of veggies – roasted peppers, courgettes, onion, they can all go in & no waste!
  Pour the eggs & cheese mixture over the top & bake as in the recipe above. Blissfully beautiful, the sweet peppers offset the tang of the cheese & the smokey bacon perfectly. Or, why not swap raw asparagus for the beetroot – it’s so crisp & delicious! Snap off the lower woody stalks, trim the tips to a couple of inches long & thinly slice the rest of the stems into tiny discs. Lay the tips in a sunray pattern around the tin, sprinkle in plenty of
  the chopped stems & add the cheese & egg mixture. Chop or rip some fresh mint leaves & scatter across the top, then bake as before. Slice & share warm, or save for lazy lunches, brunches or swift suppers.