

 The first pasta I ever made was a very soupy looking lasagne when I was a teenager & it didn’t improve much until my twenties – it tasted very nice, but you needed a spoon to eat it. My pasta skills have progressed a bit since then & I am happy to say, you don’t need a spoon to eat my lasagne anymore (although I do recommend wearing an elasticated waistband).
Some people may think of pasta making as a bit fiddly or time consuming (it’s like the bread making scenario all over again). I appreciate this, because I too had a few issues in the beginning (actually, I still do on occasion) & that’s OK, because your kitchen isn’t a Michelin starred restaurant – you’re making it for family & friends, not paying customers! It just takes a little practice, that’s all. The best thing is pasta takes very little time to make from scratch, plus it’s fun to make when the weather is a bit pants & the kids are “bored” – get them making pasta! If you don’t have a pasta machine, don’t worry – a good solid rolling pin is just fine & a little elbow grease (your arms will be firmer after a few pasta making sessions too, bonus!). Ready to get stuck in? Hands washed, aprons on & here we go!
What you need:
 The recipe I use is 100g of strong ’00’ flour (or strong bread flour) & one large egg, per person (so if you’re cooking for three people, that’s three eggs & 300g of flour). However, I like to mix half flour with half fine semolina, which gives it that gorgeous golden, sunshine yellow colour (& everyone likes a little sunshine).
Forget pudding semolina in those tiny boxes, have a look in your local shops & markets for the proper semolina flour. I tend to buy a bag each of coarse & fine semolina – coarse is great for sprinkling on trays before baking grissini, freestyle bread shapes or pizzas (it’s also good for crisping up your roasted potatoes).
Also, I recommend buying good quality free-range eggs – trust me, it makes all the difference. Here’s a little test to see if your eggs are really fresh. Half fill a jug with cold water & gently plop the eggs into the jug, one at a time. If they sink, they’re fine & fresh; if they float, it means they are not that fresh & probably shouldn’t be used.
What to do:
Measure your flour into a bowl & tip onto a clean  work surface. Make a well in the middle, crack your eggs in carefully & combine them a little before using clean, cool fingertips to bring the flour in from the sides & gently combine into a lovely golden dough (it’s messy, but that’s half the fun).
 Knead for about five minutes until flexible, then wrap in cling film & leave to rest in the fridge for half an hour. After that, you can roll it out, stuff it with some fabulous fillings, or cut into ribbons (such as tagliatelle) & even hang some up to dry for another day (if you don’t have a rack, use a clean clothes horse). It’s that simple! If you do save some, remember to store in the fridge because it’s got fresh egg in it.
While that’s chilling out (I hear you groaning at my jokes), here’s a fast filling that I love – ricotta & spinach. You can make your own ricotta, I do it & it’s really easy, but we don’t all have the time so grab a regular sized pot (about 250g) from your deli for this.
Wilt a couple of generous handfuls of fresh, washed spinach in a dry frying pan or skillet. Don’t have the heat too high though, you want to wilt it not fry it. The spinach will shrivel up into silky emerald coloured swirls. Put this in a blender with the ricotta & give it a good whizz around. If it’s not firm enough, add a grating of Parmesan. Put in the fridge until your pasta is ready.
 To make ravioli, roll the dough out until it’s almost thin enough to see through. Lay it down on a flour dusted surface (sprinkle some semolina too – this will stop it sticking). Then simply add small splodges of your filling (about a teaspoonful), roughly an inch apart, down one side of the pasta sheet – sometimes I use a piping bag to do this (less mess & a bit quicker). Dip your finger in a cup of cold water, run it along the edge & between the fillings, before folding the other side of the pasta over the top. Press the edges down firmly, using a cupping action with
  the side of your hand to separate the fillings into individual bumps & remove any air. Cut them into little parcels using a ravioli or pizza cutter (or even a small cookie cutter) & set aside on a plate or board, again dusted with flour or semolina (or both).
Bring a pan of water to a rolling boil, chuck in a couple of generous pinches of sea salt, then gently add your pasta to the water. It should 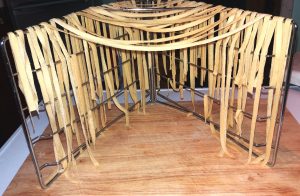 cook in about 2-3 minutes, so pick one out & have a taste to check – obviously, if you’re cooking ravioli or similar stuffed pasta, use your judgement on this & make sure the filling is piping hot. Then drain (saving a cup of the water) & serve as you like it- spoon on some sauce, or just add a drizzle of extra virgin olive oil & a sprinkle of black pepper. If your sauce is a bit too thick, add some of the cooking water to loosen it up a bit & make it silky smooth (you really don’t need much). All you need to do then is eat it!
 Speaking of sauce, usually I make my family recipe tomato sauce for this, but sometimes there’s a bag of salad that needs using up – perfect for homemade pesto. Try blitzing a couple of generous handfuls of fresh washed rocket, basil & spinach in a blender (I’ve used all sorts of leafy greens & lovely veggies from the fridge for this over the years). Add a good drizzle of olive oil, a few pine nuts (almonds or walnuts are good substitutes) & about an ounce of grated hard Italian cheese – I use either Parmesan or Grana Padana (sometimes a mixture of both), but it’s down to your personal taste here. You don’t need any salt – Parmesan will add that flavour. Add a little of the pasta water to thin it out a bit & spoon over your handmade ravioli!
If you’re like me & make pasta very often, one of the best tips I can give is to treat yourself to a robust pasta machine – forget brand names here, go for the one that you feel most comfortable with. Take it out of the box, have a play with it before you buy it.
When I first began making pasta, I would roll out the dough by hand with a rolling pin (several times until it was thin enough & my arms ached), so my pasta machine is one of the best purchases I’ve made. With the turn of a handle you can have perfectly precise spaghetti (they are also really good for rolling out fondant icing too!).
These plump little pasta parcels are perfect for meat-free Mondays, or mid-week suppers with friends! Why not get everyone involved & make it a family event! Stay hungry! 😉 Aimee x

 Bananas – love them or loathe them, they are one of the most versatile foods & make some of the best tasting treats. Now I don’t usually get all fired up about fruit, but they’re getting a bit of press recently & it’s not good – apparently, people are throwing away millions of pounds worth of bananas a year because they’re a bit blemished, bruised & generally not very beautiful! So don’t throw them away – show the banana some love!
 And then came the delightful discovery of the chocolate banana loaf & it’s one my family’s favourite treats. Use really over-ripened bananas here – as bruised & blotchy as you can get – check out the reduced section of your local shop & if you have a few leftover, just freeze them. My tip is to double the mixture & make two – they tend to evaporate rapidly! Ready to bake it happen? Hands washed, aprons on & here we go!
 minutes. Use a skewer to test if it’s cooked – poke it in the middle (the thickest part) of the loaf & if it comes out clean, then it’s ready. If not, give it another five minutes & check again. Once cooked, leave it in the tin on a cooling rack for five minutes, before gently easing the loaf out onto the rack. Carefully remove the greaseproof paper from the edges & leave to cool completely (about half an hour or so).
 All that’s left to do is indulge in a thick slice with a cuppa – it’s moist, chocolatey & comforting, plus it makes a great addition for afternoon tea. Store the rest in an airtight container or freeze a few slices for when you fancy a treat. I really want to say this keeps well, but it never lasts very long in our house!
 Fridays are fabulous for many reasons: it’s the Preekend (as it’s fondly known here), the fizz is chilling in the fridge & thoughts turn to dinner. Pizza is very much loved in our house & we’ve tried them all over the years – the fresh, the frozen & the takeaways. But nothing beats making your own, getting everyone involved & having a relaxing meal (pizza is definitely relaxed & a great way to wind down the week!).
 Because I’ve been baking up a storm, I like to delegate the dough making on a Friday night to the guys & my Husband has become Chief Pizza Dough Maker. Usually, I’ll pour us each a glass of Prosecco to sip (in “scary saucers”, which my Husband can fit his face in) & while he’s kneading the dough, I make the sauce & we catch up on each other’s news & gossip. Hands washed, aprons on & here’s how to make your own!
 Usually, I have a couple of jars of my homemade tomato sauce in the fridge, leftover from
 Once the dough is stretched out, I smooth a large spoonful of the sauce over the top, leaving half an inch around the edge & it’s ready to be adorned with beautiful toppings!

 There is something heavenly about the heady fragrance of fresh, ripe juicy strawberries that always makes me think of Summer. When my son was young, we would spend many a sunny afternoon in a strawberry field, gently plucking plump berries from their leafy beds & enjoying their tantalising fragrance on the way home, eagerly looking forward to devouring them!
 Now we all know they go very well sandwiched in a scone with jam & cream (if you don’t, you’re missing out), so I like to include these beautiful berries in other delights too.
 For a quick impromptu dessert (unexpected guests will love this), whip up a fluffy, fat-free sponge & layer between thinly sliced strawberries & piped cream. It looks like you’ve spent all afternoon baking, but actually takes about 20 minutes from start to finish & most of that time is spent on the assembly! Dust it with icing sugar & if you really want to make it look extra fancy, make a pattern in the sugar with a hot metal skewer across the top (wear an oven glove though – the scent of burning fingers is never attractive).
 family call it this because the Italian name is crostata di mandorle e fragoline (please note, no fraggles were harmed in the making of this treat). Of course, the pastry has to be homemade with soft butter, eggs, sugar & flour – if you’re going to do these beauties justice, have a go at making your own. I’ve used various types of flour,
  Another favourite of mine are strawberry jam tarts – I have my own take on these jammy little pastry cups & this is for those over-ripened fruits, the slightly squishy, sad looking ones that have been living in your fridge for a few days & need eating. Put a spoonful of the squished berries in the bottom of pastry cases,
  spoon a little warm, seedless jam over them (only half fill, as jam tends to grow), then bake. Once cooled, just add a swirl of soft cream & a sprig of mint! I try to keep a few in an airtight container for the next day, but they somehow evaporate …. !
 During my extreme shopping trip today (which is where I hit three supermarkets before 10.00am like some sort of ninja with a trolley), a couple of people asked me about baking bread & how come it’s so hard/messy/time-consuming (you get the picture). My reply: it’s not (well, it’s not the way I do it).
 Baking bread is like creating some sort of magic in the kitchen! There really is nothing quite like that heady, warm scent of a freshly baked loaf – especially if you’ve made it yourself. Both my Husband & Son bake bread – I taught my Son this recipe when he was at junior school (which he proudly told his teacher was better than her packet bread mix & refused to make it – she wasn’t impressed!).
 Fold it gently again to distribute the seeds/fruit in the dough, shape it to fit your loaf tin & pop it in. Repeat with the other dough ball. Cover with the oiled clingfilm & leave for a further half hour to prove again.

