

 Magnificent March has almost departed & true to form, it’s definitely been “in like a lion & out like a lamb”! Looking out into the garden at the blue skies, bright sunshine & bud-laden plants, it’s hard to believe that only a couple of weeks ago the willow tree was being whipped around in a frenzy of foliage by a ravaging wind, blowing away the Winter cobwebs & bringing a breath of fresh Spring! Now things have settled down a bit, the trees & plants who defiantly hung onto their buds & tiny leaves are ready to bloom in the coming weeks.
The Spring Equinox inspired me to make more sugar flowers, including some delicate daffodils & a few tulips, along with a few chocolate bunnies. If you’ve seen my social media recently, you’ll know I’ve been making modelling chocolate & sugar creations for Mother’s Day & Easter (which is approaching at warp speed!). Cue several cute bunnies, golden yellow daffodils, pretty roses & heavenly heels! As I don’t have any moulds or templates, I  just used a pair of my shoes as a visual guide, then had a play around until I got the style I wanted. The pink one contains the most modelling chocolate, mixed with a little fondant to create that pretty pink hue. The hardest part for me is giving them away & knowing someone might actually eat them (I can’t even think about that!).
 Although Spring is a bit unpredictable at times, it’s also a sign of better days to come. One of those days is the perfect pinnacle of the month, the day we celebrate our Mums & how amazing they are. It’s not always easy to see what they do for us (we’ve all been a petulant teenager who’s pushed the boundaries a bit), so we should show them our appreciation (we should show it every day, but on this day just a little bit more). What better way to show your appreciation than by baking a beautiful cake for her! This oil-free, rich moist carrot cake recipe came from an afternoon of experimenting with another one of my cakes, resulting in a beautifully light, fluffy & fragrant treat. Lightly spiced, this delicate beauty is perfect for Mother’s Day & let’s face it, Mum should be treated to something special. Usually, a carrot cake is decorated with a few fondant carrots, but I wanted to make this different so add a few sugar blooms & blossoms to mine as it’s a celebration cake. It is really easy to make (I’ve made several, just to be sure) & would be a lovely addition to an afternoon tea for your Mum. Ready to bake it happen? Hands washed & aprons on, here we go!
What you need:
6oz Self-Raising Flour (plus a little extra for your tins)
6oz Unsalted Butter, at room temp (plus a little extra for your tins)
4oz Vanilla Sugar (pop a vanilla pod in a jar of sugar & leave overnight)
2oz Golden Syrup
3 medium Carrots, grated (about 200g)
Quarter of a heaped teaspoon Ground Ginger
Quarter of a heaped teaspoon Ground Cinnamon
1 heaped teaspoon Baking Powder
3 large Eggs
100g Walnut Pieces
For the Buttercream Filling:
5oz Unsalted Butter
10oz Icing Sugar
Just under 1/4 teaspoon each of Ground Ginger & Cinnamon
Decorations:
9 Walnut Halves, Sugar Flowers or Fondant Carrots (most supermarkets sell these ready made or you could make your own – see further down the recipe for fondant carrot help)
What to do:
Firstly, pre-heat the oven to 170*C & prepare three 7 inch sandwich cake tins (this means you have three ready-made layers & no fiddly cake cutting).
Rub a little butter all around each tin, ensuring it goes all up the sides & then shake a little flour into them, coating all the butter & tip away the excess. Cut out circles of greaseproof paper the same size as your tin base & pop them inside the tin, ready for your cake mix to go on top. Set them aside.
Wash & peel the carrots, then grate (I use the attachment on my food processor). Place on a dry cloth (cheesecloth, muslin or an old clean tea towel will do) & squeeze out the excess moisture. Set aside. (I use an old white tea towel & boil wash it so it doesn’t stain).
 Do yourself a favour & measure the sugar, syrup & butter into the same mixing bowl, as they will be mixed together – that way, you’re not trying to scrape syrup out of another bowl & won’t get in a sticky mess (trust me on this!). It’s less washing up too.
Whip up the sugar, syrup & butter together using an electric mixer, until fluffy & a pale cream colour.
Add one egg at a time & beat into the mixture well with the mixer, until all the eggs are combined.
Mix the flour, baking powder, Ginger & Cinnamon together & sift into the wet mixture, then fold together using a spatula or large spoon – stir in a figure of eight around the bowl, ensuring everything is fully combined. Folding will keep all the lovely air you’ve whipped into the mixture.

Add the carrots & walnuts, stirring gently into the mixture.
Divide into your prepared sandwich tins & bake in the centre of the oven for approximately 20-22 minutes, until risen & golden brown on top. To test if your cakes are cooked, poke a stem of dried spaghetti into the centre & if it comes out clean, your cakes are done.
 Remove your cakes from the oven & place on a cooling rack. Run a palette knife around the edge of the cake tin to release the cake, then gently transfer onto your cooling rack. Remove the paper carefully from the base of your cake by pulling it back on itself slowly.
Leave your cakes to cool completely before filling & decorating – the cooler they are, the easier they are to handle.
While they are cooling, time to make the buttercream. Beat the butter in a bowl with a spatula until smooth & silky, then slowly tip in all the icing sugar & spices.
Press the sugar into the butter, turning your bowl as you go, until you have a smooth but firm buttercream. You might need a minute here, because it does make your arms ache a bit, but it’s better than a cloud of sugar! Scoop into a piping bag ready for piping. If you don’t have a piping bag, just use a little sandwich bag with the corner cut off.
Splodge a little buttercream in the centre of a serving plate, or a pretty dinner plate big enough for your cake, then place your first cake layer onto this.
Pipe small swirls around the edge of the cake – if you’re not sure about using a nozzle, just use the plain bag & pipe little splodges around the edge to make an outer circle.
Fill the centre of the circle with buttercream, smoothing over to cover the cake.
Place the next cake layer on top, then repeat until you have a clean layer of cake on top. Here’s a little tip: if your top layer of cake is a bit uneven on top, flip it over – the bottom will be flat & smooth, then you have a lovely even surface, perfect for decorating (you’re welcome!).
 Pipe a small swirl in the centre of your cake & top with either a walnut half, little fondant carrots or sugar flowers. Repeat around the edge of the cake at intervals (I usually do 8 around the edge & one in the middle).
As you can see from my cake, I made some sugar flowers along with fondant carrots & a little chocolate bunny. You can buy sugar flowers & fondant carrots ready made, but they are also lots of fun to make. Get some pretty coloured fondant or sugar paste (most supermarkets sell these), a few fine tipped paintbrushes & have a go!

To make little fondant carrots, you will need some orange fondant & a little green fondant too. Roll little fat sausages of orange in your hand to about an inch long, then roll one end slightly thinner. Use a fork to make grooves around your carrots, then poke a little hole in the fatter top end (this is for your leaves).
Roll the green fondant into a very thin long strip, then cut into short strips & bunch a few together to make your leaves. Dot a tiny spot of water into the hole in your carrot top, then push the green leaves in gently. You can either leave them to set for about an hour or put on your cake now.

That’s it! Your fragrant & fluffy carrot cake is ready to be placed in the centre of the table, ready for Mum to have a slice! If you’re not serving your cake straightaway, simply pop it into an airtight container or cake tin to keep it fresh for later. A personal gift of handmade cake is something your Mum will cherish. Wishing you all a wonderful Mother’s Day! Stay hungry! A 😉 x

 Spring has arrived. It’s like we’ve just opened a window after Winter, a breathe of beautiful freshness after the cold snap. This time of year is the most exciting for me, when the sleepy seeds & bulbs are stirring in the ground, springing from the soil & bringing a new season of flowers, vegetables & recipes! There are always lovely smiling faces at my local shops too & although I only popped in for eggs, I always end up with a basket full of goodies
  (including a potted Oregano to add to my ever increasing hoard of herbs on the patio, but not the walnuts that I only remembered as I pulled into the driveway). Whilst waiting at the checkout, I got chatting with one of our Derbyshire Fire & Rescue Fire Fighters (hi Anna!). It never ceases to amaze me how our Fire Fighters head off into potentially highly dangerous situations (obviously they have lots of training & nerves of steel), so huge thanks & appreciation for their service!
 been making for many years. When I worked in an office, I would bake cakes for client meetings & once made this for an important new client – I shelled the walnuts myself & a piece accidentally got in the cake, which obviously ended up in her slice! This recipe began as a few scribbles in the back of a notebook one afternoon, when I decided to bake & discovered a lack of sugar, so used golden syrup instead (one of my best experiments!). Before we get started, I just want to address the type of sugar for this particular recipe. Because golden caster sugar is not always easy to find, I tend to use light golden Demerara or Vanilla sugar (just put regular sugar in a jar with a snapped vanilla pod overnight). It blends perfectly without any grittiness, but if you’re concerned just chuck it into a coffee grinder to make it fine. Ready to get baking? Hands washed & aprons on, here we go!
 6oz Unsalted Butter (room temperature)
 Once all your eggs are combined, sift in the flour & then fold into the mixture. Folding is just stirring in a figure of eight style around the bowl, until your dry ingredients are mixed into the wet.
 Carefully place the top layer of cake onto the buttercream, pressing gently down & making sure it’s even all the way around.
 Leave to set for ……. as if I’d make you wait! Get slicing & sharing your beautiful baking! If you do have any leftovers, wrap in cling film & freeze for an afternoon treat. Whether you’re celebrating or just fancy a slice of sweetness, why not “Espresso yourself” & whip up my Coffee & Walnut cake to share! Stay hungry! Aimee 😉 x
 carpeted with row upon row of rich red roses, ready to be plucked & packed for someone’s sweetheart. Fluffy toy animals line shelves, all cute, cuddly & clutching velvet hearts, while pink & red boxes of chocolates wait patiently to be unwrapped & eaten. Walking into my local supermarket earlier this week, I was greeted by a wall of wine-coloured roses, swathed in cellophane & stacked in ascending buckets (perfect for any “Last Minute Larrys” who may
  have just remembered on their way home!). My week has been filled with creating cute chocolate hearts, sculpting them from my homemade modelling chocolate, then dipping in melted chocolate & dusting in pink sparkly sugar. The white ones resemble smooth, satin covered pebbles, although they are soft to the bite & melt in the mouth (I’ve obviously had to sample a few!).
 loveliness lie a delicate onion flavour, less intense than their rotund counterparts & worth more than steaming as a side with your spuds. These little leek filled cheesy crumbles, perched on puff pastry pillows are perfect as a starter or even a vegetarian main course (check with your date before you start cooking, otherwise that steak you’re considering might be wasted). This recipe is actually one of my Husband’s creations, in honour of a recipe I used to make when we
  first started dating. As you know, I prefer to make my own puff pastry & although easy to make, it does need an hour to rest, so use that hour to pamper yourself in the shower beforehand & then your pastry will be ready when you emerge, all shiny & clean (multi-tasking at it’s finest). If you are using shop-bought, please make sure it’s made with real butter to bring out the flavour of the filling (you’re going to a lot of effort for this evening, so it’s important). Ready for a little love-baking? Hands washed, aprons on & here we go!
 9-12 small Potatoes (depending on size), skin on & washed
 Prepare the leeks & potatoes, as you can cook these together by steaming the leeks over the potatoes. Chop the potatoes into thin slices & put into a large saucepan (I use a food processor for this, so I can get them wafer thin). Chop the leeks into thin slices too, discarding the tops if they are a bit tough. Place in a steamer above the potatoes.
 Make the crumble – tip the flour & butter into a bowl. Rub together with your fingertips until it resembles fine breadcrumbs, then add the grated cheese, half of the Parmesan & all the breadcrumbs. Stir through & set aside.
 circles (you can cut whatever shape you like, it’s your pastry!). If you’re making a large one for sharing as a main course, cut to the size of your baking tray & gently score a line around the edge, about 1cm thick.
 carefully onto each pastry base (if making a big pastry, leave the 1cm edge free of filling).
 Serve these delicate cheesy crumble topped puffed pastries as a starter, or as a larger version to share over a glass of fizz. If you have any leftover crumble, potatoes & leeks, chuck them all in a bowl together & tip into a greased muffin tin. Bake them for 10-15 minutes until golden & when cooled, pop them in cupcake cases for tomorrow’s lunch!
 For a little suppertime seduction on your romantic rendezvous, try my Husband’s recipe for this delicious delicacy! Happy love-baking! Stay hungry! A 😉 x
 persistent. Beautiful golden daffodils, delicate narcissus & tiny tête-à-tête trumpets are all blossoming on patios, windowsills & supermarket shelves, their slender sleeves tightly packed together with golden tips peeking out of the top, ready to burst into brightness! Nature is defiantly poking her tongue out at the world, with crocuses & snowdrops lining the grass verges too. It’s this beauty amongst the harshness of Winter that has been my inspiration recently, especially with the sugar art I’ve been creating. Just the scent of daffodils lifts the spirits, so I decided to try making a sugar version in their honour.
 bigger than a regular cake is epic for us). The cake had four layers of rich chocolate cake in each tier & took me two days to make & decorate, but the actual decorations took just over a week & a bit to make, as they needed to dry/set before they could be added to the cake. Fred Bear, a white modelling chocolate creation I made, was sat by the cake with sugar paste balloons for the birthday boy (worry ye not readers, Fred is currently sat with some sugary friends & won’t be eaten – he took a while to make & is far too cute!).
 for stairs, hence it’s name). The delicious caramel syrup enveloping the fruit has a light, zesty flavour & will satisfy any sweet cravings during this cold snap, plus that fading fruit in the bowl will be used up, so no waste! If you’re buying fresh, check out any that are “wonky” or on sale – really ripe fruit has plenty of natural sweetness & requires less sugar. Ready to get your pud on? Hands washed, aprons on & here we go!
 Next, prepare your fruit. Go through that fruit bowl & pick out any apples & pears that are about to walk out in protest, because they’re so ripe. The riper the fruit, the better the pudding.
 Add the Muscovado sugar, butter, vanilla extract, sprinkle in the cinnamon & zest.
 Using a slotted spoon, scoop the fruit into the bottom of the greased casserole dish with the caramel sauce (be careful not to splash yourself, as it’s sugar & it will burn you!). There should be some liquid left over, so tip this carefully into a heatproof jug & put in the fridge to chill (you’ll be needing this later).
 Now to make the sponge cake topping! In a large mixing bowl, beat the sugar & butter together until fluffy (I do this with a wooden spoon, but you can use an electric whisk if you prefer).
 Sift the flour into the creamy mixture & fold in (move your spoon around like a figure of eight in the bowl, scooping flour into the mixture). Make sure all the flour is combined into the cake mixture & give it a good stir at the end just to make sure.
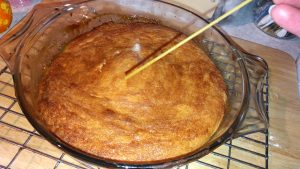 To test if your cake is ready, get a piece of spaghetti & gently poke it into the centre of the sponge. If it comes out clean, the sponge is done. If not, pop it back in the oven for a few more minutes & check again.
 mouthful of red hot lava-like fruit straight from the oven!). Trust me, it will still be warm & the sauce will soak into the bottom of the sponge cake nicely.


 meal to prepare, satisfying those cravings for fried fast food without actually being fried. Leftovers can be frozen for future lazy suppers, lunchtime wraps with salad or even sliced & tossed in pasta with a little homemade tomato sauce & a few roasted peppers. To pané means to coat in a little flour, egg & breadcrumbs (in my last blog, I did this with arancini to make crispy risotto balls). The only tip I will give is you need to keep one hand for the dry ingredients & one for the wet, otherwise you’ll end up with panéed fingers!
 2 large Chicken Breasts (you can get 8-10 pieces from this)
 Drizzle the remainder of the oil generously over the chicken portions & place the tin in the centre of the oven for about 20 minutes. Halfway through cooking, give it a good shake to loosen them from the tin & flip them over. Because it’s thin, the chicken will cook faster & the crumb coating will stop it drying out.
 sharp knife to check they are piping hot before eating), or simply layer them cold in a sandwich, wrap or salad for lunch the next day. Try adding a teaspoon of pesto
 Although we’re barely into the New Year, piled up platefuls of plenty are replaced with sparse-looking salads, kale on a crispbread & some rather questionable smoothies. Personally, I don’t go in for all that stuffing & starving yourself (there are other ways to be miserable). As I’ve mentioned before in a previous blog, there are two things to remember: (1) your “in door” is much larger than your “out door” (think about it) & (2) everything in moderation (one slice of chocolate cake, not six). January is not a sponge to wipe away the over-indulgences of December! It’s still Winter & we need warming, cocooning comfort food that satisfies the appetite & fills you up, so this is no time to start depriving your body of much required sustenance!
 watching old movies together while dinner’s cooking. Sometimes, I’ll cook a roast chicken & make chicken stock at the same time (multi-tasking at it’s finest!). Homemade stock is extremely easy to make, you know what’s in it (no hidden nasties) & is very versatile too, being the base to many soups, sauces & dishes. It also means that we can have a rich, rib-sticking risotto on a Monday night, made with fabulously fresh chicken stock, a bit of bacon & a variety of colourful vegetables. Here’s a link to my easy roast chicken & chicken stock recipe:
 glossy risotto is beautiful piled on a plate, adorned with shimmering roasted vegetables & a drizzle of the oil from the pan with all it’s garlicky goodness. A tray of roasted veggies will cook in about the same time too & any leftovers are perfect on pizzas, tossed in pasta or just topping some toasted ciabatta rubbed with a little raw garlic & olive oil, creating a beautiful bruschetta anytime (I’ve usually got a jar of these in the fridge). If you’re cooking this risotto as a vegetarian meal, simply swap the chicken stock for homemade vegetable stock instead (& leave out the bacon, of course). Ready to give it a go? Hands washed, aprons on!
 Pre-heat the oven to 220*C & prepare your roasting vegetables – wash thoroughly & apart from the tomatoes, chop into chunky pieces.
 Put in the middle of the oven to cook while you make the risotto. Give everything a shake after about 10 minutes & return to the oven. Once cooked, pop them on a cooling rack (this will be when your risotti is finished, but here’s a picture to give you an idea of what to expect).
 Pour the glass of white wine into the pan & stir well (the scent of this bit is always lovely!). Always use the wine you would drink & absolutely never anything marked “cooking wine”!
 Once you’re happy with your risotto, add a generous handful of Parmesan, along with a couple of small chunks of butter dotted around the pan & leave the pan to one side (you can cover it up if you like). Give it a couple of minutes to rest, then slowly stir in the puddles of butter & melted cheese.
 Parmesan, then tuck in! This rich, warming comfort food tastes lovely with leftover chicken from Sunday dinner or try topping with crispy chicken legs roasted with honey, lemon & fresh Thyme. Have a wander around my other recipes to give you some ideas.
 which are perfect for creating the most amazing arancini (which literally translates as “little oranges”). Because the amount leftover varies each time I make risotto, I don’t tend to measure the ingredients when I make these beautiful little rice balls, so these are approximate measurements below. An ice-cream scoop comes in very handy when you’re making these & I have been known to use a melon baller on occasion, hence the title to this blog. Ready? Let’s get rolling!
 Using a tablespoon or an ice-cream scoop, take little heaps of cold risotto & shape into balls in your hand (yes, you’re going to get messy but that’s half the fun). Leave them on a tray in the fridge to chill for at least half an hour (if you can leave them for a couple of hours, this will be better).
 Beat the egg in another similar dish (tip: add a tiny pinch of salt to break down the egg & make it smoother).
 If I’ve made quite a few (which is quite often), I’ll bake them in the oven – really easy & no hot pans to stand over. Get a cupcake or patty tin, put an arancino in each cup & drizzle with a little olive oil (drizzle, not drown!). Bake them for about 10 minutes, turn them using a couple of spoons, & return to the oven for a further 5-10 minutes until crispy & golden. Test one as before, to make sure they are piping hot in the middle before serving.
 Once cooked, remove the arancini gently using a slotted spoon or tongs & place on either greaseproof or kitchen paper to remove the excess oil (or tip them into a metal sieve & shake). Allow them to cool for a couple of minutes before serving. Sometimes, I’ll let them cool completely & pop them in the fridge to chill for a couple of hours, ready to snacking later (they are perfect for picnics).
 beautiful balsamic vinegar & add a dusting of black pepper. My homemade tomato sauce goes very well with these – the richness of the risotto is cut by the sweet, but tart tomato (see my meatball blog for tomato sauce recipe). These more-ish little mouthfuls are perfect for munching, whether for lunch, supper or as a simple starter (also great for nibbling with pre-dinner drinks or curled up on the sofa with a glass of wine & a good film).
 blur into one another & before you know it, you’ve got a glass of fizz in one hand, a saucepan in the other & a houseful of hungry guests. Juggling your many hats is not an easy task – there’s the Work you, the Home you, the you who everyone turns to when things go backside up & then there’s the you who feeds everyone. Having a little time in reserve for yourself is rare & when you do get a bit of spare time, everyone wants a share of it. Sometimes, you have to be a bit selfish because if you don’t look after yourself, you won’t be able to look after anyone else. This time of year can be a real drain on you too, both physically & mentally, so we all need a bit of help every now & then (& a lot of coffee!).
 couple of (or ten) extra portions of everything & freeze them for future meals – there’s very little effort in peeling a few extra potatoes or chopping another couple of carrots (especially if you delegate). It’s like having your own fast food outlet in your freezer & all you’ve got to do is decide what you want for dinner! Trust me, after a long day at work & being tightly packed on a train for an hour, plus having at least a 20 minute drive home, you really don’t want to be faffing around with food when you get there. Be kind to yourself & with a little planning, you can be organised like a cooking ninja (just think of me as your Foodie Godmother).
 potatoes, crisp roasted parsnips & a golden-crusted, velvety cauliflower cheese, it really hits the spot! Leftovers are deliciously lovely – slice thinly for nibbling with cheese & crackers, layer with salad in sandwiches & a feisty mustard mayo, or chuck chunks into a creamy, cheese-enveloped pasta bake. I’ve fried it for breakfast, created some fabulous frittatas & it’s even graced a few of my homemade pizzas too!
 taste. The gorgeously gooey glaze gives it a deep rose tinted finish & the scent will definitely make you feel Christmassy! As it’s the time of year for making mulled wine too, I must confess that I have on occasion added the spices from my homemade version the night before (you can see some of the wine-coloured, slightly sozzled oranges in the photos below), with a few fresh spices thrown in – waste not, want not! This could possibly be the shimmering jewel on your table for Boxing Day & beyond. Ready to get your Glammon? Hands washed, aprons on & here we go!
 (including that paper circle around the edge), as you want all the lovely spices to impart their fragrant flavours into the meat.
 Bring to the boil gently, then turn down the heat until it’s just a bubbling simmer. It’s a bit like giving the gammon a spicy bubble bath & you don’t want any spillages.
 Put all the glaze ingredients into a mixing bowl & mash together. Make sure everything is mixed well into a gooey, gloopy syrup. Pour all over the gammon, making sure you coat it all over the top & sides thoroughly.
 rest for half an hour (I like to cover mine loosely with foil or greaseproof paper – just make a dome shape over the dish, so it doesn’t touch your glazed gammon).
 You won’t need to call your guests to the table – once your gammon is ready to dish up, there will be a queue of shiny little faces at the kitchen door waiting to taste it. If you do have any leftovers, try some of the suggestions I’ve made above (especially the pizza one – here’s the link to my pizza dough recipe to give you a bit of help:
  So there’s my gorgeously gooey & ever so slightly glamorous gammon. When you’re fed up of turkey or just fancy something spicy & special, get your Glam-mon! Stay hungry! Aimee 😉 x
 party, we have zoomed through a newly frosted November at warp speed & driven straight into December! If you’ve been following me on social media, you’ll know that our Son has graduated from University in November (cue lots of photos & two extremely proud parents!). Seeing him there in his cap & gown, clutching his well-deserved Degree, was one of those moments I won’t forget! He’s probably reading this, so I’ll just say it’s wonderful to see all his hard work (both studying & supporting himself working) come to fruition, so congratulations once again & we’re really proud of you!
 One of my favourite indulgences is a large spoonful of creamy, crunchy-topped cauliflower cheese, enveloped in a silky smooth cheese sauce. Although I know you can get cauliflower all year round, it seems to taste better when it’s in season during these later months. Cauliflower is one of the most versatile veg we can eat & I’ve grilled, baked, steamed, boiled & pureed it, cooked it in curries & eaten it raw, dipped in lots of luscious pots of sauces, pesto & salsa (this came from when I was a little girl & loved to eat the stalk).
  veggie dish. Pure pale cloud-like florets, steamed until al dente & draped in the most luxurious silky smooth sauce, created with a collection of cheeses & crowned with a deeply golden crispy crust – it’s spectacular as the main event, rather than just a mere side dish & this humble vegetable should be given a bit more kudos!
  1 large head of Cauliflower (2 if they’re small or you’re making extra to freeze)
 Once ready, transfer the florets carefully into a large lasagne or pie dish. Make sure they are all floret-side up & pack them well into the dish. I find this easier to do with a couple of forks or spoons, so you don’t burn your fingers. Set to one side while you make the sauce.
 As the sauce thickens up, you should start to feel some resistance with the whisk. Keep whisking slowly (swap hands if your wrist aches) & when you are satisfied with the thickness, add a couple of ounces of the grated mild cheddar & whisk until melted.
 drizzling slowly into all the corners & working your way towards the centre. Make sure every floret is covered with the sauce & use a spatula to scrape out any remaining in the pan – you’ve worked hard to make this & shouldn’t waste any (or you could just dip a piece of crusty bread in & eat it – call it Chef’s perks).
 Remove carefully & place on a cooling rack for 5 minutes (trust me, it won’t go cold!). This will allow everything to relax, settle & generally calm for a few moments (because it will be hotter than the sun & you don’t want to burn your mouth).
 So that’s my very cheesy, creamy Super Cauli-Flower Cheese-ness, in all it’s lusciously gooey gorgeousness! Make it your own centrepiece for a vegetarian dinner, or even as an accompanying dish to go with your favourite Sunday roast. Next time you want a side with substance, reach for the cauliflower & create a little cheesy indulgence! Stay hungry! A 😉 x
 So off we trot downstairs to get her some breakfast & put the coffee on. Just lately, there’s been a little boy cat coming around in the garden called Cisco (another IT nerd’s cat), wooing Bengy from her windowsill like a furry feline version of Romeo & Juliet. Unfortunately for him, she’s having none of it & snootily sits there with her nose in the air, emitting the odd growl every now & then (before we had Bengy, I’d never heard a domestic cat growl). Poor Cisco & his unrequited love!
 On mornings like these, I like to whip up something special for breakfast, but really easy to make (including the sauce!). These full flatbread foldovers are so simple & filling enough to keep you going until lunchtime, even if you’re really hungry & will sort out a hangover too! They are perfect for breakfast in bed or brunch with friends, scoring you a few brownie points along the way. I’ve made this recipe for two people, but you can double it up if you’re cooking for more. Ready? Aprons on, hands washed & here we go!
 Heat up your frying pan or skillet until nice & hot, then place each flatbread in the pan next to each other (if you’re not comfortable cooking them together, just do them one at a time).
 Put a flatbread on a plate, place a few rashers of bacon on one half & top with a generous scoop of your silky scrambled eggs. Fold over the other half & that’s your full flatbread foldovers done!
 into a beautiful dark brown sauce. Give it a taste on a clean fingertip & if you like it a bit more acidic, add more Balsamic & shake it again until you’re happy with the taste. That’s your brown sauce ready to go, just drizzle as much or little as you like!
 yeast? No problem! Pre-heat the oven to 220*C. Make the dough as above, split into two & roll out, stretching into ovals. Sprinkle some coarse semolina or breadcrumbs onto a baking tray & lay the flatbreads on top. Raid the fridge for toppings – try cherry tomatoes, halved with round side up like little red buttons, with a little ricotta splodged all around & grated Parmesan. Shake a little Oregano over the top, a drizzle of olive oil & bake for 5-10 minutes on the top shelf. Once the cheese is bubbling, slide them onto a board, slice & share! Perfect for when you can’t wait & faster than any dial-a-dinner pizza!

 Sundays are perfect for relaxed cooking & sometimes you just want an easy, lazy dinner that you can chuck in the oven & forget about (until dinner time that is!). Nobody wants to be racing around the kitchen, trying to prepare a fabulous feast for the family in record time. The best meals are those that just fit together, like the pieces of an edible food puzzle. We tend to eat our Sunday meal at dinner time, giving us a chance to catch up with family & friends during the day, enjoy a crisp Autumn walk in the sunshine together, or simply curl up on the sofa together & watch old films. Eating later in the day means you can just kick off your shoes, pour yourself a glass of wine & relax for the evening, especially in the chillier months.
 of sumptuous sides. It’s great when you have the time, but not everyone wants to start preparing lunch first thing in the morning (especially when you should be making a pot of fresh coffee & a mini mountain of fluffy pancakes). This is where a spatchcocked chicken comes in handy. To reduce the cooking time of a piece of meat, it is sometimes butterflied or spatchcocked. This bodes well for those long days at work or when you’ve been out galavanting & haven’t the energy to cook a full-on roast dinner, but have guests arriving in a couple of hours or just want to eat before midnight! Obviously, there is some element of preparation & even a little delegation, but spatchcocked chicken is an elegant yet effortless dish that your family & guests will love.
 Turn the chicken breast-side up again & lay in the roasting tin, splaying out the body & legs. Give the top of the bird a firm press down, just to contact the chicken with the tin.
 get the most juice from them, give the lemons a firm roll on the board first.
 But it doesn’t end there, you can still make a few more meals with the leftovers. Any extra slices of cooked chicken (& don’t forget the bacon bits!) can be used for packed lunches, crammed into pots with pasta, roasted peppers & salad, or stuffed in freshly baked baguettes, filled to the brim with rocket, fresh basil leaves & a splodge of mayo or pimped up Greek Yoghurt (just add a pinch of black pepper & dollop of pesto to a cup of the yoghurt). Plus you can save the carcass to make stock too! Great
  for rustling up a rich risotto, making a spicy soup or even for gravy. See my “Bird in the Hand” blog link I shared above for instructions & just chuck it back in the oven to work it’s magic, while you all tuck in to dinner (multi-tasking at it’s finest of course).