

![]() It’s been a funny old year so far, like one of those intense mystery novels with one dizzying plot twist after another. None of us know what’s going to happen next, the author has gone rogue & the leading characters are all bickering with each other like petulant, hungry teenagers. When everything seems to be a swirl of stress & stomach dragons are grumbling, never fear – comfort food is here! A proper dinner helps calm grumbling of all kinds, soothing those pesky stomach dragons & restoring a little peace (albeit briefly).
It’s been a funny old year so far, like one of those intense mystery novels with one dizzying plot twist after another. None of us know what’s going to happen next, the author has gone rogue & the leading characters are all bickering with each other like petulant, hungry teenagers. When everything seems to be a swirl of stress & stomach dragons are grumbling, never fear – comfort food is here! A proper dinner helps calm grumbling of all kinds, soothing those pesky stomach dragons & restoring a little peace (albeit briefly).
Preparing a meal is something I truly enjoy. It’s impossible not to feel relaxed, while creating something so comforting & satisfying. The whole process requires you to focus on each task & that in itself  seems to release any tension. It’s not as precise or technical as some recipes, but it’s sheer ease brings a sense of peace as you create a meal for your family. My adoration of Italian food began when I was a teenager & this is a rush-less ragu recipe I’ve been making for my family ever since. It is at the heart of my homemade meat lasagne, slowly baked between blankets of cheese sauce & sheets of homemade pasta, regularly shared as a Sunday dinner & often accompanied by my Husband’s focaccia (he’s quite a talented baker). Sometimes I make it with sausages, sometimes beef or both, usually whatever I’ve got in the freezer (I freeze meat in small batches for this very purpose).
 This is a family-sized recipe & will serve at least six people generously (it makes a decent six portion lasagne too, although I have stretched it to eight on occasion). Keep some handy in the freezer for when you’re short on time (make sure you use fresh beef or sausage if you intend to freeze it though, not previously frozen).
A ragu is not fast food – to me it means “Relax And Gradually Unwind”, so just take your time & go at your own pace – there’s definitely no rush. Ready to ragu? Hands washed & aprons on!
What you need:
200g Minced Beef or 4 Plain Pork Sausages, skins removed (or half beef & pork)
2 medium Carrots, washed, peeled & finely chopped
2 sticks of Celery, washed & finely chopped
1 medium Onion, skin removed, topped, tailed & finely chopped
2 tins of Plum Tomatoes & their juice
1 generous tablespoon Tomato Puree
1 or 2 dried Bay Leaves (if you’re unsure, just use one)
1 sprig fresh Rosemary (approx 6″ long), leaves chopped finely
3 or 4 cloves garlic, chopped/sliced finely
2 tablespoon Extra Virgin Olive Oil
A splash of Balsamic Vinegar (the good stuff – about a teaspoonful)
Seasoning – Sea Salt & Black Pepper, both freshly ground
What to do:
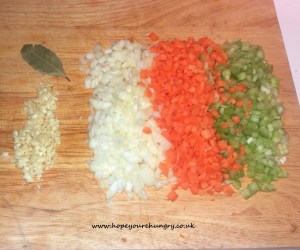
Firstly, prepare your garlic, carrots, onion & celery. Make sure you wash the carrots & celery thoroughly to remove any grit or dirt. Peel the carrots & trim the ends off them & the celery. Chop finely into mini pieces & set aside on your board.
Next, peel the garlic & onion. Top & tail the onion, then chop finely as before – you can always use the food processor for this if you prefer. Here’s a little tip from me: wear sunglasses to help reduce any tears (obviously not dark ones, you need to see).
Chop the garlic finely & then the Rosemary. Remove the spindly leaves from the stem first – I save these for making mini-tomato & vegetable kebabs.
 Heat the oil in a large skillet or deep frying pan on a medium heat. Add the carrot, celery & onion & fry for a few minutes to soften. Keep them moving around the pan, so they don’t catch & burn.
Add the meat – squeeze the sausages from the skins straight into the pan if it’s easier. Break any big chunks into finer pieces (I use tongs for this, but a wooden spoon or spatula is just as good). Stir fry until the meat is thoroughly coloured & all the pink has disappeared.
Season with a little salt & pepper, sprinkle in the garlic, Rosemary & bay leaves, giving everything a good stir (the scent is fabulous). I don’t add the garlic at the beginning, because it can burn quite quickly & lose it’s sweetness.
 Next, add the tomatoes – I tend to buy the whole plum tomatoes & squish them by hand, evenly over the pan. Yes, it’s messy but you’ll wash. Half fill each tin with cold water to swirl out those last little drops of tomato juice into the pan too – we don’t waste anything!
Add the tomato puree & a good splash of balsamic vinegar (even a few drops makes all the difference). Reduce the heat to low & let it softly simmer for about 30-40 minutes, stirring occasionally.
Give it a taste, then add a little salt & pepper as needed (depending on the sausages you use, you might not need very much). Using a clean spoon, taste it again to make sure it’s to your liking (seasoning is a personal thing).
 Once you’re happy, let it bubble away on a gentle simmer for another 30 minutes or so, until reduced to a rich, thick meaty sauce. Give your ragu another quick taste to check the seasoning is good & adjust it if you need to. To test if it’s done, drag the spoon through the middle (the parting of the ragu) – if it leaves a gap & you can see the bottom of the pan, then it’s ready!
 Get the family together, grab a fork & get stuck in! It makes a sumptuously lazy supper generously spooned over spaghetti (with a good scattering of grated Parmesan on top), or stuffed in a variety of pasta parcels & shapes. This versatile rich meat sauce is especially fabulous layered up in lasagne – here’s the link to my vegetable lasagne recipe, just swap the meat ragu for the vegetable one: https://hopeyourehungry.co.uk/perfect-pastafication/
 Sometimes, I’ll use the leftover meat sauce in a pasta bake (brilliant when you’re short on time & easily feeds two people comfortably). Pre-heat the oven to 180*C. Pop a couple of generous spoonfuls of ragu into the bottom of a small baking dish. Next, cook a couple of handfuls of fusilli (these twirly swirls make the best topping for this, as they are easily coated with the cheese sauce).
Make the cheese sauce while the pasta is cooking – melt 45g butter in a pan, then add 45g plain flour & stir well to make a thick paste. Slowly add 300ml of semi-skimmed milk, a little at a time & stir gently (I use a whisk to make  sure there are no lumps). As the sauce thickens, stir more vigorously until silky smooth. Add a small handful of grated mild cheese (approx 60g) & mix in until melted. Taste, then season accordingly with a little sea salt & freshly ground black pepper. Sprinkle generously with more grated cheese, dust with a little dried Oregano & bake for about 30 minutes.
 When it’s ready, the topping will have turned a gorgeously golden hue. Allow to cool for a few minutes before tucking in (just add a simple green salad & a little homemade focaccia for scooping up the sauce.
 When the world gets too fast, slow down the pace & make a little comfort in your own kitchen with a fabulously flavourful ragu – Relax And Gradually Unwind. Stay hungry! Aimee 😉 x

 It’s early Summer & thoughts turn to sunny weekends & lazy days, sipping something refreshing in the garden & eating delicious food together. The comforting fragrance of freshly baked bread, garden-grown herbs & sweet garlic wafting through the air, always reminds me of sunny picnics on the patio. While the Husband is gardening his socks off (with refreshing intermissions of something chilled), I enjoy creating a few treats for us to indulge in later.
 This version is a fabulously fruity version, topped with ripe baby tomatoes. As they bake, they become darker, slightly softened & a little jammy, resembling cabachon rubies mounted in a golden cloud of fluffy focaccia. Pardon my poetics, but this type of food can be inspiring! Ready to bake it happen? Hands washed, aprons on & let’s dough it!
 Knead the dough for about ten minutes, stretching it by pushing away with the heel of your hand & pulling it back over itself. Turn the dough slightly & repeat. If you’ve got a good sticky dough, you might need a dusting of flour occasionally as you’re doing this – be careful not to overdo this, otherwise it will alter the recipe & become unpleasant. Remember, the effort you put into the kneading now will result in a fluffy, well-risen bread later, so give it some elbow grease – just think of those toned arms!
 When your dough has doubled in size, it’s ready for the next stage. Simply take the oiled film off & scoop your dough onto a lightly floured work surface, making sure you remove all remnants from the bowl (you’ve put a lot of work into this, so don’t waste any!).
 Dot the tomato halves all over the top, round side up & sprinkle evenly with the chopped garlic, a good pinch of freshly ground black pepper & sea salt. Remove the Rosemary leaves from the stem & either leave whole or chop roughly, before sprinkling them on top too.
 Transfer to a chopping board & slice into focaccia fingers, ready for dipping & devouring! Add a few accompaniments & turn it into a mini feast – try a few sundried tomatoes, fragrant olives, salami, Proscuitto & a few cheeses. Place the board in the centre of the table & let people help themselves. Perfect for a relaxed afternoon treat or a light lunch. Next time you’re feeling kneady, just dough it! Stay hungry! Aimee 😉 x
 cooking builds during the day, making dinner that much more enticing. Pasta is undeniably one of my favourite foods! It’s easy to prepare & a pleasure to eat, especially when it’s crammed full of flavoursome fillings or dressed in a rich, sumptuous sauce, or both! When I discovered these pretty pasta shells on a random shopping trip some years ago, I had already decided what kind of fillings I would make, the sauce, the herbs, everything – all before reaching the checkout! Now I appreciate not everyone gets excited by a bag of pasta (I have a dedicated pasta
  shelf in the pantry), but they inspired me to create something wholesome & filling – proper rib-sticking, colourful comfort food to warm you on a chilly day like today, without taking all day to make. This recipe for Stuffed Conchiglioni is something we enjoy making together as a family & definitely eating together! They can be made in advance & the best bit is there’s going to be plenty of leftovers for lunches (hot or cold) & maybe a couple of pots for the freezer, for those “can’t be bothered” nights. So here goes – hands washed & aprons on!
 500g of dried Conchiglioni (1.1lb)
 Chuck in the chopped onion & bacon pieces, stir fry for a few minutes, keeping the onion moving so that it doesn’t catch & burn. If any liquid forms around the bacon, simply strain it off & discard. Add a little more olive oil if needed. Once cooked, leave to cool for a few minutes.
 Tip the breadcrumbs into a large mixing bowl, along with the cream cheese. Add the fried bacon & onion, mixing thoroughly to create a lovely thick stuffing. Cover the bowl with a plate & leave while your pasta cooks.
 cook according to the instructions on the pack.
 might want to prep another, slightly smaller dish for any extra shells (OK, there are always extra shells, trust me on this).
 Lay each stuffed shell in the prepared dish, then carry on stuffing until you’ve filled them all. At this point, you can cover them in cling film & put them in the fridge until you want to eat them – they will keep until the next day.
 Add the tomato puree, the sugar & seasoning to taste (you won’t need much salt, so go easy on this). Add a couple of teaspoons of dried Basil (or rip up about half a dozen leaves of fresh & chuck them in). Give everything a good stir & reduce to a gentle simmer for about half an hour with a lid loosely on, stirring occasionally.
 Spoon your sauce generously all over the stuffed shells, making sure they are just covered & no bits are peeking out. Dot chunks of Mozzarella all over the top & add a sprinkling of dried Oregano.
 some fresh, crusty bread, get everyone to the table & get stuck in! Usually, my guys magically appear in the kitchen while I’m dishing up, grabbing a slice of warm bread to munch on & dunking it in the sauce.
 So next time you feel the chill on a dull day, whip up some colourful, comforting Conchiglioni! Stay hungry 😉 A x

 also the time of year my Husband & I met, so we always celebrate our first date (it involved a large Harley Davidson Sportster, a couple of hundred bikers delivering Christmas presents & rather a lot of tinsel!).
  Christmas Day. Some of these multi-tasking munchies can even be used as a starter, so make a few extra (which is my mantra, as you probably know by now). One of my favourites (& apparently everyone else’s!) are baked cheesy biscuits – you can serve them simply on their own or with a dip, or even pipe some cream cheese on them & decorate with chopped chives. They are really easy to make & the recipe is in my blog called “Grate Expectations” – here’s the link for speed:
  Scoop spoonfuls of the breadcrumb mixture into each mushroom – be generous & keep going until every mushroom is crammed full, then sprinkle with a little more cheese. Any leftover breadcrumb mixture, chuck it in the fridge for later (someone always turns up late or you might fancy a midnight snack). Scatter a few pine nuts over the top (these are gorgeous & have a sort of popcorn taste to them).
 If you’re preparing them in advance, cover in cling film now & pop them in the fridge until you need them (they keep until the next day at least). Otherwise, bake in the oven for 15-20 minutes until golden & gorgeous. These are great hot or cold, either on their own or with dips, or just with a green salad as a starter.
 prepped by one of your Helpers a few days before, then stashed in the fridge in airtight containers or bags, ready to be whipped out with a delicious dip anytime! If you fancy something different, try raw crunchy cauliflower florets (one of my faves), sliced peppers, sugarsnap peas & mangetout. Give them a good wash, trim the ends & stand them in a cup. One thing I don’t do at this time of year is make dips – I really cannot be bothered & what with all the other stuff to do, just buy some nice ones & store them in the fridge until needed. Simply scoop them into individual tea cups with saucers & dinky spoons (saving your table from splodges), rather than leaving them in a plastic tray – even if they do have one of those optimistic re-sealable tops, dips always disappear first!
 Measure your spices into a cup & carefully mix together. (Sometimes, I only use half this mixture & sprinkle the rest over chunky raw potato slices, drizzled in olive oil, to make spicy wedges in the oven – bake at 220*C for 25 minutes & serve with a cooling dip, like Greek yoghurt mixed with a few chopped mint leaves).
 Take a couple of pieces of chicken, coat them in the egg & shake off the excess. Chuck them in the breadcrumb mixture & pat this onto the chicken to ensure it’s coated well. Place them into the roasting tin & repeat until you have coated all the chicken. Drizzle more olive oil over the top (drizzle, not drown).
 Spread them on a huge plate for people to help themselves – turn it into a starter with a salad, a couple of potato wedges & a yoghurt & mint dip, or leave them to cool before freezing them in a bag until needed. Job done!