

Although it’s barely the beginning of March, we have been enjoying plenty of gloriously golden sunshine & blue skies, lifting everyone’s spirits. Dainty flowers are flourishing in hedgerows & borders, a vast array of vibrant colours emerging & encouraging us to believe  Spring has arrived. It’s like we’ve just opened a window after Winter, a breathe of beautiful freshness after the cold snap. This time of year is the most exciting for me, when the sleepy seeds & bulbs are stirring in the ground, springing from the soil & bringing a new season of flowers, vegetables & recipes! There are always lovely smiling faces at my local shops too & although I only popped in for eggs, I always end up with a basket full of goodies
  (including a potted Oregano to add to my ever increasing hoard of herbs on the patio, but not the walnuts that I only remembered as I pulled into the driveway). Whilst waiting at the checkout, I got chatting with one of our Derbyshire Fire & Rescue Fire Fighters (hi Anna!). It never ceases to amaze me how our Fire Fighters head off into potentially highly dangerous situations (obviously they have lots of training & nerves of steel), so huge thanks & appreciation for their service!
Today would have been my Grandma’s birthday, Mamma as she was fondly known to us & she was one of the best bakers I know. Her velvety rich chocolate cake was rather famous in our family & I would love sitting at the huge table in her kitchen, watching her carefully create this magical masterpiece. Saturday afternoons would involve watching wrestling with Grandad (it was Giant Haystacks & Big Daddy in those days), then curling up on the sofa with Mamma & a slice of cake while we watched Calamity Jane or another old Hollywood classic. Cake should invoke happy memories, both to the baker & the eater – birthdays, weddings, anniversaries & afternoons with your favourite people are all accompanied by a good cake (or they should be). It’s a fabulous way to show someone how much you care & baking a cake for someone is personal, unique & one of the easiest ways to make them smile.
Perfect for Springtime afternoons, my lusciously light & lovely Coffee & Walnut cake is one of my Husband’s favourites & something I’ve  been making for many years. When I worked in an office, I would bake cakes for client meetings & once made this for an important new client – I shelled the walnuts myself & a piece accidentally got in the cake, which obviously ended up in her slice! This recipe began as a few scribbles in the back of a notebook one afternoon, when I decided to bake & discovered a lack of sugar, so used golden syrup instead (one of my best experiments!). Before we get started, I just want to address the type of sugar for this particular recipe. Because golden caster sugar is not always easy to find, I tend to use light golden Demerara or Vanilla sugar (just put regular sugar in a jar with a snapped vanilla pod overnight). It blends perfectly without any grittiness, but if you’re concerned just chuck it into a coffee grinder to make it fine. Ready to get baking? Hands washed & aprons on, here we go!
What you need:
 6oz Unsalted Butter (room temperature)
6oz Self-Raising Flour
(plus a little extra Butter & Flour for prepping your cake tins)
4oz Sugar (I use either Demerara or Vanilla Sugar as mentioned)
2oz Golden Syrup
3 large Eggs
4oz Walnut pieces (plus 12 walnut halves for decorating the top)
4 tablespoons Espresso Coffee (leftover from the morning’s fresh pot or just strong coffee mixed in cold water)
For the buttercream:
10oz Icing Sugar
5oz Unsalted Butter (room temperature)
2 teaspoons Espresso Coffee (saved from the mixture above)
What to do:
Pre-heat the oven to 180*C & put the shelf in the centre of the oven.
Prepare your cake tins – you will need two 7 inch cake tins for this cake. Grease with a little butter all around the inside (you can use the butter wrapper or just smudge around with your fingers). Chuck in a spoonful of flour & shake it all around, until all the butter is covered. Tip out the excess.
Cut two circles of greaseproof paper out to fit the bottom of your tins & pop one in each. Although the butter & flour will make your tins non-stick, this will ensure your cake comes out clean too.

Put the softened butter into a large mixing bowl, pour in the golden syrup & tip the sugar on top. Using an electric whisk (or a wooden spoon if you like), whip up the butter, syrup & sugar until light, smooth & a pale cream colour.
Crack in one egg at a time & whisk thoroughly into the mixture (it will become looser, so don’t panic).
 Once all your eggs are combined, sift in the flour & then fold into the mixture. Folding is just stirring in a figure of eight style around the bowl, until your dry ingredients are mixed into the wet.
Stir a little of the coffee into the cake mixture gently, just a spoonful at a time & taste it (it should be delicately coffee flavoured, not “smack you round the face” cake!).
Add the walnut pieces & stir in gently to combine.
Divide the mixture equally between the two cake tins, spreading out to the edges with a spatula (just to even out the mixture).
Bake in the centre of the oven for approximately 25 minutes, until the centre has risen & turned a gorgeous golden brown on top.
To test if your cake is ready, poke a stick of spaghetti into the centre & if it comes out clean, your cake is done! Pop your tins onto a cake rack to cool for a minute.
 Slide a pallet knife around the edge of the cake to loosen it from the tin, then tip it onto your (oven gloved) hand, peel off the greaseproof paper from the base (pull it back onto itself, not straight up or you’ll break your cake) & place the cake carefully onto the cooling rack, bottom side down. Repeat with the other one & leave to go completely cold.
Now to make the filling! I have a certain method for making buttercream, because I really don’t like using an electric whisk & being showered in sugar! This is the way I do it & it’s really easy, but your arms might ache after (it’s all worth it in the end!).
Tip the butter into a large mixing bowl & give it a good beating with a wooden spoon or spatula, just to make it smooth.
Add all the sugar & using your spatula, press it into the creamed butter, using the sides of the bowl as you do.
Continue until all the sugar & butter are blended into a thick, creamy mixture. Add a little coffee, mix in & taste (again, it should be delicately flavoured). If it becomes too loose, add another tablespoon of icing sugar & blend again. It needs to be stiff enough to pipe onto the cake.
Pop your buttercream into a piping bag, either with a nozzle or your choice or without (I’ve used a plastic bag with a corner snipped off when I’ve not had a piping bag to hand).
Once the cake is cold, it will be easier to decorate & less likely to break up (if the weather is hot, give it 10 mins in the fridge after the cake has gone cold & this will give you a much better base to work on).
Place your bottom layer of cake onto a serving plate & pipe around the edge of the cake – I pipe a pretty pattern around the edge & then fill in the centre bit by just piping long swirls tapering off in the middle.
 Carefully place the top layer of cake onto the buttercream, pressing gently down & making sure it’s even all the way around.
Pipe a small swirl of buttercream in the centre of the cake & pop a walnut half on top, pressing gently.
Pipe further swirls around the cake at equal spaces, dotting with the walnut halves as above. If you do have any leftover buttercream, don’t throw it away – pipe little swirls or flowers onto a strip of greaseproof paper & freeze for future bakes. Next time you have a cake emergency (yes they do exist), you have ready-made decorations. Sometimes, I like to dust all over with a spoonful of icing sugar (put a teaspoonful in a tea strainer & shake it over your cake like a dredging of sugary snow).
 Leave to set for ……. as if I’d make you wait! Get slicing & sharing your beautiful baking! If you do have any leftovers, wrap in cling film & freeze for an afternoon treat. Whether you’re celebrating or just fancy a slice of sweetness, why not “Espresso yourself” & whip up my Coffee & Walnut cake to share! Stay hungry! Aimee 😉 x

 persistent. Beautiful golden daffodils, delicate narcissus & tiny tête-à-tête trumpets are all blossoming on patios, windowsills & supermarket shelves, their slender sleeves tightly packed together with golden tips peeking out of the top, ready to burst into brightness! Nature is defiantly poking her tongue out at the world, with crocuses & snowdrops lining the grass verges too. It’s this beauty amongst the harshness of Winter that has been my inspiration recently, especially with the sugar art I’ve been creating. Just the scent of daffodils lifts the spirits, so I decided to try making a sugar version in their honour.
 bigger than a regular cake is epic for us). The cake had four layers of rich chocolate cake in each tier & took me two days to make & decorate, but the actual decorations took just over a week & a bit to make, as they needed to dry/set before they could be added to the cake. Fred Bear, a white modelling chocolate creation I made, was sat by the cake with sugar paste balloons for the birthday boy (worry ye not readers, Fred is currently sat with some sugary friends & won’t be eaten – he took a while to make & is far too cute!).
 for stairs, hence it’s name). The delicious caramel syrup enveloping the fruit has a light, zesty flavour & will satisfy any sweet cravings during this cold snap, plus that fading fruit in the bowl will be used up, so no waste! If you’re buying fresh, check out any that are “wonky” or on sale – really ripe fruit has plenty of natural sweetness & requires less sugar. Ready to get your pud on? Hands washed, aprons on & here we go!
 Next, prepare your fruit. Go through that fruit bowl & pick out any apples & pears that are about to walk out in protest, because they’re so ripe. The riper the fruit, the better the pudding.
 Add the Muscovado sugar, butter, vanilla extract, sprinkle in the cinnamon & zest.
 Using a slotted spoon, scoop the fruit into the bottom of the greased casserole dish with the caramel sauce (be careful not to splash yourself, as it’s sugar & it will burn you!). There should be some liquid left over, so tip this carefully into a heatproof jug & put in the fridge to chill (you’ll be needing this later).
 Now to make the sponge cake topping! In a large mixing bowl, beat the sugar & butter together until fluffy (I do this with a wooden spoon, but you can use an electric whisk if you prefer).
 Sift the flour into the creamy mixture & fold in (move your spoon around like a figure of eight in the bowl, scooping flour into the mixture). Make sure all the flour is combined into the cake mixture & give it a good stir at the end just to make sure.
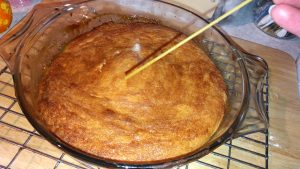 To test if your cake is ready, get a piece of spaghetti & gently poke it into the centre of the sponge. If it comes out clean, the sponge is done. If not, pop it back in the oven for a few more minutes & check again.
 mouthful of red hot lava-like fruit straight from the oven!). Trust me, it will still be warm & the sauce will soak into the bottom of the sponge cake nicely.

 This time of year is one of my favourites, just as everything is starting to spring & sprout in the garden, refreshing & regenerating. Buds are beginning to pop up, soon to bloom into beautiful blossoms, while the trees are turning green & growing again. The lovely Spring sunshine seems to be a bit shy this week, making it difficult to get out into the garden, so I’ve been practising my sugar skills & learning a few new techniques. Despite the lack of sunshine this week, I’ve still managed to get some sparkle in the form of sugar & edible glitter though!
 Having made a warren full of baby bunnies over Easter, I was inspired by the pretty pale pink blossom trees of Spring to create a chocolate tree. If you’ve been following me on social media, you will know I’ve been excitedly sharing various pictures of my progress. It was something I needed to try & although it took me five days from start to finish, I’m really pleased with the results, plus I’ve had some fabulous feedback – thank you so much to all you kind, lovely people (you know who you are!). All I’ll say is that I know how Richard Dreyfuss felt about his mashed potato mountain in Close Encounters!
 As it’s still a bit chilly outside, my Chicken & Leek Pie is just perfect for this inbetween weather & the bright vegetables will add some colour to chilly evenings. Leeks are a bit under-rated & have always struck me as rather pretty. With their slender bundles of long, frond-like leaves, tightly packed & tall, they go from being the darkest emerald green at one end to the palest, apple-flesh green at the roots. They can be cooked in a variety of ways, but we tend to just boil them until bland, then spend the whole meal pushing them around a plate & not eating them. What a waste!
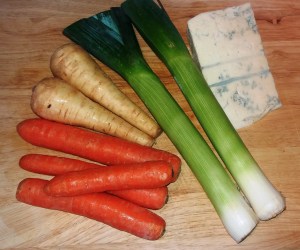
 Peel, top & tail the carrots & parsnips. Chop into bite-sized slices (I usually cut into half, then slice). Nothing needs to be perfect here, just get chopping.
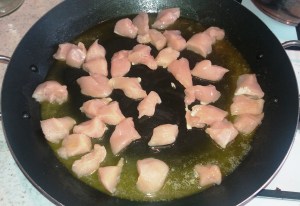
 Sprinkle the flour on top & stir thoroughly, ensuring all the chicken is coated well. The chicken will become clumpy, the oil & butter mixture will cook the flour, basically making a roux in the frying pan. This is going to make your pie filling more solid (making it easier to slice up later).
 Break up the Gorgonzola Dolce or Danish Blue cheese into pieces & dot around the pan, add the strained leeks, carrots & parsnips. Stir everything gently until thoroughly mixed. Season with a little freshly ground black pepper (you won’t need any extra salt, as there’s salt already in the butter & Gorgonzola).
 If you’re only putting a pastry lid on your pie, tip everything into a large pie dish (or individual ones if you like) & spread evenly. Set to one side while you make the pastry. If you’re making a pastry bottom for your pie, grease your dish with butter & dust with a little flour (this will make it easier to remove when cooked).
 If you’re just making the lid, dip your fingers in a cup of water & run them around the edge of the pie dish – this will act as a sort of glue to bind your pastry crust to the dish & help stop leaking (it’s no guarantee, but it does help). You don’t need to do this if you have a pastry base, as it will naturally stick to itself when you put the lid on.
 Brush lightly all over with milk to give the pastry a nice gloss while it’s cooking. If you want to decorate with leaves & shapes like I’ve done here, you can add the shapes now you’ve brushed it with milk (so they will stick).
  roasted potatoes, & a huge green salad. Any leftovers will freeze nicely or you can cut it into slices, wrapped individually for lazy lunches or picnics.