

 Gazing into the garden while sipping my first coffee of the day, there is an Autumnal air about it. The early sunshine is just peaking over the rooftops, causing the dew laden lawn to shimmer in the sunlight & perfectly summing up the Summer.
August has been very much “all or nothing”, either a raging hot heatwave or shivering shade, deluge or drought, & nothing  inbetween. The poor plants don’t seem to know which way to turn & our multi-tasking willow tree has been happily soaking up the excess water, whilst providing welcome cool shade to the local wildlife. There are baby olives on our little olive tree trying to ripen, green tomatoes just starting to blush red & a bounty of blackberries waiting patiently to be plucked. The garden seems to be clinging on by it’s very leaf-tips to the last days of Summer, as Autumn has quietly arrived & begun to unpack her colourful attire across the landscape.
Before Autumn settles in, there are some comforting meals we can indulge in to soften the seasonal switch. Fresh produce is all around ![]() us, just waiting to be turned into tasty transitional treats. Some of my best ideas come from mooching around the markets, shopping when everyone else is sat in traffic (or still in bed), & picking up some fabulous bargains. The early bird always catches her worm & although thankfully not very worm-like, earthy foods have caught my eye recently – the beautiful but humble mushroom.
us, just waiting to be turned into tasty transitional treats. Some of my best ideas come from mooching around the markets, shopping when everyone else is sat in traffic (or still in bed), & picking up some fabulous bargains. The early bird always catches her worm & although thankfully not very worm-like, earthy foods have caught my eye recently – the beautiful but humble mushroom.
Soft, light & flavoursome, mushrooms are one of the most versatile ingredients in cooking. They go with pretty much everything, adding both subtle & substantial flavour to dishes, & the variety is truly  amazing! From the tiny to the tawny, closed cup or open, the frilly or the flat, these fabulous funghi are just waiting to be turned into delicious dishes!
As I wanted them to be the main attraction, I created my Champignon the Wonder Pie – a delicate mushroom & vegetable stew, tucked in under a crisp comforting blanket of buttery puff pastry. This is one of those lazy afternoon recipes to make, rather relaxing & a little therapeutic even. Although simple to make, there is going to be some prep involved – I hear you groaning, but I promise it’s all easy stuff, no mysterious ingredients & worth every minute when you taste the results.
Firstly, you’re going to need vegetable stock – use either a stock cube or fresh, whatever works best for you & the time you have available. I make my own & freeze it, as it uses up all the veg trimmings & you know what’s in it (too much salt & mushrooms = watery mess & a soggy pie). My easy vegetable stock recipe means no standing around watching pans either. You’ll need a couple of carrots, an onion, two celery sticks & a handful of fresh herbs (half a dozen Sage leaves, some sprigs of Thyme & a couple of Rosemary  stems work well), along with any mushroom stems, parsnip, bean or pea trimmings – wash everything well to remove grit & dirt, then chuck them all in a roasting tin with 2-3 pints of cold water, a splash of olive oil & a few good grinds of black pepper & sea salt. Cover it with foil to seal in all the juices & bake at 200*C for just over an hour, then strain & that’s it. Use it fresh, stick it in the fridge for a couple of days or freeze it. Save the veggies to whizz up into soups or sauces & pour any leftovers into jars for the fridge or ice cube trays to freeze.
If you prefer, you can swap the vegetable stock for chicken stock (as long as your guests are not vegetarian) – both work well & it tastes just as lovely either way. A little bit of tasty trivia for you here: vegetable stock is actually a broth, as stock refers to a liquid that has bones cooked in it.
 Next, although I have used two types of pastry (shortcrust for the base & puff for the lid), you could use shortcrust all over or just use shop-bought puff lids if time is limited – please make sure it’s proper all-butter puff to do your pie proud. If you do fancy having a go at making your own, here’s the link to my puff pastry recipe: https://hopeyourehungry.co.uk/puff-up-the-volume/ You will only need half the amount, so reduce the measurements accordingly. It’s easy to make & just needs an hour to rest in the fridge before rolling, so you could make this while the stock is in the oven.
Ready to bake it happen? Hands washed, aprons on & here we go!
What you need:
For the filling:
250g Mushrooms approx (I’ve used closed cup & flat but use what you like here)
1 stick of Celery
1 medium Carrot
1 medium Red Onion
2 tablespoons of Sweetcorn
100ml Vegetable Stock approx
25g Salted Butter
25g Plain Flour
1 tablespoon Extra Virgin Olive Oil
For the base Pastry:
6oz Plain Flour, plus extra for rolling out & prepping your tin
2oz Salted Butter, plus extra for your tin
1 large Egg
A little cold water, about a tablespoon
4oz Puff Pastry (see link above to make fresh or buy all-butter puff pastry)
2 teaspoons grated Parmesan or Medium Cheddar
1 Egg & 2 tablespoons of Milk, whisked together to make egg wash
What to do:
Pre-heat the oven to 220*C & prepare a pie tin. I’ve used an 8″ square cake tin because it was handy. Smudge a little butter around the inside of the tin & then sprinkle with flour. Tip out the flour (save for rolling out) & set the tin aside.

Time to prepare your vegetables! Give them all a good wash in cold water & remove the onion outer skin. Top & tail all of them, chop finely & set aside.
Prepare the mushrooms next. Give them a good wipe with a damp cloth to remove any dirt or grit (if they’re small, use a pastry brush). Take out about half a dozen & set to one side whole. Chop the rest up finely & set aside too.

Heat a large frying pan or skillet. Add the butter & oil, mixing well until melted together.
Add the carrot, onion & celery, stirring well to coat in the oil butter mixture, then fry on a medium heat for 3 or 4 minutes. Give them a nudge around the pan from time to time, so they don’t catch & burn. You want them to soften slightly, but not go squishy.
Add the mushrooms & give everything a good stir fry for a couple of minutes.
 Sprinkle in the plain flour around the pan & stir fry everything together until the flour has disappeared. This is going to make a roux in the pan, as it will absorb the butter & oil in the mixture, thickening everything up nicely.
Add the stock gradually & stir well into the mixture, making a smooth sauce. When everything is combined, turn off the pan.
Slice up the whole mushrooms you saved into bite-sized bits & stir them into the stew.
Make the base pastry by rubbing the butter into the flour. Add the egg & stir into the flour mixture using a metal spoon or knife. As it starts to come together, add a trickle of the cold water to form a soft dough.
Turn it out onto a floured surface, sprinkle a little flour on top & roll out until slightly larger than the size of your tin all around.
Flop the pastry over your rolling pin & carefully lift into the tin, draping it inside as you do so. Press gently into all the edges & leave a little hanging over the tin (to attach the puff pastry lid to later). Try using the end of the rolling pin for this, as it’s smooth & won’t tear your pastry.
Roll out the puff pastry to just over the size of your pie tin & set aside.
 Tip the mushroom pie filling into the pastry lined tin & spread out well. Dip your finger in a cup of cold water & run it around the edge of the pastry.
Put the puff pastry lid on top & press the edges down to seal the pastry base to the lid. Prick all over with a fork or a sharp knife.

Brush with a little egg wash all over. If you want to make little pastry decorations with the leftover bit of puff, do that now & lay them on top, then brush them too (not too many though). Sprinkle with a little grated Parmesan.
Bake in the oven for about 25 -30 minutes, until thoroughly golden & the layers are starting to show at the edges. The sides of the pastry will come away from the tin slightly when it’s ready.
 Put the pie tin on a cooling rack for a few moments to relax before serving. That’s it! Just get everyone around the table & dig in! Meaty but meatless, this mushroom-packed pastry goes well with either a generous scoop of cheesy mashed potatoes & steamed crisp vegetables, or a zesty green salad scattered with a few spots of aged Balsamic vinegar & toasted pine nuts. Slice it up cold for a luscious leftover lunch or freeze in slices for indulgent lazy suppers after a long day at work.

However you serve it, this crispy champignon-crammed pie is the perfect comfort food for chilly almost-Autumn evenings. Stay hungry! 😉 Aimee x

 This time of year is one of my favourites, just as everything is starting to spring & sprout in the garden, refreshing & regenerating. Buds are beginning to pop up, soon to bloom into beautiful blossoms, while the trees are turning green & growing again. The lovely Spring sunshine seems to be a bit shy this week, making it difficult to get out into the garden, so I’ve been practising my sugar skills & learning a few new techniques. Despite the lack of sunshine this week, I’ve still managed to get some sparkle in the form of sugar & edible glitter though!
 Having made a warren full of baby bunnies over Easter, I was inspired by the pretty pale pink blossom trees of Spring to create a chocolate tree. If you’ve been following me on social media, you will know I’ve been excitedly sharing various pictures of my progress. It was something I needed to try & although it took me five days from start to finish, I’m really pleased with the results, plus I’ve had some fabulous feedback – thank you so much to all you kind, lovely people (you know who you are!). All I’ll say is that I know how Richard Dreyfuss felt about his mashed potato mountain in Close Encounters!
 As it’s still a bit chilly outside, my Chicken & Leek Pie is just perfect for this inbetween weather & the bright vegetables will add some colour to chilly evenings. Leeks are a bit under-rated & have always struck me as rather pretty. With their slender bundles of long, frond-like leaves, tightly packed & tall, they go from being the darkest emerald green at one end to the palest, apple-flesh green at the roots. They can be cooked in a variety of ways, but we tend to just boil them until bland, then spend the whole meal pushing them around a plate & not eating them. What a waste!
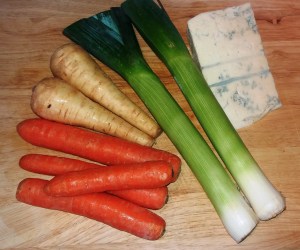
 Peel, top & tail the carrots & parsnips. Chop into bite-sized slices (I usually cut into half, then slice). Nothing needs to be perfect here, just get chopping.
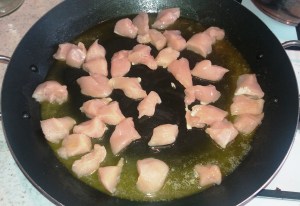
 Sprinkle the flour on top & stir thoroughly, ensuring all the chicken is coated well. The chicken will become clumpy, the oil & butter mixture will cook the flour, basically making a roux in the frying pan. This is going to make your pie filling more solid (making it easier to slice up later).
 Break up the Gorgonzola Dolce or Danish Blue cheese into pieces & dot around the pan, add the strained leeks, carrots & parsnips. Stir everything gently until thoroughly mixed. Season with a little freshly ground black pepper (you won’t need any extra salt, as there’s salt already in the butter & Gorgonzola).
 If you’re only putting a pastry lid on your pie, tip everything into a large pie dish (or individual ones if you like) & spread evenly. Set to one side while you make the pastry. If you’re making a pastry bottom for your pie, grease your dish with butter & dust with a little flour (this will make it easier to remove when cooked).
 If you’re just making the lid, dip your fingers in a cup of water & run them around the edge of the pie dish – this will act as a sort of glue to bind your pastry crust to the dish & help stop leaking (it’s no guarantee, but it does help). You don’t need to do this if you have a pastry base, as it will naturally stick to itself when you put the lid on.
 Brush lightly all over with milk to give the pastry a nice gloss while it’s cooking. If you want to decorate with leaves & shapes like I’ve done here, you can add the shapes now you’ve brushed it with milk (so they will stick).
  roasted potatoes, & a huge green salad. Any leftovers will freeze nicely or you can cut it into slices, wrapped individually for lazy lunches or picnics.

 to head to the local shops & pick up whatever is in season. Most people go shopping with a list; I like to just see what’s available, then decide what I can make from that.
 500g Stewing Meat – I prefer beef, but you can use whatever you like (adjust which herbs you use accordingly)
 Prepare the vegetables – peel, top & tail the carrots, onions & parsnips. Dice the onions. Chop the other veg into bite sized pieces – I usually cut them down the centre lengthways, then again & chop them into pieces. Share them between the two casserole dishes.
 Once it’s cooked, place the stews on a cooling rack or thick wooden chopping board. Using a fork & spoon, fish out the Thyme twigs & discard them – the leaves will have gone into the stew. If you want to thicken your gravy, my tip here is to strain some off from each pot, about half a pint each, then heat it up in a saucepan while stirring. This thickens it up nicely, without going like treacle. Then pour it back into each pot, stirring into the meat & veg,
  before serving in huge bowls with lots of fresh, thick cut bread to mop up the gravy.
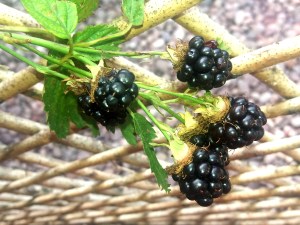
 It’s that time of year, when the hedgerows are bursting with delicious, deepest dark purple blackberries, just waiting to be plucked from their brambles. There’s something satisfying about picking fresh fruit that instantly transports me back to childhood – I would pick apples, blackberries, raspberries & cherries for my Mum to turn
  into the tastiest treats, carefully carried home (usually in my skirt turned inside out & filled with berries that stained – sorry Mum!). I’ve always grown blackberries in the garden – they are really easy to grow either in pots on the patio or along a hedgerow & the more fruit you pick, the more they seem to produce. Plus they have the prettiest little white flowers that the bees adore, so I’m doing my bit for them too!
 For sweet dishes, the basic pastry I make is just butter, flour, sugar & eggs. One of the best tips I’ve discovered is to use icing sugar – your pastry will be smooth, silky & really easy to roll. Depending on the filling, sometimes I’ll add a bit of orange or lemon zest (or both!). It’s always fabulously fluffy in the middle, with that melt-in-the-mouth buttery taste. I have used this recipe for all kinds of pastry delights & it is easy to adapt, so you can change it up as you need or leave it simple & let the filling do the talking. Hands washed, aprons on!
 Tip the flour into a large mixing bowl & then add the butter, eggs & 4oz of vanilla sugar or icing sugar. If you are using orange & lemon zest, add that too. Get your hands in the bowl & start mixing, squishing everything together to distribute evenly & make a pliable ball of pastry. Dust a worktop with flour & place the dough on top. Dust your rolling pin too (you don’t want the pastry to stick to it!).
 your pie). Take the other pastry ball & roll it out, turn it & then roll again. If it’s a bit sticky, add another dusting of flour underneath before rolling – use a pallet knife to slide underneath if necessary. Try not to add too much flour to the worktop though, because it will combine with your pastry & become dry. Once rolled, transfer it to the prepared
  baking tin, making sure that there is no air between the pastry & tin. Use a floured finger to press it gently into all the corners or curves if using a fluted tin, or the dusted handle of a wooden spoon works really well.
 Once your pie case is prepared, add the filling. I use regular, uncooked ripe apples or pears that have been peeled & cored, then sliced thinly & fanned out over the bottom of the pastry case. Top with a few luscious blackberries, dusted with a little cinnamon & a good sprinkling of vanilla sugar. Don’t over-fill your pie case – just one layer of sliced fruit & a few berries is sufficient – too much filling will make it soggy underneath (never a good look!) & the pastry won’t cook.
 rolling pin to lift it & gently roll it over the pie. Pinch & press the edges together into a pretty pattern using your fingers, all the way around until it is sealed up nicely. If you feel like being a bit creative, cut out shapes with the trimmings to decorate – add after brushing with milk, then brush them too. When I’m making a pie with blackberries in, I like to decorate with flowers, because they look a bit like blackberries & sometimes I’ll add pastry leaves too. It’s just to use up any leftover pastry trimmings – no need to throw them away, just create some pretty shapes for the top.
 After baking, remove your pie from the oven & place on a cooling rack. Leave it in the tin for a few minutes, as it will be easier to remove once it has cooled down a bit. Even if you are going to eat it hot, you don’t want to be burning your mouth – fruit fillings especially will be like molten lava & tend to be hotter than the sun, so give it a moment & save yourself (& your guests) some pain! If you’re going to eat it cold, just leave it to cool completely in the tin before cutting it.
 If you’ve used a loose-bottomed tin, just push the base up from underneath & ease your pie onto a serving plate or board. Slide a pallet knife gently underneath the pie to separate it from the actual tin base. If you’ve use the greaseproof paper method, simply lift it out & transfer to a plate, then slice, serve & share! There are a number of ways to eat this delicious pie, but simple is always best – serve warm with a scoop of soft vanilla ice-cream.