

 Gazing into the garden while sipping my first coffee of the day, there is an Autumnal air about it. The early sunshine is just peaking over the rooftops, causing the dew laden lawn to shimmer in the sunlight & perfectly summing up the Summer.
August has been very much “all or nothing”, either a raging hot heatwave or shivering shade, deluge or drought, & nothing  inbetween. The poor plants don’t seem to know which way to turn & our multi-tasking willow tree has been happily soaking up the excess water, whilst providing welcome cool shade to the local wildlife. There are baby olives on our little olive tree trying to ripen, green tomatoes just starting to blush red & a bounty of blackberries waiting patiently to be plucked. The garden seems to be clinging on by it’s very leaf-tips to the last days of Summer, as Autumn has quietly arrived & begun to unpack her colourful attire across the landscape.
Before Autumn settles in, there are some comforting meals we can indulge in to soften the seasonal switch. Fresh produce is all around ![]() us, just waiting to be turned into tasty transitional treats. Some of my best ideas come from mooching around the markets, shopping when everyone else is sat in traffic (or still in bed), & picking up some fabulous bargains. The early bird always catches her worm & although thankfully not very worm-like, earthy foods have caught my eye recently – the beautiful but humble mushroom.
us, just waiting to be turned into tasty transitional treats. Some of my best ideas come from mooching around the markets, shopping when everyone else is sat in traffic (or still in bed), & picking up some fabulous bargains. The early bird always catches her worm & although thankfully not very worm-like, earthy foods have caught my eye recently – the beautiful but humble mushroom.
Soft, light & flavoursome, mushrooms are one of the most versatile ingredients in cooking. They go with pretty much everything, adding both subtle & substantial flavour to dishes, & the variety is truly  amazing! From the tiny to the tawny, closed cup or open, the frilly or the flat, these fabulous funghi are just waiting to be turned into delicious dishes!
As I wanted them to be the main attraction, I created my Champignon the Wonder Pie – a delicate mushroom & vegetable stew, tucked in under a crisp comforting blanket of buttery puff pastry. This is one of those lazy afternoon recipes to make, rather relaxing & a little therapeutic even. Although simple to make, there is going to be some prep involved – I hear you groaning, but I promise it’s all easy stuff, no mysterious ingredients & worth every minute when you taste the results.
Firstly, you’re going to need vegetable stock – use either a stock cube or fresh, whatever works best for you & the time you have available. I make my own & freeze it, as it uses up all the veg trimmings & you know what’s in it (too much salt & mushrooms = watery mess & a soggy pie). My easy vegetable stock recipe means no standing around watching pans either. You’ll need a couple of carrots, an onion, two celery sticks & a handful of fresh herbs (half a dozen Sage leaves, some sprigs of Thyme & a couple of Rosemary  stems work well), along with any mushroom stems, parsnip, bean or pea trimmings – wash everything well to remove grit & dirt, then chuck them all in a roasting tin with 2-3 pints of cold water, a splash of olive oil & a few good grinds of black pepper & sea salt. Cover it with foil to seal in all the juices & bake at 200*C for just over an hour, then strain & that’s it. Use it fresh, stick it in the fridge for a couple of days or freeze it. Save the veggies to whizz up into soups or sauces & pour any leftovers into jars for the fridge or ice cube trays to freeze.
If you prefer, you can swap the vegetable stock for chicken stock (as long as your guests are not vegetarian) – both work well & it tastes just as lovely either way. A little bit of tasty trivia for you here: vegetable stock is actually a broth, as stock refers to a liquid that has bones cooked in it.
 Next, although I have used two types of pastry (shortcrust for the base & puff for the lid), you could use shortcrust all over or just use shop-bought puff lids if time is limited – please make sure it’s proper all-butter puff to do your pie proud. If you do fancy having a go at making your own, here’s the link to my puff pastry recipe: https://hopeyourehungry.co.uk/puff-up-the-volume/ You will only need half the amount, so reduce the measurements accordingly. It’s easy to make & just needs an hour to rest in the fridge before rolling, so you could make this while the stock is in the oven.
Ready to bake it happen? Hands washed, aprons on & here we go!
What you need:
For the filling:
250g Mushrooms approx (I’ve used closed cup & flat but use what you like here)
1 stick of Celery
1 medium Carrot
1 medium Red Onion
2 tablespoons of Sweetcorn
100ml Vegetable Stock approx
25g Salted Butter
25g Plain Flour
1 tablespoon Extra Virgin Olive Oil
For the base Pastry:
6oz Plain Flour, plus extra for rolling out & prepping your tin
2oz Salted Butter, plus extra for your tin
1 large Egg
A little cold water, about a tablespoon
4oz Puff Pastry (see link above to make fresh or buy all-butter puff pastry)
2 teaspoons grated Parmesan or Medium Cheddar
1 Egg & 2 tablespoons of Milk, whisked together to make egg wash
What to do:
Pre-heat the oven to 220*C & prepare a pie tin. I’ve used an 8″ square cake tin because it was handy. Smudge a little butter around the inside of the tin & then sprinkle with flour. Tip out the flour (save for rolling out) & set the tin aside.

Time to prepare your vegetables! Give them all a good wash in cold water & remove the onion outer skin. Top & tail all of them, chop finely & set aside.
Prepare the mushrooms next. Give them a good wipe with a damp cloth to remove any dirt or grit (if they’re small, use a pastry brush). Take out about half a dozen & set to one side whole. Chop the rest up finely & set aside too.

Heat a large frying pan or skillet. Add the butter & oil, mixing well until melted together.
Add the carrot, onion & celery, stirring well to coat in the oil butter mixture, then fry on a medium heat for 3 or 4 minutes. Give them a nudge around the pan from time to time, so they don’t catch & burn. You want them to soften slightly, but not go squishy.
Add the mushrooms & give everything a good stir fry for a couple of minutes.
 Sprinkle in the plain flour around the pan & stir fry everything together until the flour has disappeared. This is going to make a roux in the pan, as it will absorb the butter & oil in the mixture, thickening everything up nicely.
Add the stock gradually & stir well into the mixture, making a smooth sauce. When everything is combined, turn off the pan.
Slice up the whole mushrooms you saved into bite-sized bits & stir them into the stew.
Make the base pastry by rubbing the butter into the flour. Add the egg & stir into the flour mixture using a metal spoon or knife. As it starts to come together, add a trickle of the cold water to form a soft dough.
Turn it out onto a floured surface, sprinkle a little flour on top & roll out until slightly larger than the size of your tin all around.
Flop the pastry over your rolling pin & carefully lift into the tin, draping it inside as you do so. Press gently into all the edges & leave a little hanging over the tin (to attach the puff pastry lid to later). Try using the end of the rolling pin for this, as it’s smooth & won’t tear your pastry.
Roll out the puff pastry to just over the size of your pie tin & set aside.
 Tip the mushroom pie filling into the pastry lined tin & spread out well. Dip your finger in a cup of cold water & run it around the edge of the pastry.
Put the puff pastry lid on top & press the edges down to seal the pastry base to the lid. Prick all over with a fork or a sharp knife.

Brush with a little egg wash all over. If you want to make little pastry decorations with the leftover bit of puff, do that now & lay them on top, then brush them too (not too many though). Sprinkle with a little grated Parmesan.
Bake in the oven for about 25 -30 minutes, until thoroughly golden & the layers are starting to show at the edges. The sides of the pastry will come away from the tin slightly when it’s ready.
 Put the pie tin on a cooling rack for a few moments to relax before serving. That’s it! Just get everyone around the table & dig in! Meaty but meatless, this mushroom-packed pastry goes well with either a generous scoop of cheesy mashed potatoes & steamed crisp vegetables, or a zesty green salad scattered with a few spots of aged Balsamic vinegar & toasted pine nuts. Slice it up cold for a luscious leftover lunch or freeze in slices for indulgent lazy suppers after a long day at work.

However you serve it, this crispy champignon-crammed pie is the perfect comfort food for chilly almost-Autumn evenings. Stay hungry! 😉 Aimee x

 bars full of oats & apricots are baking nicely in the oven & their familiar, fruity fragrance is wafting around the house, a seductive scent of apricots & buttery, toasted oats. The coffee pot is almost empty, but that can be easily rectified! It’s always a bit of a limbo day after a long weekend & sometimes Tuesday can feel a bit Monday-ish, so the last thing anyone wants to be doing is making a complicated concoction for dinner tonight!
 If you’ve been following my blog, you’ll know that I like to have a selection of sides in the freezer for mid-week meals & I usually have a couple of pots of my lazy, cheesy mashed potatoes for such occasions (really, who has the time or energy to mash spuds after work?!). If you too want to be prepared like a cooking ninja, here’s the link to pre-prepped enlightenment:
  of each pork chop. Muscovado is a moist sugar, so you don’t need much & it gives a light caramel taste.
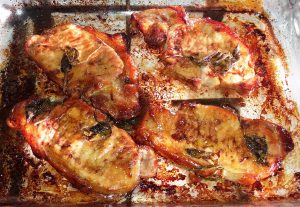 Bake in the centre of the oven for about 20-25 minutes, turning them over halfway through – be careful not to splash yourself, as molten sugar will hurt!
 Simply serve these sticky, sweet chops with some of my lazy, cheesy mash or a few crispy roasted potatoes & a heap of steamed veg. They are filling & flavoursome, go with all sorts of sides including fragrant, fluffy rice & I’ve even served them with chips & a gorgeous green salad.
 I’ve been designing cake, making tiny tea sets & small sugar bunnies to sit on the top, I’ve also been writing & doing numerous things at the same time, like the multi-tasking ninja that I am. When the weather is unpredictable, there is one thing you need to be able to rely on & that’s a rich, rib-sticking dinner to warm you through!
 It’s efficient, versatile & quick to cook. Making pasta is one of my favourite things to do & it’s something we make together as a family. When my Son is home, we make pasta & pizzas, all congregating in the kitchen & chatting simultaneously, whilst we work on creating dinner. It’s what cooking is all about for me & that’s how our children learn, by cooking with us. There are times when stress will start to invade your life & making pasta is one of the best things to de-stress, relax & take your mind off everything.
 Because my Husband works shifts, I like to make a variety of dinners & freeze them in two-portion pots, ready to be whipped out of the freezer at a moment’s notice. Usually, the freezer has at least one whole drawer filled with a selection of lasagnes & they’re all different. There’s the lasagne al forno, which is the one with meat (usually beef), a sumptuous spinach & cream cheese layered lovely & then, one of my favourites: vegetable lasagne! I have been a vegetarian a couple of times & this luxurious layered dish is one of my favourite indulgences! It’s lighter & quicker to make than a meat lasagne, but fabulously filling & you can create this velvety vegetable version in around half the time. Plus you can make it in advance & freeze it in individual pots for those evenings when you need instant pasta gratification. Fancy a go? Hands washed & aprons on!
 Take the seeds & any white pith out of the peppers (save the seeds & you can plant them in eggboxes on the windowsill). Chop the peppers into bite-sized pieces. It doesn’t need to be perfect or anything. Add them to the dish with the courgettes in.
 Add the tomato puree, Basil & Oregano, along with the sugar & a good pinch of the black pepper & sea salt to season your vegetable ragu. Give everything a good stir to distribute the puree & seasonings thoroughly.
 As the sauce thickens up, you should start to feel some resistance with the whisk. Keep whisking (swap hands if your wrist aches) & when you are satisfied with the thickness, add a couple of ounces of the grated mild cheddar & whisk until melted. Turn off the heat.
 Here’s a tip to help you fit your dried pasta sheets to those rounded corners of your dish. Take your dried lasagne sheet & snap off the top corner edge with your thumb, about 1cm in. Lay the lasagne sheet with the missing edge nearest the corner, then take the piece you snapped off & turn it around, placing it in the corner with the pointy end towards the middle of the dish. You’re welcome! All these years, we’ve all been trying to make it fit & then a few years ago, I decided to use up some random pieces & that was it!
 Cover the ragu with a layer of lasagne, making your corners fit as above.
 Spread it evenly with the back of the spoon you used before, then sprinkle liberally with the mixed grated cheese. This will give you a gorgeous, crispy cheesy topping. Sprinkle a good pinch of dried Oregano over the top, squeezing it in the tips of your fingers as you do so, to release the pungent fragrance of this wonderful herb.
 Serve with a huge green salad & maybe a few chunky chips, if you feel the need. Any leftovers can be packed up into pots for lunches (hot or cold, it’s rather nice), or frozen for lazy late night suppers, curled up on the sofa with a glass of wine.
 been following my blog, you’ll have most of your Christmas cooking prepared by now too (well done you!). This part is all about the main event: a beautifully basted bird, & whether you prefer turkey, chicken or something else completely, you want it to be perfect. It’s like a spectacular Sunday lunch, only with more people (& more wine). Whether you’re having a full-on festive feast or not, everyone will be looking forward to spending a few days with their family & friends.
 pterodactyl (it was a bit of a beast & needed two people to wedge it into the oven), along with joints of beef, pork & Quorn, plus a glazed gammon joint & various crates of veg – this involved several days, two kitchens & a bottle of Sherry! Despite all the chaos, dinner would be done & I somehow managed to keep smiling – it’s a bit like being a swan on a pond, all calm & graceful on the top, but paddling like mad under the water!
 2-3 medium/large Carrots
 Next you need to fill the cavity of the chicken – again, this helps the chicken cook evenly & it also flavours it nicely too. There are various fillings you can use, but ultimately it’s down to personal choice – some people prefer traditional sage & onion stuffing, some prefer using a few fresh herbs & vegetables. If you made some of my homemade sage & onion stuffing for this, simply spoon it into the cavity until full. If you prefer your stuffing separate, bundle together a couple of thin carrot & celery sticks with the leaves on, along with the herbs (saving a couple of Sage leaves) & put inside the chicken cavity.
 If you’re using bacon, layer your bacon rashers across the chicken breast, starting at the top & working your way down, with each rasher overlapping the previous one. This is good if the skin has split on your chicken – it will keep your breast meat moist & the bacon will crisp up nicely at the end of cooking. Wash your hands well again afterwards (they’ll be sparkling by now!).
 Lay a couple of equal sized foil strips on top of each other, with the dull sides on the inside (the side that goes next to the chicken), then fold the top over about a centimetre all the way along. Do this a couple of times, then mash them together well to make sure they don’t come undone in the oven. If you have a larger sheet of foil, just put a crease or fold in the middle, leaving the central part un-creased. Put over the tin, making sure it forms a dome over the top & doesn’t touch the chicken, then press firmly around the edges of the tin so that none of that lovely steam can escape. This is what makes your stock, infusing with the bird & veg to produce a fragrant, flavoursome fluid for making gorgeous gravy later.
 When you’re happy that it’s crisped enough, remove your roasting tin from the oven & place on a cooling rack (I use a grill tray with a wire rack in it for this, to catch any drips). Replace the foil lid & seal around the tin to protect the meat from drying out, then let it rest for at least half an hour. By resting the bird, the meat relaxes nicely & becomes beautifully tender. Traditionally, you should let the bird rest for the same amount of time it was in the oven, but I leave it as long as it takes to cook the accompanying side dishes.
 If you’ve been following my previous blogs, this is where you grab a well-deserved glass of something nice, give yourself a pat on the back & relax, because all your sides will be prepared! Just pop them in ovenproof dishes, then warm them through in the oven while your roasties cook (bet you’re glad you did all that prep now!). Obviously, this is also when you tell everyone else to keep out of the kitchen while you’re working hard (on your G&T hopefully) & send them off to set tables, find tablecloths, fill glasses – anything to keep them busy & give you a five minute breather.
 a pint into a jug (keep the rest in the pan, put the lid on & leave to cool, then freeze). To remove any fat from the stock (that’s the golden bubbles you can see here), get yourself a few sheets of kitchen paper & touch it gently on the top – the grease will attach itself to the paper, which you can then throw away (no faffing around trying to separate it).
 When everything is ready & you’re happy with it, get your Little Helpers in to distribute dishes to the table (maybe have some extra treats to reward them for their support).