

Romance gushes in many guises & St Valentine’s Day is no exception. There are the usual, traditional gifts of long-stemmed, sweetly scented ruby red roses, accompanied by cheeky cards & boxes of beautiful Belgian chocolates, all intended to melt even the frostiest of hearts. Whether you’re a secret admirer or a “heart-on-your-sleeve” kind of person, everyone loves receiving a sweet token of affection on this particular day. We all get the warm fuzzies when we open a Valentine’s love note or receive flowers – it’s human nature. In the past, I have sometimes given a card & small gift to some of my single friends, just to let them know they were appreciated (not that I wanted to pick out curtains or anything).
Over the last couple of years, I’ve usually been busy creating handmade chocolate  hearts in their hundreds as treats for people to give to their beloved, dipping each one in melted chocolate, decorating them by hand & turning my kitchen into my own little chocolate factory! By the time I’d finished, I really didn’t want to see, smell or taste chocolate for a few weeks after! Last year, my Husband was suitably spoiled as always, with a selection of his favourite handmade chocolates decorating a rather large, milk chocolate frosted heart-shaped chocolate cake (I think there was just enough chocolate in it!).
 This year, I wanted to do something a bit different & as it was birthday month in our house this January, I decided to make my own sugar roses. I did so much research that I was dreaming in fondant & buttercream! Our lovely neighbours have been my taste testers (every time I knock on their doors, they must be thinking “oh no, it’s that cake woman again!”) & I’ve been handing out buttercream roses like I’m on some sort of quest. Once I had realised that (a) you need a much stiffer buttercream & (b) you need the nozzle the right way up, my roses started to actually resemble flowers. There was a lot of “woohoo-ing” & dancing around the kitchen at this point – it was a major achievement for me, as previous attempts had resulted in
  wavy pebbles on sticks (albeit edible ones). As these were a success, I decided to make a small bouquet for a birthday gift.
Obviously, once I’d realised that I could make these fabulous floral treats, I couldn’t stop there & decided to create some sugar art of my own, modelling them from fondant sugar paste & even marzipan. I made a couple of fondant roses one Summer & they lasted for a full five minutes, before retreating into a puddle of sugary petals (it was rather hot that day, so it probably wasn’t a good idea). This time, I made them with both marzipan & sugar paste, so was quite surprised with my  achievement (they’re quite fiddly & I’m not very patient). I won’t bore you with the details, but as it took me about a couple of hours to create each one from scratch (not including the centres), you can appreciate that I couldn’t watch them being eaten (the Husband kept wandering into another room every time he ate one, so I wouldn’t see).
Whatever Valentine’s Day treats you make, they should always be made with love. Here’s a recipe that even the most challenged cook can create in their own kitchen. We have been making these cookies for many years now & call this the 1234 recipe, because it’s so easy & only has four basic ingredients – just add chocolate! So, aprons on & hands washed, here we go!
What you need for the basic recipe:
1oz Custard Powder
2oz Light Muscovado Sugar
3oz Softened Butter or Spread (although Butter tastes best)
4oz Self-Raising Flour
Optional:
100g Milk Chocolate chunks (chuck a bar in the blender & pulse it to get chunks)
Or:
A handful of Sultanas
What to do:
Pre-heat the oven to 200*C & line a couple of baking trays with sheets of greaseproof paper (no washing up!).
Put everything in a mixing bowl, get your hands in & squelch everything together to make a silky, smooth dough. Break up any large pieces of the Muscovado sugar while your doing this too.
If you’re adding chocolate chunks or sultanas, chuck these in now & mix evenly into the dough (tip any powdered chocolate out of that blender too – we don’t waste chocolate!).

Take a tablespoonful of mixture in your hand, roll into a ball & press onto the baking tray with your fingers. Leave about an inch gap between each & repeat until you have all the mixture done on the tray.
Bake for approximately 8-10 minutes, until just turning golden. When they’re ready, use a pallet knife to transfer each one to a cooling rack – be careful, as they will be soft & breakable.
Once cooled, eat them as they are or drizzle all over with melted chocolate & let them set. Keep in an airtight container or biscuit tin until you fancy a treat. They will keep for about a week (but only if you don’t tell anyone about them).
That’s the basic recipe, but for something more love inspiring, here’s a Valentine’s Day variation for your Amour – Cookie Sweethearts. If you don’t want to use the heart cookie cutter, you could always use a flower one & make an edible bouquet of cookie flowers instead!
What you need:
2oz Custard Powder
4oz Light Muscovado Sugar
6oz Butter or Spread
8oz Self-Raising Flour (with more for rolling out)
A pinch of Bicarbonate of Soda
For the filling:
3oz Softened Butter
6oz Icing Sugar
Half a jar of Strawberry or Raspberry Jam (purée any large pieces of berry)
1 Heart shaped Cookie Cutter & 1 small Heart shaped Cookie Cutter
What to do:
Preheat the oven to 200*C & prepare two large baking trays with greaseproof paper as before.
Mash all the ingredients (except the jam) into a large mixing bowl, squishing everything together to make a silky dough as before & breaking up any large pieces of the sugar.
Dust your work surface with a little flour & take half of the dough, rolling it out to about half a centimetre thickness. You will find that you need to slide your pallet knife underneath at stages, as it can get sticky. Avoid adding too much flour, just dust it lightly, as this will alter the recipe.
Cut out the large heart shapes with your cookie cutter. Take half of those you have cut out & place on your prepared baking tray, about an inch apart as before.
With the remainder of your heart shapes, take the smaller cookie cutter & cut hearts out of the centre of the larger shapes. Keep the tiny hearts & put them on the baking tray to bake alongside your other hearts.
Put the hearts with the holes in on another prepared baking tray, spaced out as above.
 Bake them all for about 8-10 minutes, until golden & then gently transfer them to a cooling tray. These will be crisper than the other recipe, so they should be firmer.
Whilst they are cooling, make the buttercream. Put the softened butter in a mixing bowl & using a spatula or the back of a wooden spoon, press it out all around the bowl to make it smooth.
Add the icing sugar & repeat, pressing it into the butter until you have a creamy consistency. This is how I make buttercream, because I’ve been covered with a cloud of powdered sugar by using the mixer & it’s not fun (the damp tea-towel over the bowl didn’t work for me). Once it’s all smooth, give it a quick whisk up with the mixer if you like & it will become light, fluffy & airy.
Put the buttercream into a piping bag (you can use a nozzle if you like or just snip the tip off the bag) & set aside.
Tip the jam into a small bowl & give it a stir with a wooden spoon or spatula to smooth it out. You want the jam to soften, so that you can pipe it. Sometimes, you can just give it a whisk by hand in a bowl until it’s smooth. Break up & purée any large pieces of berry (or eat them – Cook’s bonus).

Pour into another piping bag & again, you don’t need a nozzle – just snip off the end of a bag, but keep it small this time.
Take your whole hearts & pipe a thin layer of buttercream on top. These will be the base of your heart biscuits. Put one of the open heart biscuits on top & press gently to attach – wipe off any excess buttercream that might ooze out of the sides & smooth with a fingertip or back of a teaspoon.
Pipe a small amount of jam carefully into the tiny heart-shaped hole on the top & leave to set on the cooling rack. Repeat the above filling stages until all your biscuits are double layered & have pretty jam centres.
 Remember all the little heart centres that you baked? Simply pipe a small splodge of buttercream into them & make little layered lovehearts, for bite-sized treats. You can always drizzle melted chocolate over the top of these if you want to make them extra special.
 Any leftover jam can be put back in the jar & left in the fridge until you need it (don’t throw jam away!). The same goes for the buttercream – just wrap up the end of the piping bag & fold over the snipped end, then keep it in the fridge to use on random cupcakes or chocolate puddings. If you’re really feeling adventurous, tip it into a bowl & add more icing sugar until a bit firmer, then use it to pipe some buttercream roses onto cookies (if you make a mistake, scrape it off, shove it back in the bag & start again – great for teaching kids & keeps them entertained for ages).
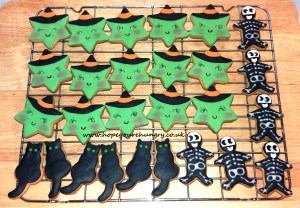
Try making different shapes & decorate as you like! I made these a while ago, as a Halloween birthday gift. They were really easy to decorate too. Simply roll out thin fondant icing, cut it out to the same shape as your cookies & stick on with a smudge of buttercream or icing. The witches’ faces were made by marking on the eyes & mouths with a straw, cut in half at one end & then using a fine brush to paint on a little food colour. 
Let them dry for about an hour or so, then serve! The skeletons were actually made using the gingerbread man cutter. If you don’t have a cat cutter, make 3 circles (each one slightly bigger), join them together on the baking tray, then add ears & a tail before baking.
 For Christmas, I simply used a tree cutter & drizzled them with melted chocolate (mix a little milk & plain chocolate together for a richer flavour), then simply adorned them with some sugar sprinkles. Why not try making cute reindeer cookies too! Simply use an upside-down gingerbread man cutter to shape your cookie dough & decorate with rolled out fondant or modelling chocolate. They are so easy to make & perfect treats for sharing.

So this St Valentine’s Day, give your Sweetheart some sugar & share these love bites! Stay hungry! 😉 A x
 Even in Summertime, soggy mornings make me think of massive mugs of heavenly hot chocolate, teeming with a mountain of mini marshmallows on a cloud of whipped cream, dusted with chocolate shavings. It’s guaranteed to put a smile on even the sourest of faces, especially if there’s a chunky chocolate chip cookie to dunk in it. I must admit, I like my hot chocolate made the old-fashioned way – boiled milk, slowly poured over flakes of grated chocolate & whisked up until silky smooth with a delicate foamy froth. After one of these & a cookie, I can take on the world (albeit slowly!).
 Over the weekend, I was invited to a beautiful ladies’ afternoon tea at one of my lovely friend’s homes & took some of these naughty chocolate chip delights as a little gift for her (fresh flowers are nice, but you can’t really eat them!). These are based on a blondie recipe & are really rich & indulgent, because they are full to the brim with so much chocolate, then swirled & drizzled with more chocolate (just to make sure there’s enough in them!). The chocolate chip & peanut butter version was a kind of happy mishap – I was experimenting with the recipe & added a splodge of smooth peanut butter into each scoop, encasing that nutty, buttery centre in the cookie dough.
  As they bake in the oven, the peanut butter starts to melt & infuse the cookies (& kitchen) with that nutty flavour & sweet scent. Of course, they are drizzled with melted chocolate too & a few chopped, salted peanuts sprinkled generously on top – the slight saltiness complements the chocolate so well! These are not for the faint-hearted, nor are they for everyday munching really – they should be a treat, or for those days when you’re just feeling a bit pants & want a “pick me up”. If I’m feeling particularly decadent, I’ll make some with plain chocolate chunks & shards of stem ginger (my favourite), or chopped dried apricots with white chocolate pieces. The choices are as endless as your imagination! The best bit? They are really easy & take minutes to make. Hands washed, aprons on & here we go!
 Get yourself a medium sized metal ice-cream scoop (one with a spring loaded handle is best), then scoop dollops of cookie dough up & drop them onto the greaseproof lined baking tray. Leave a good couple of inches between them all – they will grow! If you want to save some for another day, you can always freeze a few scoops at this stage & just defrost them when you fancy a treat.
 Bake in the centre of the oven for between 16-18 minutes, then gently transfer the cookies onto a cooling rack. If you put the tin next to the cooling rack, you can actually pull the greaseproof paper onto the rack & then move the cookies directly onto the rack after. They will be soft until they cool, so be careful as they are more delicate than they look.