

 Driving home this morning, seeing the luscious much-needed rain has brought the gardens back to greenery & lowered the temperature slightly, I felt rather peaceful. Pretty flowers were less wilted & seemed to flourish, the herbs were more fragrant & our beloved willow tree had perked up again, waggling it’s beautiful branches in the Summer breeze.
Summer is always a busy time for us & I needed to focus on two rather rapidly approaching birthdays! Twenty-four years ago, I was nine months pregnant with my handsome Son & as he was born the day before my birthday, we always celebrate in a double way. Some of my friends will know that I’m making a sugar lion at the moment (hopefully it will be ready in time!) & it’s rather large, so most of my fridge is full of lion parts (not real ones – please be assured they are all made of marshmallow, chocolate ganache & rice crispies!). Once it’s finished, I’ll share some pictures with you. When I bake up a birthday banquet, it’s usually a relaxed affair with everyone helping themselves to the various nibbles & treats, with a triple layer, triple chocolate birthday cake in the midst of it all. One of our favourite nibbles is cheese pastry straws made from delicate flaky, buttery puffed-up pastry. You know the sort I’m talking about – the crisp, light, shatter-into-a-squillion-shards-in-your-mouth kind of pastry that melts into a swirl of savoury cheesy butterness once it hits your tongue.

Now usually I would buy some shop-bought puff pastry, as it’s pre-made & quick to roll out – job done! However, despite my best efforts, I can’t find one made with just butter so I make my own version, using a recipe my Mum & Grandma made when I was younger. My Mum used to make all kinds of delicious pastries when I was a little girl & the scent of baked buttery delights would always entice me to the kitchen. Sat on a high stool by the door, I would watch her working her magic & creating all kinds of tantalising treats. Delicate voluminous layers of flaky fabulousness would crown rich fruit pies, be wrapped cocoon-like around sausage rolls or made into swirly sticks, simply showered in shavings of cheese. Of course, all magic takes a little time & I was fascinated at how a few simple ingredients can be made into something magnificent (I still am!). This pastry recipe is really simple to make (the basic recipe is just three ingredients BC – before cheese) & although it takes a little more effort to make than shortcrust pastry, the taste is amazing & it’s really worth it!
One of the most important things when making pastry is cool conditions, so it’s best to make it first thing in the morning (I like to do this when everyone is still in bed at the weekends). To make sure your  hands are cool, after washing them run your wrists under the cold tap for a few moments (trust me, it works).
The next thing to remember is take your time. Some foods should be made slowly, it’s like a ritual binding all the ingredients together & each process is important, so you can’t skip anything. This pastry is one of those slow foods, lovingly created by hand – your hands & not squished out of some huge machine into a packet (don’t get me started on the random ingredients list of unnecessary additives either!). Once you master this flaky-layered lovely, shop-bought pastry will never taste the same again! Ready? Hands washed, aprons on & here we go!
What you need:
For the Pastry:
8oz Self-Raising Flour (plus extra for rolling out)
6oz Salted Butter, cold from the fridge & cut into 4 equal pieces (I used salted, as it omits the need for additional salt)
100ml Cold Water
For the Filling:
1oz Medium Cheddar, grated
Half an ounce each of Parmesan & Grana Padana, grated finely
Freshly ground Black Pepper
A bit of melted butter (a teaspoonful should be enough)
1 large Egg, beaten (for glazing)
What to do:
 Tip the flour into a large mixing bowl & add one of the butter pieces. Rub it into the flour until it resembles fine breadcrumbs.
Using a round-ended knife, stir together & slowly add enough water, just a little at a time, to bring it all together – take your time, as you don’t want a sticky gooey mess. Once you have achieved a thick, dough-like consistency, that should be enough.
 Turn out your pastry onto a lightly floured worktop & shape into a rectangle. Roll away from you into a long piece, about a centimetre thick. Try to keep the edges as straight as you can, but don’t worry too much or you’ll drive yourself loopy! Using a dry pastry brush, dust off any excess flour as you go, especially when folding the layers (otherwise it may affect the recipe & you want flaky pastry, not floury).
 Take one of the three pieces of butter & cut into small chunks of about 1cm (you can just pull it apart, but the heat from your hands might melt it).
Dot the butter all over the top two thirds of the pastry.
Fold the bottom plain piece over the next third of pastry, then fold the top piece over that. Brush off the excess flour & press the open edges together to seal the layers of butter & air in.
 Dust the worktop with a little more flour. Turn the pastry one turn to the right & roll out again, just as you did above.
Repeat the above steps a couple more times, using up the last two pieces of butter. Then turn the pastry to the right, roll it out again & fold into thirds, brushing off the excess flour as you go.
 Lay your pastry on a piece of greaseproof paper, fold the top of the paper over your pastry & put it on a plate in the fridge for an hour (you might need to leave it longer during this heatwave we’re having, so probably add another ten minutes if you’re not sure – I’ve left it a couple of hours before & it didn’t do any harm). Get yourself a cuppa, put your feet up & read a book or something (if you’re like me, you’ve probably been whizzing around, so relax for a bit).
Pre-heat the oven to 220*C & then prepare your tins (you’ll need a couple of baking trays). Brush melted butter all over the inside of the baking tray & then run under the cold tap. Tip away the excess, leaving a wet film on the tin. Repeat with the second tray & set them to one side.
Once your pastry is rested & chilled, it’s time to get rolling! On a lightly floured worktop, roll out the pastry into a wide rectangular strip, about a centimetre thick.
 Cut into two equal pieces & on one of them, brush a little melted butter all over the top & sprinkle on two thirds of the cheese.
Place the other piece of pastry over the top, press down & roll out again, about 1cm thick.
 Brush the top of your cheesy pastry with beaten egg – just the top, not the edges, otherwise your pastry won’t rise properly.
Using a knife or a ravioli cutter (my fave tool de jour), cut into finger width strips & twist each one loosely into a twirl of pastry with the egg glazed side outwards.
 Place on the baking tray & repeat with the rest of the pastry, until you have a couple of trays of twirly swirls with about half an inch between them.
Sprinkle with the remainder of the cheese, taking care to get the majority of it on the actual pastry (although you will love the crunchy cheesy chips that this produces). Give them a quick dust with some black pepper.
 Bake in the centre of the oven for about 10-12 minutes, until they have risen & turned a gorgeous golden hue. Carefully transfer them onto a cooling rack using a pallet knife or thin spatula. Remember the crunchy cheesy chips? Shake them into a dish for sprinkling on salad as a crispy garnish or just eat them as they are – Chef’s perks!
 Serve your cheesy sticks either on their own or maybe dunked in an oozy, warm baked Camembert with a glass of chilled wine (you’ve worked hard & deserve a treat). I doubt they will last long, but if you do have any leftover just pop them in an airtight container (they will keep for a couple of days, so I’m told).
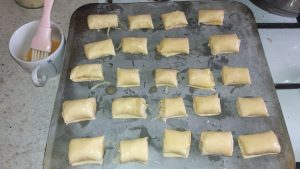 If you want to make an alternative to cheese twists, just make cheese “sausage” rolls – instead of cutting into strips, cut into wide ribbons. Lay grated cheese across the top half of the pastry ribbon, brush a line of beaten egg on the opposite edge of the pastry & roll over, carefully encasing the cheese inside. Press lightly to stick the roll together, then cut into inch long pieces & brush with egg.
  Bake at 220*C for about 10-12 minutes, until golden & risen. Transfer to a baking tray to cool for a few minutes before serving. Great for lunches, nibbles or parties.
So when your pastry needs to be buttery, puffed up, flaky & fabulous, have a go at homemade! Stay hungry! Aimee 😉 x
3 Replies to “Puff Up The Volume!”