

After a rather hectic week, the weekend should be a relaxing affair with good friends, good food & a few good rays of sunshine! Last week was no exception & seeing as my Husband was working over the weekend, it was nice to cook a simple Sunday dinner of rush-free, rustic fayre instead of a roast. Sundays are perfect for making slow-cooked, sumptuous food & one of the best ways to get the whole family involved is a recipe that you can all make together.

Meatballs are perfect for this kind of lazy day & my Meatballs Casalinga (Polpette alla Casalinga) recipe is one I’ve been making for a long time, sharing various versions over the years with friends & family. I’ve also made them in some unusual places (at the side of a riverbank while fishing & cooking them on a barbeque, next to foil-wrapped trout). This recipe first began over forty years ago when I was at school & evolved into the one I make today. It is something I suspect would  be considered as “cucina povera”, as it is quite a hearty dish made from a few simple ingredients, doesn’t cost much to make & will feed quite a few people easily! They freeze well too & are great on baguettes for lunches (that’s if there are any leftovers – good luck with that!).
What I love most about making meatballs is they are really easy, you can’t mess up the recipe (there are three ingredients) & everyone can get involved. When my guys are all home, we enjoy cooking together & it’s a nice chance to catch up on each other’s news while we’re standing around the mixing bowl, making meatballs & usually a mess (it also means they are done in less time than it would take me to make them on my own). Because they are baked, it means you only have the pasta & sauce pans to watch too.
 Sometimes I’ll use dried spaghetti as a swirly, silky cushion of plump pasta for the meatballs to sit on & sometimes I’ll make my own fresh (making your own pasta can be addictive, so be warned!). Fresh pasta takes five minutes to knead & then needs half an hour to rest in the fridge, before rolling & cutting into shapes. Before you start to panic about making your own pasta, it’s really easy & I’ve written a whole blog on this – here’s the link: https://hopeyourehungry.co.uk/pasta-parcels/ . Pasta machines have their own spaghetti cutters that slot into place at the front of the
  roller, so all the cutting is done for you at the turn of a handle! Any extra pasta can be dried & stored for future use. Even if you don’t have a pasta machine, you can roll it out thinly & cut into strips – make your own tagliatelle or papparadelle ribbons! Get creative with your pasta & make whatever shapes you prefer.
Now while the pasta is being prepped & before the balling begins, I  like to start making a rich, jammy tomato sauce & I’ve usually got a huge pan of this blipping away in the background. Forget shop-bought jars of sauce with unpronounceable ingredients, unless you are using a jar of Passata (sieved tomatoes), then this one will sort you out & it won’t take long to make. It is probably one of the most versatile sauces you will ever make & goes with pretty much everything! Although this isn’t our family recipe, it’s a close one & tastes just as jammy. Hands washed & here we go!
What you need for the Sauce:
4 tins of Italian Plum Tomatoes
Half a bulb of fresh Garlic, finely chopped
1 tablespoon of Tomato Puree
Extra Virgin Olive Oil
Basil (fresh or dried)
Freshly ground Black Pepper
Pinch of Sea Salt
2 teaspoons of Sugar (optional)
What to do:
Into a large saucepan, heat a tablespoon of olive oil & add the garlic. Gently fry for a few seconds, then slowly add the tomatoes & their juice, giving them a good stir around & breaking up any large pieces (or you can just squish them in your hands before you put them in the pan).
Add some fresh Basil – rip up about half a dozen leaves & chuck them in (don’t worry about chopping), or a couple of teaspoons of dried Basil if you prefer). Add the sugar, salt & pepper to your own taste (I like to add plenty of pepper & just a pinch of sea salt), give everything a good stir & reduce to a very gentle simmer for about 20-25 minutes with a lid half on, stirring occasionally.
Once cooked, the sauce should have thickened & reduced slightly, so give it a stir & a quick taste. Adjust the seasoning accordingly, then taste again If you want to add a little tomato puree here, add a teaspoon or two & mix well. When you’re happy turn off the heat & set aside, lid half on the pan (you don’t want the steam to add any more moisture to your sauce). It should stay warm, but you can reheat it gently if you feel it needs it.
Time to get rolling the meatballs, so hands washed & aprons on!
What you need for the Meatballs:
500g Minced Beef (don’t go too lean, as a little fat will add flavour)
(traditionally you would use half Beef, half Pork, so use what meat you prefer)
1 large Onion (Red or Brown is fine), chopped finely or minced
6 slices Bread, whizzed into fine breadcrumbs
3oz Plain Flour
Extra Virgin Olive Oil
What to do:
Pre-heat the oven to 200*C.
In a shallow bowl (or casserole dish lid), tip the flour & spread it around the dish.
Grab a large plate & dust with flour – this is where your prepared meatballs will rest until you’re ready to cook them.
In a separate large mixing bowl, add the mince, breadcrumbs & onion. If you’re wondering why I’m not adding any seasoning to them, it’s because there’s plenty in the sauce.
Get your hands in & squish everything together. This is not a time to be squeamish & it will be cold, but you want to mix everything evenly into a huge ball of meat dough. You may want to wash your hands again now, before the next stage.
Dust your hands in a little flour & scoop some of the meatball mixture up, about the size of a walnut. Give it a roll in your hands, gently pressing the mixture together as you do so – don’t compact it though, otherwise you’ll end up with a tough meatball that won’t cook & will resemble a large marble!
Once you’re happy with your meatball shape, roll it in the flour dish then pick it up, give it a shake to remove excess flour & place on the  plate you prepared earlier. Repeat until all the mixture has been turned into meatballs & your plate is full.
In a large skillet or frying pan, heat a tablespoon of the olive oil. Add a few meatballs at a time to the hot pan & roll around to coat them in the oil. Brown for a few moments, about 30 seconds or so, moving them around so they don’t sit for too long (you want an even colouring). Transfer to a ovenproof dish (a lasagne dish will do) & repeat until you have browned all the meatballs.
Place the dish in the centre of the oven for about 20-25 minutes, gently turning halfway (give them a little shake, but watch out for oil splashing). Don’t worry too much about the fat, as it will render out during  cooking into the bottom of the dish & leave your meatballs lovely & tender.
While your meatballs are baking nicely, towards the end of cooking them you should get your pasta going. If it’s dried pasta, check the cooking times on the packet.
 If you’re cooking fresh pasta, it takes about 2-3 minutes tops. Get a large pan, boil the kettle & fill halfway up with boiling water. Add a teaspoon of Sea Salt & bring to the boil. Carefully add your pasta to the water & bring back to a rolling boil (that’s when the water rolls over from the edge of the pan to the centre).
Once cooked, drain your spaghetti & serve immediately (pasta waits for no-one!), swirling into silky spoonfuls on pasta plates or bowls.
Add several meatballs – they are filling, so I would say about 8-10 is a good amount (you can always go back for seconds).
 Spoon over a generous drenching of the tomato sauce, coating the meatballs & serve immediately! If you like, dust with a little freshly grated Parmesan – leave a little dish on the table with a spoon for people to help themselves. Or you could use a speed peeler to add a few strips of Parmesan on top instead, it’s your choice.
 Leftover meatballs & sauce will keep too – freeze the meatballs in a little sauce, either in bags or plastic tubs. Pour any leftover sauce into sterilised jars when cooled & store it in the fridge. You can use it for pizza, lasagne, pasta or just for dipping veg in (I like it on my chips). It’s great on burgers too!
 One thing I would recommend is don’t wear a white shirt while swirling sauce-laden spaghetti! If you do get tomato sauce on your clothes, try this little tip I learned: add a spot of neat washing up liquid (any brand works, although Lemon seems to be best) & chuck the shirt in the wash. If you do it straightaway, it should come out fine. This works on red wine too (you’re welcome!).
So next time you fancy a lazy lunch with the family, try something different & have a ball! Stay hungry 😉 Aimee x

 This time of year is one of my favourites, just as everything is starting to spring & sprout in the garden, refreshing & regenerating. Buds are beginning to pop up, soon to bloom into beautiful blossoms, while the trees are turning green & growing again. The lovely Spring sunshine seems to be a bit shy this week, making it difficult to get out into the garden, so I’ve been practising my sugar skills & learning a few new techniques. Despite the lack of sunshine this week, I’ve still managed to get some sparkle in the form of sugar & edible glitter though!
 Having made a warren full of baby bunnies over Easter, I was inspired by the pretty pale pink blossom trees of Spring to create a chocolate tree. If you’ve been following me on social media, you will know I’ve been excitedly sharing various pictures of my progress. It was something I needed to try & although it took me five days from start to finish, I’m really pleased with the results, plus I’ve had some fabulous feedback – thank you so much to all you kind, lovely people (you know who you are!). All I’ll say is that I know how Richard Dreyfuss felt about his mashed potato mountain in Close Encounters!
 As it’s still a bit chilly outside, my Chicken & Leek Pie is just perfect for this inbetween weather & the bright vegetables will add some colour to chilly evenings. Leeks are a bit under-rated & have always struck me as rather pretty. With their slender bundles of long, frond-like leaves, tightly packed & tall, they go from being the darkest emerald green at one end to the palest, apple-flesh green at the roots. They can be cooked in a variety of ways, but we tend to just boil them until bland, then spend the whole meal pushing them around a plate & not eating them. What a waste!
 Peel, top & tail the carrots & parsnips. Chop into bite-sized slices (I usually cut into half, then slice). Nothing needs to be perfect here, just get chopping.
 Sprinkle the flour on top & stir thoroughly, ensuring all the chicken is coated well. The chicken will become clumpy, the oil & butter mixture will cook the flour, basically making a roux in the frying pan. This is going to make your pie filling more solid (making it easier to slice up later).
 Break up the Gorgonzola Dolce or Danish Blue cheese into pieces & dot around the pan, add the strained leeks, carrots & parsnips. Stir everything gently until thoroughly mixed. Season with a little freshly ground black pepper (you won’t need any extra salt, as there’s salt already in the butter & Gorgonzola).
 If you’re only putting a pastry lid on your pie, tip everything into a large pie dish (or individual ones if you like) & spread evenly. Set to one side while you make the pastry. If you’re making a pastry bottom for your pie, grease your dish with butter & dust with a little flour (this will make it easier to remove when cooked).
 If you’re just making the lid, dip your fingers in a cup of water & run them around the edge of the pie dish – this will act as a sort of glue to bind your pastry crust to the dish & help stop leaking (it’s no guarantee, but it does help). You don’t need to do this if you have a pastry base, as it will naturally stick to itself when you put the lid on.
 Brush lightly all over with milk to give the pastry a nice gloss while it’s cooking. If you want to decorate with leaves & shapes like I’ve done here, you can add the shapes now you’ve brushed it with milk (so they will stick).
  roasted potatoes, & a huge green salad. Any leftovers will freeze nicely or you can cut it into slices, wrapped individually for lazy lunches or picnics.
 bars full of oats & apricots are baking nicely in the oven & their familiar, fruity fragrance is wafting around the house, a seductive scent of apricots & buttery, toasted oats. The coffee pot is almost empty, but that can be easily rectified! It’s always a bit of a limbo day after a long weekend & sometimes Tuesday can feel a bit Monday-ish, so the last thing anyone wants to be doing is making a complicated concoction for dinner tonight!
 If you’ve been following my blog, you’ll know that I like to have a selection of sides in the freezer for mid-week meals & I usually have a couple of pots of my lazy, cheesy mashed potatoes for such occasions (really, who has the time or energy to mash spuds after work?!). If you too want to be prepared like a cooking ninja, here’s the link to pre-prepped enlightenment:
  of each pork chop. Muscovado is a moist sugar, so you don’t need much & it gives a light caramel taste.
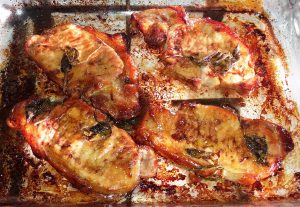 Bake in the centre of the oven for about 20-25 minutes, turning them over halfway through – be careful not to splash yourself, as molten sugar will hurt!
 Simply serve these sticky, sweet chops with some of my lazy, cheesy mash or a few crispy roasted potatoes & a heap of steamed veg. They are filling & flavoursome, go with all sorts of sides including fragrant, fluffy rice & I’ve even served them with chips & a gorgeous green salad.
 no different. After a 5.00am start, one pot of “slap you round the face” coffee & some hot, buttered toast, I was up & at ’em! Early mornings are special for me, when everyone else is still sleeping & I’m able to get as much done as possible. Stopping for fuel this morning at my local Sainsbury’s, chatting about chocolates to the lovely ladies who were also up early (hello ladies!), I was able to shop in blissful peace, wandering around the shelves selecting supplies to make tiny bunny toes. It was as if the world had stopped just for a couple of hours. By 9.00am, I had managed to hit four supermarkets & be back home (I think my shopping ninja just levelled up!).
 a bit lighter & brighter. While baking bread this week, I decided to make my usual light, fluffy bread dough & also an enriched, sweet dough. Yes, this did involve kneading by hand for ten minutes per batch & yes, my muscles would be worthy of Wonder Woman, but it was worth every minute! For many years, I’ve been making bread with fruit in (my Husband loves it toasted with butter for breakfast), so thought I’d make some fruity buns. Now you all know how much I adore proper plumped up fruit in my baking, so I’ve usually got a handful of sultanas soaking in a cup of tea ready for baking (& fluffy bread demands squishy, sumptuous sultanas!).
 Hot cross buns were so loved, someone even wrote a nursery rhyme about them, so they must have been popular! Although there are some splendid shop-bought ones out there, I do love making my own buns whenever I fancy some. My hot cross bun recipe is really easy, I promise & they freeze really well, so you can have them anytime (just leave the cross off). I will warn you, you’re going to get messy, but that’s half the fun. So, hands washed & aprons on, here we go!
 1 teaspoon each of Lemon & Orange zest (wash them first!)
 Once the dough has proved & is doubled in size, remove the oiled clingfilm & set to one side (you’ll need this again). Tip the dough onto your lightly floured work surface & knock it back to remove any large air bubbles – I throw it on the worktop a couple of times & this works really well. Knead it lightly for a few seconds & spread out on the worktop into a rectangular shape.
 Sprinkle the sultanas evenly over the top, followed by the chopped cherries, ginger & zest. If you don’t like cherries, try adding dried chopped apricots.
 Using floured hands, roll each dough lump into a ball & place on the buttered greaseproof paper, leaving roughly an inch between them.
 plain flour & water in a cup using a fork, until it resembles a gloopy paste. Scrape into a piping bag & snip the end off (don’t make it too big, just enough to draw a decent sized line), then pipe crosses on the tops of your buns, which will have all snuggled up next to each other nicely & filled the gaps.
 When the buns have turned a gorgeous golden colour with lovely cream coloured crosses, they should be ready. To check any bread, just tip it over & tap it on the bottom – if it sounds hollow, it’s ready! Be careful not to break up your big batch of buns!
 even just individual buns. Freeze any extra ones in bags & you’ll have a treat anytime. These fluffy, flavourful buns taste fabulous just as they are, lavishly spread with butter (the good stuff), or toasted. They’re great for tea breaks, breakfast or just when you need something nice to nibble.
 So when Easter comes around, why not bake some beautiful buns & share with family & friends! In fact, I might just have one now with another cuppa! Stay hungry 😉 A x
 I’ve been designing cake, making tiny tea sets & small sugar bunnies to sit on the top, I’ve also been writing & doing numerous things at the same time, like the multi-tasking ninja that I am. When the weather is unpredictable, there is one thing you need to be able to rely on & that’s a rich, rib-sticking dinner to warm you through!
 It’s efficient, versatile & quick to cook. Making pasta is one of my favourite things to do & it’s something we make together as a family. When my Son is home, we make pasta & pizzas, all congregating in the kitchen & chatting simultaneously, whilst we work on creating dinner. It’s what cooking is all about for me & that’s how our children learn, by cooking with us. There are times when stress will start to invade your life & making pasta is one of the best things to de-stress, relax & take your mind off everything.
 Because my Husband works shifts, I like to make a variety of dinners & freeze them in two-portion pots, ready to be whipped out of the freezer at a moment’s notice. Usually, the freezer has at least one whole drawer filled with a selection of lasagnes & they’re all different. There’s the lasagne al forno, which is the one with meat (usually beef), a sumptuous spinach & cream cheese layered lovely & then, one of my favourites: vegetable lasagne! I have been a vegetarian a couple of times & this luxurious layered dish is one of my favourite indulgences! It’s lighter & quicker to make than a meat lasagne, but fabulously filling & you can create this velvety vegetable version in around half the time. Plus you can make it in advance & freeze it in individual pots for those evenings when you need instant pasta gratification. Fancy a go? Hands washed & aprons on!
 Take the seeds & any white pith out of the peppers (save the seeds & you can plant them in eggboxes on the windowsill). Chop the peppers into bite-sized pieces. It doesn’t need to be perfect or anything. Add them to the dish with the courgettes in.
 Add the tomato puree, Basil & Oregano, along with the sugar & a good pinch of the black pepper & sea salt to season your vegetable ragu. Give everything a good stir to distribute the puree & seasonings thoroughly.
 As the sauce thickens up, you should start to feel some resistance with the whisk. Keep whisking (swap hands if your wrist aches) & when you are satisfied with the thickness, add a couple of ounces of the grated mild cheddar & whisk until melted. Turn off the heat.
 Here’s a tip to help you fit your dried pasta sheets to those rounded corners of your dish. Take your dried lasagne sheet & snap off the top corner edge with your thumb, about 1cm in. Lay the lasagne sheet with the missing edge nearest the corner, then take the piece you snapped off & turn it around, placing it in the corner with the pointy end towards the middle of the dish. You’re welcome! All these years, we’ve all been trying to make it fit & then a few years ago, I decided to use up some random pieces & that was it!
 Cover the ragu with a layer of lasagne, making your corners fit as above.
 Spread it evenly with the back of the spoon you used before, then sprinkle liberally with the mixed grated cheese. This will give you a gorgeous, crispy cheesy topping. Sprinkle a good pinch of dried Oregano over the top, squeezing it in the tips of your fingers as you do so, to release the pungent fragrance of this wonderful herb.
 Serve with a huge green salad & maybe a few chunky chips, if you feel the need. Any leftovers can be packed up into pots for lunches (hot or cold, it’s rather nice), or frozen for lazy late night suppers, curled up on the sofa with a glass of wine.
 If you’ve been following my antics on social media, you’ll know I’ve been working on a few (or rather a lot of) floral creations of my own over the last couple of months (which is why my blogs have been a bit all over the place recently, so apologies). Recently, I’ve been making sugar art surprise gifts, including a pair of sparkly snow white
  roses for a wedding present & three beautiful birthday blooms for a lovely friend. Now I’m working on bunches of blossoming roses for Mother’s Day gifts & although my kitchen looks like I’ve opened a sugar florists, I am still managing to bake my usual fayre (although my bread has recently developed a subtle sparkle from the edible glitter, because no matter how much you try to clean that stuff up, it gets everywhere!).
 out & celebrate in elegant, ladylike style. All my friends know that I absolutely love making afternoon tea – dainty, dinky delicacies, miniature gateaux, sumptuous sultanas embedded in fluffy scones, sweet strawberries perched on pastry cups & crustless, slender sandwiches filled with cream cheese & cucumber (not my usual doorsteps of bacon & egg, or meatballs & tomato sauce!). Tea is served in chintzy china cups, with wafer thin lemon slices floating like lilypads on the surface, often accompanied by a glass or two of pink fizz.
 Bake in the centre of the oven for approx. 18 minutes, until slightly risen & little cracks appear on the tops.
 deliciousness, it’s done. Set aside for a couple of minutes to cool slightly.
 Dip the end of a cake stick in some melted chocolate, then gently insert into the base of a cake ball. Gently spoon melted chocolate over the cake ball, removing any excess by lightly tapping the stick (carefully though, you don’t want to lose it!). If you’re making flowers, leave the cake centres to set by standing them in a jar or mug full of dried semolina or rice. If not, cover them with edible glitter, sprinkles, wafer flowers or sugar pearls.
 So that’s your Mum’s elegant afternoon tea sorted, just add a pot of tea & a flute of fizz! Here’s wishing a fabulous Mother’s Day to Mums everywhere (& the Dads who do double-duty as both)! Stay hungry! 😉 Aimee x
 yellow daffodils brighten up frost-bitten hedgerows & windowsills, giving a bit of hope that warmer weather is approaching. When it’s frosty & frozen outside, food tends to become more like a comfort blanket to pacify our need for warmth & contentment. There are those chilly days where it’s barely above zero on the thermometer & you just want to wrap yourself head to foot in the duvet, like some cocooned caterpillar, inside & out. All you need is a little warmth to take the edge off the chill & bring a little sunshine into your day.
 kitchen one lunchtime, opening all the cupboards & the fridge while looking blankly into their abyss for inspiration, I decided to make soup. There were various little tubs of leftovers, some fresh vegetables that needed using up & plenty of pots of chicken stock in the freezer. Just over half an hour later, I had a blissfully beautiful bowl of spicy soup to tuck into! So why go for that tin of ready-made when you can have your own made ready? It’s one of the easiest things to make, uses up all those bits of veg you were going to chuck out & will give you a boost for the rest of the day. Whether you’re at work or at home, if a lunchtime sandwich just won’t cut it, this sumptuously sunny little number will get your engine revving until dinnertime & brighten your day. So, aprons on & hands washed, let’s get started!

 Alternatively, you can always roast your veg – chop them small but chunky, chuck them in a roasting tin & give them a good glug of olive oil, a few twists of black pepper & a pinch of sea salt. Give everything a good mix up with your hands (you’ll wash) & shake the tin to spread the vegetables out evenly. Bake for 20 minutes in a hot oven (220*C), giving them a good shake halfway through cooking.
 Heat a teaspoonful of the olive oil in the saucepan, add the onions & stir fry for a couple of seconds, just to get them softened.
 Whizz up for a few seconds at a time or pulse until it’s the consistency of textured yoghurt – if you want your soup more silky smooth, just give it another quick whizz up. The vegetables will give up their colour & turn everything into an gorgeously golden liquid.
 Have a taste. If you think it needs a bit more seasoning, add another pinch of the sea salt & black pepper, then taste again. When you’re happy with the taste, turn off the heat & serve. Simply spoon your soup into a bowl & serve with a warm, freshly baked bread roll or baguette, smothered in cold butter, ready to dunk. If you’re serving it as a starter, perhaps decorate with a little chopped fresh Parsley or Coriander, some homemade croutons & a couple of Parmesan shavings.
 Any leftovers can be frozen in a couple of freezer bags or plastic pots with lids on, or you could stash some in the fridge in jars to take to the office – just warm it up when you need it! If it separates in the jar, just give it a good shake before re-heating. Soup is a great portable one-pot lunch if you’re working & can be made in advance, so you can just grab one as you’re leaving the house. It also makes a perfect pasta sauce too – ricotta stuffed ravioli draped in this silky soup & sprinkled with grated Parmesan will definitely warm you through!
 hearts in their hundreds as treats for people to give to their beloved, dipping each one in melted chocolate, decorating them by hand & turning my kitchen into my own little chocolate factory! By the time I’d finished, I really didn’t want to see, smell or taste chocolate for a few weeks after! Last year, my Husband was suitably spoiled as always, with a selection of his favourite handmade chocolates decorating a rather large, milk chocolate frosted heart-shaped chocolate cake (I think there was just enough chocolate in it!).
 This year, I wanted to do something a bit different & as it was birthday
 achievement (they’re quite fiddly & I’m not very patient). I won’t bore you with the details, but as it took me about a couple of hours to create each one from scratch (not including the centres), you can appreciate that I couldn’t watch them being eaten (the Husband kept wandering into another room every time he ate one, so I wouldn’t see).
 Bake them all for about 8-10 minutes, until golden & then gently transfer them to a cooling tray. These will be crisper than the other recipe, so they should be firmer.
 Remember all the little heart centres that you baked? Simply pipe a small splodge of buttercream into them & make little layered lovehearts, for bite-sized treats. You can always drizzle melted chocolate over the top of these if you want to make them extra special.
 Any leftover jam can be put back in the jar & left in the fridge until you need it (don’t throw jam away!). The same goes for the buttercream – just wrap up the end of the piping bag & fold over the snipped end, then keep it in the fridge to use on random cupcakes or chocolate puddings. If you’re really feeling adventurous, tip it into a bowl & add more icing sugar until a bit firmer, then use it to pipe some buttercream roses onto cookies (if you make a mistake, scrape it off, shove it back in the bag & start again – great for teaching kids & keeps them entertained for ages).

 For Christmas, I simply used a tree cutter & drizzled them with melted chocolate (mix a little milk & plain chocolate together for a richer flavour), then simply adorned them with some sugar sprinkles. Why not try making cute reindeer cookies too! Simply use an upside-down gingerbread man cutter to shape your cookie dough & decorate with rolled out fondant or modelling chocolate. They are so easy to make & perfect treats for sharing.

 so I don’t have to do much apart from put them on a plate. Then there are perfectly plump pancakes. I’m not talking about the delicately thin, elegant crêpes we usually eat on Pancake Day though. Breakfast pancakes are duvet-like delicacies – substantially thick, warming & with a fluffy filling. What they shouldn’t be is fiddly, time-consuming & boring! Now I’m not saying you need to be standing around the stove, flipping fluffy pancakes for all you’re worth at stupid o’clock (as if I would suggest such a thing!). The best way to get your pancake fix without the faff is to make a batch in advance & keep some ready made in the fridge (or freezer if you really want to be organised).
 Heat up a large skillet or frying pan on a medium heat – your pan needs to be nice & hot before you start cooking your pancakes.
 Remove each pancake, one at a time & lay on the plate with a strip of greaseproof paper in between each one to separate them.
 If you’re serving them immediately, cover the plate with an upside-down mixing bowl to keep them warm & transfer to the table. If not, leave them to cool & wrap a couple at a time in clingfilm, then put them in the fridge or freezer. You can put them in an airtight container too, just keep them separated with the greaseproof paper strips, then serve when you want some. To reheat your pancakes, simply pop a couple in the toaster for about 30 seconds to warm through & that’s breakfast prepared!
 These fabulous fluffed up pancakes don’t have to be dull either! They are perfect with an array of fresh fruit, beautiful berries or just a squeeze of fresh lemon juice & a drizzle of golden syrup. If I have a couple of punnets of fresh berries going spare, I’ll put them in a saucepan with some golden syrup & simmer gently until they become soft & squishy, making a warm fruit sauce to pour on top. These soft little flatcakes also taste scrumptious with scrambled eggs – great if you fancy something a bit more exciting than cereal (which is obviously for midnight snacks).
 to serve them is to splodge spoonfuls of apricot jam in between the layers with whipped cream, top with a couple of fresh raspberries, then drizzle with pureed peaches – open a tin of peaches, chuck them in the blender, whizz up with a squeeze of lemon juice & pour into a serving jug! If you don’t want to use cream, maybe use strawberry or raspberry ice cream instead. These sumptuous stacks of sweetness look impressive & are really quick to assemble (especially if you have a few pancakes already made). There would have been pictures, but they never last long enough!
 cooking builds during the day, making dinner that much more enticing. Pasta is undeniably one of my favourite foods! It’s easy to prepare & a pleasure to eat, especially when it’s crammed full of flavoursome fillings or dressed in a rich, sumptuous sauce, or both! When I discovered these pretty pasta shells on a random shopping trip some years ago, I had already decided what kind of fillings I would make, the sauce, the herbs, everything – all before reaching the checkout! Now I appreciate not everyone gets excited by a bag of pasta (I have a dedicated pasta
  shelf in the pantry), but they inspired me to create something wholesome & filling – proper rib-sticking, colourful comfort food to warm you on a chilly day like today, without taking all day to make. This recipe for Stuffed Conchiglioni is something we enjoy making together as a family & definitely eating together! They can be made in advance & the best bit is there’s going to be plenty of leftovers for lunches (hot or cold) & maybe a couple of pots for the freezer, for those “can’t be bothered” nights. So here goes – hands washed & aprons on!
 500g of dried Conchiglioni (1.1lb)
 Chuck in the chopped onion & bacon pieces, stir fry for a few minutes, keeping the onion moving so that it doesn’t catch & burn. If any liquid forms around the bacon, simply strain it off & discard. Add a little more olive oil if needed. Once cooked, leave to cool for a few minutes.
 Tip the breadcrumbs into a large mixing bowl, along with the cream cheese. Add the fried bacon & onion, mixing thoroughly to create a lovely thick stuffing. Cover the bowl with a plate & leave while your pasta cooks.
 cook according to the instructions on the pack.
 might want to prep another, slightly smaller dish for any extra shells (OK, there are always extra shells, trust me on this).
 Lay each stuffed shell in the prepared dish, then carry on stuffing until you’ve filled them all. At this point, you can cover them in cling film & put them in the fridge until you want to eat them – they will keep until the next day.
 Add the tomato puree, the sugar & seasoning to taste (you won’t need much salt, so go easy on this). Add a couple of teaspoons of dried Basil (or rip up about half a dozen leaves of fresh & chuck them in). Give everything a good stir & reduce to a gentle simmer for about half an hour with a lid loosely on, stirring occasionally.
 Spoon your sauce generously all over the stuffed shells, making sure they are just covered & no bits are peeking out. Dot chunks of Mozzarella all over the top & add a sprinkling of dried Oregano.
 some fresh, crusty bread, get everyone to the table & get stuck in! Usually, my guys magically appear in the kitchen while I’m dishing up, grabbing a slice of warm bread to munch on & dunking it in the sauce.
 So next time you feel the chill on a dull day, whip up some colourful, comforting Conchiglioni! Stay hungry 😉 A x